Vita-Mix Corporation ® Use and Care Manual Read and Save These Instructions ADVANCE PERFORMANCE BEVERAGE BLENDING BLENDING STATION® ADVANCE ON-COUNTER F O O D S E R V I C E BLENDING STATION® ADVANCE IN-COUNTER All Models
Important Safeguards 1. Read all instructions. 2. To protect against risk of electrical shock, do not put motor base in water or other liquid. 3. Close adult supervision is necessary when machine is used by or near children. 4. Unplug the power cord from the wall outlet when the Vita-Mix® machine is not in use, before disassembling, when putting on or taking off parts, and before cleaning, other than washing the container. 5. Never contact moving parts, especially the blades. 6.
Important Safeguards 18. CAUTION: Turn power OFF or unplug the machine before touching movable parts. Shut OFF power switch at night or whenever machine will be left unattended. Save These Safety Instructions Enjoy the safety of this grounded machine. The Vita-Mix blender’s U.S. power cord comes equipped with a three-prong (grounding) plug which mates with a standard threeprong wall outlet (Figure A). This cord will vary for countries outside the United States.
Start/Stop Pre-Set Programs Speed Control Owner Controls Display Window High/Low Pulse Blending Station® Advance ON/OFF Power Switch – Located on the side of the motor base, the ON/OFF switch controls the power to the machine. While plugged in, switch to ON to ready the machine for blending. Shut OFF the power switch at night or whenever the machine will be left unattended. START/STOP Button – Pressing START/STOP once starts and runs the machine and turns the blade.
DISPLAY Window – This area, depending on which button is pressed, displays a variety of operation messages. A “READY” message appears when there is power to the machine. OWNER CONTROLS – A control panel is accessible by pressing the Vita-Mix logo. • Press once to reveal the mode message. Press button 1 then 6 within five seconds to continue. Once the READY correct code is entered, the display will indicate the motor temperature (NORM, WARM, HOT), a usage count and a total.
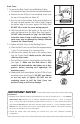
Two-Piece Lid 48 oz. / 1.4 Ltr. Xtreme Performance (XP) Container To secure lid plug, rotate it so one tab locks between the notches on top of rubber lid Lift lid tabs to remove lid The two-piece lid is easy to clean and easy to put on, take off and seal. • To remove a fully latched lid, lift the two tabs and pull upward and off. • Twist the center lid plug to fasten or remove. FIGURE A Port on top of One-Piece Lid One-Piece Lid (optional) 48 oz. / 1.4 Ltr.
Back Cover: 1. To remove the Back Cover from the Blending Station: a. First remove the Cover Door from the unit as described above. b. Remove the two (2) Back Cover mounting screws from the rear of the machine (see Figure D). c. From the rear of the machine, firmly push the bottom of the cover forward (towards the Control Panel), keeping the bottom edge of the cover against the Motor Base. FIGURE D DO NOT tilt or strike the cover during removal. d.
The Blending Station® Advance is pre-programmed with an Advance program which is optimized for the Xtreme Performance (XP) container. The program can be customized by using the Control Panel, or a programming chip or programmer software kit available from Vita-Mix Corporation. Call your distibutor or Customer Service for more information. Programming One of the Six Blending Station® Advance PRE-SET Buttons 1. Press the OWNER CONTROLS button (Vita-Mix® logo). “MODE” will appear in the display window.
Programming your In-Counter Blending Station Advance with a Custom Chip 1. Turn the machine on. 2. Remove the container and lift the machine from the bottom edges to reveal the motor and housing area. With the machine facing towards you, locate the slot underneath on the right hand side of the machine between the motor and the outer wall. 3.
Blending Station® Advance Recipe Options Arranged by recipe number and drink type: RECIPE NUMBER DESCRIPTION RUN TIME 1 Thin Juice Drink Ramps up to HIGH (87%) :13 2 Light Coffee Drink Ramps up to HIGH (100%) :18 3 Thick Specialty Drink Ramps up to HIGH (100%) :20 4 Ice Cream & Coffee Drinks Ramps up to MED (50%) for 5 seconds, then ramps up to HIGH (100%) for 10 more seconds :15 5 Smoothie Ramps up to MED (50%) for 10 seconds, then gradually ramps up to HIGH (100%) :20 6 Thick Hard-
RECIPE NUMBER DRINK TYPE DESCRIPTION RUN TIME 19 1-2 Drink Cocktail Ramps up to HIGH (90%) :13 20 3-4 Drink Cocktail Ramps up to MED (45%), then ramps up to HIGH (100%) :25 21 Kids Cup Starts at MED (55%), then decreases to LOW (7%), then quickly to HIGH (100%) :30 22 Bar Shake Gradually steps up to HIGH (100%) :25 23 Bar Special Ramps up to MED (58%), decreases to LOW (22%), then gradually steps up to HIGH (100%) :35 24 Utility Blend Ramps up to MED (40%), then gradually increases
In-Counter Blending Station Preparing the Counter Area: • Before cutting holes, make sure that there is adequate clearance under the counter for the motor. The motor will extend about 5.67 in. / 14.4 cm below the counter but it is best to allow at least 10 in. / 25.4 cm from the under-counter to shelves or any other equipment under the counter. Also, when using the removable cover design, the back of the hole must be at least 4.25 in. / 10.8 cm from any wall to allow for cover door clearance.
On-Counter and In-Counter Blending Station Electrical Requirements: • 120 VAC • 50/60 Hz • 15 Amps The 120 VAC Blending Station Advance is built using a U.S. three-prong grounded cord. 20 amp outlet per machine is recommended. • 220/240 VAC • 50/60 Hz • 1300-1550 Watts • 100 VAC (Japan) • 50/60 Hz • 1000 Watts Advance Dimensions: On-Counter: In-Counter: • 19.5 in. / 49.5 cm high with lid closed • 26.75 in. / 67.94 cm high with lid open • Depth: 10.5 in. / 26.67 cm with handle • Width: 9.5 in. / 24.
Gasket Installation Instructions: 1. Follow the instructions on page 12 for preparing the counter area for the installation of your In-Counter Blending Station.® Also, use the Template Sheet (provided in your machine’s original package) to assist you in the placement and ventilation of your machine. 2. Unplug the machine. Lay the machine on its back with the motor pointing toward you. Allow 1-2 in. / 3-5 cm of the motor base to hang over the edge of the counter top to facilitate easy fitting of the gasket.
1. If your recipe freezes up, try reducing the amount of ice. Compared to other blenders, you do not need as much ice to make an equally frozen drink in a Blending Station® Advance. 2. Place liquids and soft foods in your container first. Hard items and ice should be placed last. 3. Whole, hard or frozen ingredients should be small. Solid frozen fruit is extremely difficult to blend. For best results, use semi-frozen fruit.
Blending Station® Advance Instructions Using the PRE-SET Program Buttons The following is the basic Advance setting of the six PRE-SET buttons for the Blending Station Advance machines. These programs, numbered 1 through 6, are blending cycles designed for the most commonly made drinks. Depending on the viscosity of the drink you are creating, selecting one of the PRE-SET programs will run the machine for a full cycle. The machine will stop by itself when the cycle is complete.
1. Place liquids and soft foods in the container first, solid items and ice last. Although not necessary for processing, you may want to cut or break food into smaller pieces for more precise measuring of ingredients. Thawed or partially thawed fruit is recommended. Button 5 or 6 is recommended for heavy-duty blending. 2. Set the container on the motor base by aligning it over the centering pad anchored to the base. (Motor must be completely stopped before positioning container.
CONTINUED FROM PAGE 17 2. The speed of the motor can be changed with: • the motor off: – Press the ▲ or ▼ buttons until the desired speed percentage is displayed. 100% is the highest setting and 7% is the lowest setting. – When the START/STOP button is pressed, the motor will ramp quickly to that speed. – Blending can be stopped by pressing the START/STOP button at any time. • the motor on: – With the container in place, press the START/STOP button. The machine will begin blending.
WARNINGS! Never use a blade assembly with loose, damaged or nicked components. Caution: Do not remove blades unless absolutely necessary! Never attempt to take the blade assembly itself apart. This will void the warranty. 32 24 16 8 4 Blade Agitator Assembly. The blade assembly includes a precision-hardened stainless steel blade with enclosed steel ball bearings for maximum durability.
Care Note To ensure that you get the longest possible life from your Vita-Mix machine, we recommend the following products, when used as directed by the supplier: CLEANING PRODUCTS . . . . . . . . . . . . . . . . . . . . . . . . . . SUPPLIERS IN USA Solid Supra, Solid Power, . . . . . . . . . . . . . . . . . . . . . . . . . Ecolab, Inc., St. Paul, MN Guardian Acclaim, Solid Guardian Plus, . . . . . . . . . . . . . . 800-352-5326 Solid Super Impact, Solid Insure . . . . . . . . . . . . . . . . . . . . . www.
Motor Base/Control Panel 1. Unplug the power cord. 2. Gently wash the outside surface with a damp soft cotton cloth moistened with a mild solution of warm water* and nonabrasive detergent or nonabrasive liquid spray cleaner. Be careful to not scratch or scrub the display window on the control panel. NEVER IMMERSE MOTOR BASE IN WATER OR OTHER LIQUID. Dry with a soft cotton cloth. Lid Separate the lid and plug. Wash in warm, soapy water. Rinse clean under running water and dry. Reassemble before use.
Blending Station® Advance Item # Part #1159 Lid Plug for 48 oz. / 1.4 Ltr. XP Container #15575 Lid only (no plug) for 48 oz. / 1.4 Ltr. XP Container #15574 Two-part lid assembly for 48 oz. / 1.4 Ltr. XP Container #15566 48 oz. / 1.4 Ltr. XP Container, blade assembly & lid assembly #15569 48 oz. / 1.4 Ltr. XP Container only #15567 48 oz. / 1.4 Ltr.
Items Sold Separately: ¤ #1159 #15574 #15575 #15566 #15569 #15606 Software Kit – USB Version #15598 #15644 Extra Programming Chip for Software Kit OUNCES 48 40 32 #15567 24 16 8 4 #15585 #891 #15576 – One-Piece Lid #15579 #15596 Retainer Nut Wrench #15603 #18007 #18005 #18008 #18006 23
1. Problem: • Loud noise from blender container blade area • Container blades do not spin • Increased vibration • Leaking from bottom of container Solution #1: Broken or worn drive socket. Replace (Item #891). Instructions are included with part. Solution #2: Check blade assembly for loose, damaged or nicked components and replace. Solution #3: Tighten retainer nut with the retainer nut wrench moving clockwise until it is snug. (See page 19.) 2. Problem: • Loud grinding noise from the blender motor 3.
7. Problem: Solution #1 • Machine is running irregularly • “NO PROGRAM” is displayed when a button is pushed • Button pressed starts wrong program • Machine starts by itself • A specific program button is defective • Machine was turned off for a day, week or month and turned on, but there is no power • Machine does not work when first tried • Machine works but no information displayed on screen • Program buttons run the blender on the same speed 8.
Limited Warranty Vita-Mix® Corporation warrants your Commercial Vita-Mix machine to be free from defects in materials and workmanship for a period of three years from the date of purchase when used in accordance with the accompanying instruction booklet. Provisions of this limited warranty are void if your Vita-Mix machine has been subjected to obvious abuse, negligence, accident, alteration, or failure to follow operating instructions, or product exposure to abnormal or extreme conditions.
PLEASE NOTE: The Service Contract outlined in the following paragraphs applies only to customers in the United States and Canada. Customers in all other countries should contact their local Vita-Mix® Distributor for service details. This Vita-Mix machine includes a 1-Year Service Contract effective from date of purchase. In the event your machine should need parts or repairs covered under this Service Contract, call Vita-Mix Customer Service immediately for instructions.
Dimensions: 15 in. / 38.1 cm above counter 19.5 in. / 49.5 cm compact cover 9.5 in. / 24.13 cm 10.5 in. / 26.67 cm 9 in./ 22.86 cm 12.5 in. / 31.75 cm 5.67 in. / 14.4 cm below counter Overall dimensions of On-Counter: 19.5 in. / 49.5 cm High x 9.5 in. / 24.13 cm Wide x 10.5 in. / 26.67 cm Deep Ship weight of On-Counter: 19.5 lbs. / 8.9 kg Overall dimensions of In-Counter: 15 in. / 38.1 cm above counter 5.67 in. / 14.4 cm below counter x 9 in. / 22.86 cm Wide x 12.5 in. / 31.