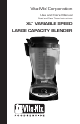
Vita-Mix Corporation ® Use and Care Manual Read and Save These Instructions XL VARIABLE SPEED TM LARGE CAPACITY BLENDER Model: VM0141
Important Safeguards 1. Read all instructions. 2. To protect against risk of electrical shock, do not put motor base in water or other liquid. 3. Close adult supervision is necessary when machine is used by or near children. 4. Unplug the power cord from the wall outlet when the Vita-Mix® machine is not in use, before disassembling, when putting on or taking off parts, and before cleaning, other than washing the container. 5. Never contact moving parts, especially the blades. 6.
Important Safeguards 16. When making nut butters or oil based foods, do not process for more than one minute after mixture starts circulating. Overprocessing can cause dangerous overheating as well as damage the container. 17. Always operate the Vita-Mix machine with a lid in place. 18. WARNING: When processing hot liquids: • The two-part latching lid must be securely in place. This allows steam to escape naturally and will prevent the lid from coming off when the machine is turned on.
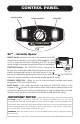
CONTROL PANEL Start/Stop Switch Variable Speed Dial Pulse Switch ON OFF VARIABLE SPEED LARGE CAPACITY BLENDER XLTM – Variable Speed ON/OFF Switch. Located on the side of the machine, the ON/OFF switch controls the power to the machine. While plugged in, switch to ON to ready the machine for blending. Shut OFF the power switch at night or whenever the machine will be left unattended. START/STOP Switch – The START/STOP switch is located on the left side of the control panel when facing the machine.
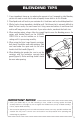
BLENDING TIPS 1. If your ingredients freeze up, try reducing the amount of ice. Compared to other blenders, you do not need as much ice to make an equally frozen drink in an XLTM Blender. 2. Place liquids and soft foods in your container first. Hard items and ice should be placed last. 3. Whole, hard or frozen ingredients should be small. Solid frozen fruit is extremely difficult to blend. For best results, use semi-frozen fruit.
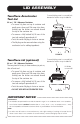
LID ASSEMBLY Two-Piece Accelerator Tool Lid To secure lid plug, rotate it so one tab locks between the notches on top of rubber lid 64 oz. / 2.0 L Advance Container • To secure lid, place on top of container and gently press down until lid snaps into place, making sure the latches are secured around the top of the container rim. • To remove a fully latched lid, lift one of the two tabs and pull upward and off. • Twist the center lid plug to fasten or remove.
Two-Piece Lid 1.5 gal. / 5.7 L Extra Large Container The two-piece lid is easy to clean, easy to put on, take off and seal. • To secure lid, place on top of container and gently press down until lid snaps into place, making sure the latches are secured around the top of the container rim. • To remove a fully latched lid, lift one of the two tabs and pull upward and off (Figure D). • Twist the center lid plug to fasten or remove.
GENERAL INSTRUCTIONS WARNINGS! • When the machine is not in use, unplug the machine from the outlet. • If you detect a change in the sound of the machine or if a hard or foreign object comes into contact with the blades, do not serve the contents. Inspect your blade assembly for loose, nicked or missing parts. If parts are loose, missing, or nicked, replace with new blade assembly. (See page 19.) When processing hot liquids always: • Use caution; escaping steam or splashes may scald • Lock the lid.
7. Set the ON/OFF switch to ON. 8. When blending hard to blend mixtures such as dips and spreads, or mixtures using frozen ingredients, use the accelerator tool (see page 11) to help ingredients flow into the blades. Continuously moving the tool around in a circular motion during blending will help eliminate air pockets and encourage an even blend. 9. After the blender has been stopped, wait until the blade comes to a complete stop before removing the lid or container from the motor base. 10.
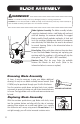
BLADE ASSEMBLY WARNINGS! Never use a blade assembly with loose, damaged, nicked, or missing components. Caution: Do not remove blades or blade assembly unless absolutely necessary! Never attempt to take the blade assembly itself apart. This will void the warranty. Blade Agitator Assembly. The blade assembly includes 32 24 16 8 4 a precision-hardened stainless steel blade with enclosed steel ball bearings for maximum durability.
ACCELERATOR TOOL WARNINGS! When processing hot liquids or mixtures: • The two-part latching lid must be securely locked in place. DO NOT use the one piece lid or a nonlatching lid. This allows steam to escape naturally and will prevent the lid from coming off when the machine is turned on. • Do not start processing hot liquids on HIGH speed. Always start processing hot liquids on LOW speed, then switch to HIGH speed while the machine is running. • Use caution with hot liquids.
CARING FOR YOUR MACHINE Care Note To ensure that you get the longest possible life from your Vita-Mix® machine, we recommend the following products, when used as directed by the supplier: CLEANING PRODUCTS . . . . . . . . . . . . . . . . . . . . . . . . . . SUPPLIERS IN USA Solid Supra, Solid Power, . . . . . . . . . . . . . . . . . . . . . . . . . Ecolab, Inc., St. Paul, MN Guardian Acclaim, Solid Guardian Plus, . . . . . . . . . . . . . . 800-352-5326 Solid Super Impact, Solid Insure . . . . . . . . . . .
Motor Base/Control Panel 1. Unplug the power cord. 2. Gently wash the outside surface with a damp soft cotton cloth moistened with a mild solution of warm water and nonabrasive detergent or nonabrasive liquid spray cleaner. NEVER IMMERSE MOTOR BASE IN WATER OR OTHER LIQUID. 3. Thoroughly clean switches so that they work freely. They may become sticky from use.
PARTS LIST XLTM Blender Item # Part #15900 Lid and plug for 1.5 gal. / 5.7 L Large Capacity Container #15899 1.5 gal. / 5.7 L Large Capacity Container, blade assembly & lid assembly #15896 1.5 gal. / 5.7 L Large Capacity Container only #15897 XL blade agitator assembly for Large Capacity Container #15901 XP retainer nut for Large Capacity Container #15892 Accelerator Tool Lid and plug for 64 oz. / 2.0 L Advance Container #15894 64 oz. / 2.
Items Sold Separately: #755 #15900 #XXXXX #15899 #15596 Retainer Nut Wrench #15896 #XXXXX #15897 #15901 #15902 #15895 #755 #15892 #XXXXX #760 #15894 #XXXXX #15893 #15941 #15942 15
TROUBLESHOOTING 1. Problem: • Increased vibration • Leaking from bottom of container • Increased container noise 2. Problem: • Machine will not run Solution #1: Check blade assembly for loose, damaged or nicked components and replace. Solution #2: Tighten retainer nut with retainer nut wrench moving clockwise until it is snug. See page 10. Solution #1: Double-check to make sure power cord is firmly in power outlet. Solution #2: Check to make sure the ON/OFF Switch is in the ON position.
4. Problem: • Loud grinding noise from the blender motor Solution: Motor bearings need to be replaced. Call Vita-Mix® Customer Service. 5. Problem: • Machine is running irregularly • Machine starts by itself • Machine was turned off for a period of time and turned on, but there is no power • Machine did not work right out of the box Solution #1: Try plugging the machine into a new outlet. Solution #2: Call Vita-Mix Customer Service.
WARRANTY LIMITED WARRANTY In order to maximize the life and keep your Vita-Mix® product in good working order, it is important that you follow a few simple maintenance instructions: 1. Periodically inspect the drive socket and replace with the extra drive socket that is enclosed with your purchase. Additional replacement parts are available as needed by calling our Technical Service Department at 800-886-5235. 2. Manually rotate the blade bearing assembly to make sure it turns without hesitation. 3.
• The warranty is void in the event that repairs to the Equipment are performed by someone other than Vita-Mix,® or an authorized Vita-Mix Service Center. Vita-Mix will not be responsible for the cost of any unauthorized repairs. • The sole obligation of Vita-Mix under the warranties herein is to repair or replace the warranted part or parts as determined exclusively by Vita-Mix.
Dimensions: 17.63 in. / 44.77 cm with 64 oz. / 2.0 L advance container 18.25 in. / 45.6 cm with 1.5 gal. / 5.7 L container 8.5 in. / 19 cm 12.5 in. / 31.75 cm 19 in./ 48.26 cm 8.5 in. / 19 cm 83 in. / 195.58 cm Overall motor base dimensions: 12.5 in. / 31.75 cm High x 8.5 in. / 21.59 cm Wide x 19 in. / 48.26 cm Deep With 1.5 gal. / 5.7 L Container: 18.25 in. / 45.6 cm High With 64 oz. / 2.0 L Advance Container: 17.63 in. / 44.77 cm High Ship weight of machine: 50 lbs. / 22.