
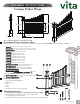
Instructions / Assembly

3
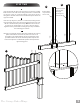
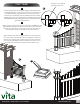
STEP T WO
A
Insert the bottom rail (part 3) into the bracket on the base molding.
Make sure the holes in the rail are facing towards the second bracket
on the post. Using one screw 5/8"(16mm), secure the rail in place
through the side wall of the bracket as illustrated. Repeat this for the
opposite side wall.
Insert the top rail (part 2) into the second bracket, making sure the
larger sized holes in the rail are facing towards the bottom rail. Secure
the rail as described in the previous step. Note: The holes in the rail
are approx. 1/8” (3 mm) larger on one side to allow for proper
alignment of the pickets when mounting. Repeat steps A and B for
the remaining post and rails.
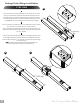
Break open one bundle of pickets (part 4). Start with the 41” (104 cm)
picket at the furthest end of the rails, and insert each one in
descending order, ending with two 29 1/4” (74 cm) pickets at the
post. Make sure the tabs on the end of the pickets “snap” into the
bottom rail. Open the second bundle of pickets and repeat for the
opposite wing panel.
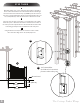
A
B
C
Bottom Rail is
only routed on
the one side
Top rail is routed
on both sides:
The larger
opening faces
the bottom rail.
B
C
The Cottage Picket Wings