
Instructions / Assembly


3
ST EP T WO
A
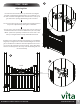
Hinges and Latch Installation
Now determine which way your gate is going to open in your arbor.
This will help you determine which side of the gate to install the hinge
on. After you have determined which edge of the gate post the hinges
are going to be installed on, turn the gate so that the screws you
installed in D on the previous page are facing down. This way these
screws will not be in the way when putting on the hinge.
Separate the hinges (part 5) into two halves. Place the half with the
“eye holes” onto the gate post, centering it at the end of the top rail as
illustrated. Pre-drill each pilot hole, then attach the hinge with the
black screws provided in the hinge kit.
As in the previous step, place one half of the hinge onto the gate post. The
second hinge should be installed 16 1/2“ (42 cm) down from the top hinge
(see illustration B). This hinge will be installed above where the bottom rail
goes into the gate post. Attach with screws provided in hinge kit.
Center the gate latch (part 6) at the end of the top rail opposite where
the hinge was attached. Install as close to the outside of the post as
possible. Fasten the latch to the post using the screws from the latch
kit.
Install screws to attach where the rail goes into the post (as in page 2 -
D) note: you will not need to install white screw into gate on top rail
where the hinge is attached.
A
B
B
16 1/2"
(42 cm)
C
C
D
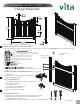
The Cottage Picket Gate