
Installation & Assembly


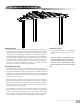
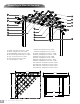

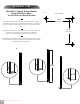

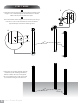
Table Of Contents

Wood Post Layout & Installation
for In-Ground Application
Measure and mark out the location of the pergola posts using
string line and temporary wood stakes. Diagonal distances must
be the same to ensure a square installation. Adjust string lines
accordingly. The inside corner of the string lines will be the post
location.
Please Note:
Should you decide to moderately modify the dimensions of your
pergola from the standard kit size, a circular saw with a sharp
fine-tooth blade is all that you need to cut, shorten or modify the
vinyl components.
1
This pergola can also be installed on a pre-existing wood or
concrete surface using our bolt down bracket system with
a 4x4 wood post (sold separate). See page eight for more details.
Post location and placement is the most critical step in the
overall installation process. Please double check for the
possibility of any underground utilities such as sprinkler, gas
or telephone lines.
STEP ONE
After you have determined where the posts will be located,
excavate 10” diameter x 36” deep post holes.
After holes are dug and cleaned, place the 4x4 wood post into
a hole ensuring it’s level and square to string lines. The final post
height should be a maximum of 90” out of the ground.
Fill the vacant hole with pre-mixed concrete all the way to
within 3” of the top of the hole.
Once concrete has set, back fill 3” space with soil.
Repeat for all four posts.
Please Note:
Some 4x4 pressure treated posts can be larger than 3 1/2” x 3 1/2”
square due to twisting or cracking. In extreme cases, you may need
to shave down the top of the 4x4 wood slightly to get the vinyl post
started over the wood post. Before installing your wood posts in the
ground, please check to confirm this and correct at this starge if
necessary.
1
2
3
STEP T WO
Install Wood Supporting Posts Directly into the Ground
4
10”
36”
90” Maximum
1
2
3”
3
7
8 x 8 Corner Pergola
Overhead View
* from corner of wood post to corner of wood post.
85 3/8 in
216.9 cm
85 3/8 in
216.9 cm
120 7/8 in*
307 cm