
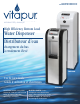
Use And Care Manual


5
OPERATING INSTRUCTIONS
Initial Product Cleaning Procedure
Like most appliances, your water dispenser requires periodic maintenance for maximum efciency and performance and
must be cleaned on a regular basis (i.e. every 4 months). To maintain a hygienic environment within your water dispenser
and prevent potential formation (growth) of bacteria, we strongly recommend regular cleaning. A cleaning kit is available
through our Customer Service Department at 1-866-253-0447 or can be ordered on line
at www.ghpgroupinc.com.
1. Make sure the lower compartment storage door is “open”
(this will prevent activation of the water pump).
2. Make sure the power cord is plugged into electrical outlet.
3. Using a clean jug/container pre-mix (50ml / 1.7ozs) water dispenser
cleaner with 2L / 0.5 gal of hot water. Place the jug/container on the oor
of the bottle storage compartment. Insert the stainless straw into the
cleaning solution, (make sure the jug/container does not tip over) and close
the storage door. The water pump will start automatically and draw the
cleaning solution into the dispenser reservoirs. When all of the cleaning
solution has been drawn, the pump will continue to operate for
approximately 20 seconds and stop automatically, followed by a ashing
yellow light (add water) condition (this is normal). Simply open the storage
door to cancel the ashing yellow light. Allow the cleaning solution to sit inside the dispenser for 20 minutes.
4. Place a jug/container under the dispensing spigots and press both the hot and cold dispensing buttons until the
cleaning solution stops owing. Discard cleaning solution.
5. Using a jug/container, drain the remaining cleaning solution from the internal reservoirs by unscrewing the drain cap
and removing the drain plug from the drain valve located at the back of the unit. Discard the cleaning solution.
6. Re-install the drain plug and drain cap on the unit and ush the system using 2L clean water only (no cleaning
solution) following the same basic steps outlined above. (See step # 3) Place jug/container under drain valve and
remove drain cap and drain plug allowing rinse water to drain. When the rinse water stops owing, re-install the
drain plug and drain cap and tighten. The cleaning process is now complete.
Installing the Water Bottle
IMPORTANT: Always wash your hands first before handling water bottle! Clean the top of the water bottle with a
clean cloth. Water bottles can be purchased from your local retailer.
1. Make sure the lower door (bottle storage compartment) is open. The water pump cannot operate as long as the
door is in the open position.
2. Remove the protective label from the top of the bottle.
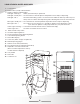
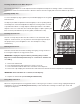
3. Most water bottles have a puncturable membrane in the top cap. To puncture the membrane, insert the straw into
the cap and push downward until the membrane opens. Insert the straw all the way into the bottle until the bottom
of the straw touches the bottom of the water bottle. NOTE: The water bottle drinking straw features an exclusive
telescopic design for use with either 18.9L (5gal) and 11.4L (3gal) water bottles.(See Fig. 1 & Fig. 2) To adjust the
length of the water bottle drinking straw, hold the upper portion of the straw and simply pull/push the lower portion
of the straw to the desired length.
4. To attach the water bottle straw onto the neck of the water bottle, make sure the handle is positioned “horizontally”
and press rmly onto the top of the bottle neck. (See Fig. 3) When the handle is in the “vertical” (locked) position,
(See Fig. 4) it is possible to lift/carry the water bottle. However, when installing the 18.9L (5gal) water bottle inside
the storage compartment, the handle must be in the “horizontal” position. (See Fig. 3)
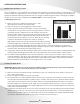
Cleaning Kit
Available online at
www.ghpgroupinc.com