
Use and Care Manual


13
2. Turn on the main water valve in the house.
3. Fully open a cold water faucet-preferably a laundry sink or bathtub with no aerator.
4. This allows the removal of any debris from piping which may have occurred during installation. Check for leaks.
5. Turn off the main water valve in the house. Keep the laundry sink faucet or bathtub faucet with no aerator open.
6. The system is now ready for filling the resin tank with water. For the purpose of filling the softener resin tank the bypass
assembly piston rod has to be pushed to the “In Service” position. Turn on the main water line SLOWLY to expel air in the
resin tank and fill the resin tank with water. Check for any leaks at all connection points. When the laundry sink or bathtub
faucet is on it eliminates any air bubbles in the resin tank. Note the colour of the water coming from the faucet or laundry tub
faucet. If discoloured let water run until clear.
NOTE: At no time should there be “large particles” of media noticed at a faucet which you opened. If this is seen immediately
shut off the water and bypass assembly as this could be an indication of a distributor failure. Contact manufacturer or
distributor for assistance.
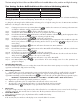
7. When the bypass assembly is in service mode
and the display screen shows the following
every 5 seconds:
i) Mode (A-11) Volume Delayed/Up
Flow. The regeneration is by up flow.
Regeneration will begin when Soft
water capacity (Volume U.S.
Gallons) is depleted and time
reaches the regeneration time.
ii) In-service regeneration time
iii) In-service soft water available
iv) In-service flow rate
8. Add 2.6 U.S. Gallons of water to the brine tank during initial start-up only. This will allow for the first regeneration brine
solution. After the first regeneration the brine tank refills automatically for future regenerations.
NOTE: If too much water is put into the brine tank during softener start- up it could result in salty water complaint after the
first regeneration. During the first regeneration the unit will draw out the initial volume of brine solution and refill it with
the correct volume of water in the brine tank for the next regeneration.
9. Press the manual/return key to start the manual regeneration cycle to check for leaks.
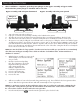
1. After installation is completed, push the piston plunger on the bypass assembly to bypass mode.
The head of the piston plunger is identified with a red circle.
sTarT-up insTruCTions
Bypass assembly with inlet ports downward Bypass assembly with inlet ports upward
Plunger in
bypass mode
Plunger in
bypass mode
Outlet Port
Outlet Port
Inlet Port
Inlet Port