User Manual Ceiling Fan with Lights Model No.
CONTENTS 01 02 03 04 05 06 07 08 09 Packing List Installation kit Safety Rules Installation Preparation Installation Step 1 Installation Step 2 Installation Step 3 Remote Control Instructions Trouble Shooting
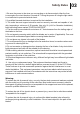
01 Packing List A B C D E Quantity Quantity Part Bracket 1 D Remote Control 1 B Canopy 1 E Remote Holder 1 C Fan Assembly 1 Part A Description Description Note: Some parts may be assembled together in the package. (E12 x 4 light bulbs, Max 40W each, not included).
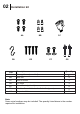
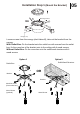
02 Installation kit AA DD BB EE CC FF GG Quantity Part Description AA Canopy Screw (assembled) 4 BB Wire nut CC Pair of Gloves DD “S” Hook 3 1 1 EE Wood Screw (opitional) FF Machine Screw & Washer for Outlet Box (spares) GG Expansion Bolts 4 2 2 Note: Some extra hardware may be included. The quantity listed above is the number required for installation.
Safety Rules 03 1. Be sure the power to the wires you are working on is disconnected, either the fuse is removed or the circuit breaker is turned off. Turning the power off using the light switch is not sufficient to prevent electrical shock. 2. A qualified licensed electrician is required for the installation. 3. The outlet box and support structure must be securely mounted and capable of reliably /supporting a minimum of 50 pounds.
04 Installation Preparation Tools You Need Ladder Pliers Wire Strippers Screwdrivers Drill Bit (optional) Power Drill (optional) If mounting to a support structure, you will also need the optional tools. What to Expect with Your Installation You may need a friend to help you. 30 inches from blade tip to nearest wall or obstruction Angled Ceilings are not supported.
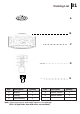
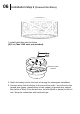
Installation Step 1 (Mount the Bracket) 05 Mounting bracket X4 Hanging cup Loosen screws from the canopy (don't take off), take out the bracket from the canopy. With Outlet Box: Fix the bracket onto the outlet box with screws from the outlet box, fix the cross bar of the bracket onto to the ceiling with 4 wood screws. Without Outlet Box: Fix the cross bar onto the solid wood structure with 4 wood screws.
06 Installation Step 2 (Connect the Wires) 1.Install light bulbs onto the fixture (E12 x 4, Max. 40W each, not included). Remote control receiver RECEIVER 2. Attach the safety cord to the hook of canopy for subsequent installation. 3. Connect wires from the fixture to the wires from outlet box with wire nuts, ground wire (green, green/yellow or bare copper) to ground wire, neutral wire (white or blue) to the neutral wire, hot wire (black or brown) to the hot wire.
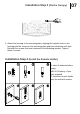
Installation Step 3 (Fix the Canopy) 07 1. Attach the housing to the mounting plate, aligning the keyhole slots on the housing with the screws on the mounting plate and twist clockwise until tight. Reinstall the screws that were removed in the Mounting bracket. Tighten these 4 screws. Installation Step 4 (Install the Remote Holder) 1. Insert 2 batteries before using: AAA 1.5V battery x 2pcs (not included) 2. Install the remote holder onto the wall with screws.
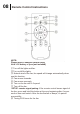
08 Remote Control Instructions NOTE: Please insert 2 batteries before using. AAA 1.5V battery x 2pcs (not included) ① Turn off the lights and fan. ② Turn on/off the lights. ③ Natural wind of the fan, fan speed will change automatically when use this function. ④ Fan moves forwards. ⑤ Fan moves reversely. ⑥ Turn on the fan with 1-6 speed. ⑦ Turn off the fan. SETUP: remote signal pairing.
Trouble Shooting 09 1. Fan doesn't work • Make sure the fan lamp is connected to an ON/OFF wall switch, not dimmer switch. • Check the remote control battery (not included in this package). • Check the circuit breaker to ensure the power is on. • Turn off power from the circuit breaker, then loosen the canopy and check all the connections according to the wiring diagram. 2. Lights Do Not Light Up / Flicker / Noisy Operation • Make sure the fan lamp is connected to an ON/OFF wall switch, not dimmer switch.