4 CH Digital Quad Recorder VT-DVR04Q Please read this instructions thoroughly before operation and retain it for future reference. User Manual V 1.
DQR WARNING All the safety and operating instructions should be read before operation. The improper operation may cause permanent damage. ‧ Please use the adaptor provided from VITEK (Other adaptor is not suitable for this machine). ‧ Please lift and place this equipment gently. ‧ Do not expose this equipment to open sunlight. ‧ Do not use this equipment near water or in contact with water. ‧ Do not spill liquid of any kind on the equipment. ‧ Please power off the unit before unplugging.
TABLE OF CONTENTS DQR What do you get ? ‧ FEATURES ---------------------------------------------------------------------------------------- 3 ‧ PACKAGE INCLUDING ------------------------------------------------------------------------ 3 Before Operation ‧ INSTALLATION GUIDE ------------------------------------------------------------------------ 4 ‧ FRONT PANEL ----------------------------------------------------------------------------------- 5 ‧ BACK PANEL ---------------------------------------
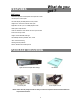
What do you get ? FEATURES DQR Features • Wavelet Compression Format replaces Time-Lapse VCR + Quad • 4 Audio inputs / 2 Audio outputs • On Screen Display and RTC (Real time clock) Function • Support from 1 channel to 4 channels video inputs • Digital Zoom can be up to 2 X 2 in DQR playback modes • Alarm Input & Output Function • Video loss detected on each channel can record up to 64 events • Power-loss memory function • Support 1 Removable HDD, IDE Type • Quick Multiple Search by date/time, alarm, full l
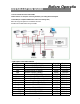
INSTALLATION GUIDE Before Operatio 1. Connect cameras and monitor with the DQR. 2. Shown below is one example for connecting the DQR to your existing Observation System. 3. Install HDD (The compatible HDD Brands are listed in the following table.) Please refer to page.18 Appendix #1 for installation instructions. The HDD must be installed before turning on the DQR.
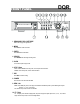
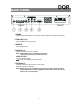
DQR FRONT PANEL PAUSE / Up HDD F u ll A L A RM TIM ER P L AY RE C A UT O FF Right REW Left MENU ENTER SEARCH SLOW AUTO REC POWER QUAD STOP / Down 1. REMOVABLE HDD CARTRIDGE Please refer to page.18 Appendix #1. 2. MENU Press MENU to enter main menu. 3. ENTER Press ENTER for confirmation. 4. SEARCH Press SEARCH for searching recording video. 5. SLOW To slow down speed of play mode. 6. STOP / Down ‧STOP : Under DQR Record / Play mode, it can stop the moment action.
11. PAUSE / Up ‧Pause : Under DQR play mode, it can pause the action. ‧UP : Under setup mode, it works as Up button. 12. PLAY Press PLAY to playback recorded video. 13. LED LIGHT The LED Light is ON under following condition. ‧HDD Full : HDD is full ‧ALARM : If Alarm Enable sets as “YES”, while the alarm is triggered , the led will be flashing ‧TIMER : When Timer is set as Enabled ‧PLAY : On Play mode ‧REC : On Recording mode ‧AUTO : 4 channel will display in full screen by turns 14.
DQR BACK PANEL IN OUT MONITOR PO W E R V IDEO 1 2 3 1 3 R 2 4 L EXTERNAL I/O RI SK O F ELECTRI C SHO CK D O NOT O PE N WAR NING : TO REDUCE THE RISK OF ELECTRIC SHOCK, DO NOT REMOVE COVER (OR BACK). NO USER-SERVICEABLE PARTS INSIDE. REFER SERVICING TO QUALIFIED SERVICE PERSONNEL. 4 1. POWER Please use the provided adaptor to connect power cord (Other adaptor is not suitable for this machine). 2. VIDEO INPUT (1-4) Connect to video source, such as camera 3.
Basic Operation START THIS UNIT Before using the DQR, please have a HDD installed ready. (refer to Appendix #1 for installation or removal of a HDD). 1. Connect the AC Power Cord with Power Adapter and plug into an electrical outlet. The Red LED indicator light will be ON and the DQR is in Standby mode. 2. Press the Power button. The POWER LED will turn from red to orange, and other red LED indicators will turn ON.
PLAY Press “ PLAY ” button, the DQR will show the last recording. 1. FAST FORWARD (F.F. ) & FAST REWIND (F.R.) You can increase the speed of Fast Forward and Rewind on the DQR. In the Play mode, press ” ►► ” once to get 2X speed forward and press twice to get 4X speed,… and the maximum speed can reach 32X. Press ”◄◄ ” once to get 1X speed rewind and press twice to get 2X speed, … and the maximum speed can reach 32X. 2. SLOW FORWARD (S.F.) & SLOW REWIND (S.R.
Detailed Menu Setup ACCESS MENU The Menu allows you to configure your DQR settings. Please follow below steps to access the Menu : Password: 0000 Press the Menu button. The password screen will appear: NOTE : The default Password is 0000. Simply press the Enter button to access the Menu. To key-in the Password, press the “Right” and “Left” buttons to move between numbers, and use the “Up” and “Down” buttons to input the number. Press the ENTER button once the correct Password is entered.
DQR MENU OPTIONS SYSTEM 1. AUDIO INPUT To choose one of 4 channels to record. (only can select 1 during operation for recording) 2. BUZZER While you set the BUZZER as “ON”, it will be triggered by event occurrence. 3. HDD OVERWRITE Select “YES” to overwrite previous recording video in HDD. NOTE : When the HDD is full under O/W Recording mode, previous recorded files may be overwritten without further warning notices. (MENU) TIMER CAMERA RECORD ALARM DWELL REMOTE ► SYSTEM EVENT 4.
TIMER 1. DAY Select the day, or days of the week (Mon–Fri / Sat-Sun / Daily) that you wish to schedule the DQR to automatically record. NOTE : 1.Special Date could be changed by “Enter”, “Up” and “Down” buttons. 2. If you have selected the specific date and recording timer set from that specific day to a new day, then the Recording Timer Schedule will be set as whole week. For specific date of Recording Timer Schedule, it is not recommended to set End Time over 23:59.
RECORD 1. RECORD IPS Select the images per second of recording. The options are as following : NTSC-60、30、15、8、4、2、 1 PAL-50、25、12、6、3、2、 1 2. RECORD QUALITY There are four quality settings : BEST, HIGH, NORMAL and BASIC. NOTE : The relationship of Record time, IPS and record quality, please refer to page.23 Recording Speed. (MENU) TIMER CAMERA ►RECORD ALARM DWELL REMOTE SYSTEM EVENT 3. RECORD MODE (RECORD) Set recording mode between Frame and Field. One frame is equal to two fields.
REMOTE (MENU) TIMER CAMERA RECORD ALARM DWELL ►REMOTE SYSTEM EVENT 1. REMOTE MODE Select RS-232 or RS-485 interface for the remote computer connection Protocol. (Please refer to page.16 for RS-232 Remote Protocol) 2. BAUD RATE Set the speed of the remote computer’s Baud Rate – which is the rate of Data transmission. Available Baud Rate are 115200, 57600, 19200, 9600, 4800, 3600, 2400 and 1200. (REMOTE) 3. ID Allow you to use RS-232 or RS-485 protocol to program different DQRs.
OPERATION OPTIONS Advanced Operation VIDEO LOSS Screen will display X if the video input is not connected properly. SEARCH 1. LAST RECORD ►LAST RECORD FULL LIST ALARM LIST TIME SEARCH Play the last recorded video. 2. FULL LIST Show a listing of all recorded video on the HDD which sorted by time. M : Manual Record time A : Alarm Record time T : Timer Record time E : External Record time 3. ALARM LIST Show a listing of all recorded video triggered by an Alarm.
DQR KEY LOCK For added security, you can “Lock” all buttons on your DQR. Locking disables the buttons and prevents other people from using the system. Press ENTER and MENU at the same time to enable Key Lock. Press ENTER and MENU at the same time to disable Key Lock. RS-232 REMOTE PROTOCOL You can use the PC keyboard to simulate DQR keypad.
DQR SPECIFICATIONS Video format Hard disk storage Record mode Camera Input Signal Main Monitor Output Audio input Audio output Video Loss Detection Refresh Rate Recording Rate NTSC/EIA or PAL/CCIR IDE type, UTMA 66 above, 1 removable HDD supported Manual / Alarm / Timer / External Composite video signal 1 Vp-p 75Ω BNC, 4 channels Composite video signal 1 Vp-p 75Ω BNC 4 audio inputs, (RCA) * 2 audio outputs, (RCA) ** Yes 60 images/sec. for NTSC / 50 images/sec. for PAL 60 images/sec.
APPENDIX #1 – INSTALLING the HDD Please follow the steps carefully in order to ensure correct installation. The compartment located on the front panel of the DQR is the removable Cartridge Casing, in which you insert the HDD. The various parts of the Cartridge Casing are labeled for your reference. 1.Remove the Cartridge Casing from the DQR Keyhole Cartridge Casing LED indicator lights Handle 2.
4. Secure the HDD in the Casing (optional) Use the screws supplied to tighten them, place the HDD into correct position. 5.Slide the top Cover over the Cartridge Casing Slide the Cover forward over the Cartridge Case. Ensure it is secured in place over the release latch. 6.Reinsert the Cartridge Casing into the DQR Fully insert the Cartridge Case into the DQR. 7. Lock the Cabinet Lock the cabinet by turning the key clockwise.
APPENDIX #2 – PIN CONFIGURATIONS 25 pin com port ‧ ‧ ‧ ‧ 9 pin com port ‧ ‧ DQR ‧ ‧ 20
PIN 1. RS232-TX : RS-232 DQR can be controlled remotely by an external device or control system, such as a control keyboard, using RS232 serial communications signals. PIN 2. RS232-RX : RS232 DQR can be controlled remotely by an external device or control system, such as a control keyboard, using RS232 serial communications signals. PIN 3, 4, 5, 6 ALARM INPUT To connect wire from ALARM INPUT (PIN 3, 4, 5, 6) to GND ( PIN 9 ) connector, DQR will start recording and buzzer will be on.
APPENDIX #3 – RACK MOUNT Screws and brackets for rack mounting applications can be purchased as an optional accessory.
APPENDIX #4 – RECORDING SPEED The Record Time is different based on Record Speed and Record Quality. Please refer to following table. NTSC SYSTEM IPS Best Record High Quality Normal Basic 60 30 15 8 4 2 1 12hr 24hr 48hr 90hr 180hr 360hr 720hr 15hr 30hr 60hr 112.
Industrial Video Products, Inc. 9970 Glenoaks Blvd. Unit B Sun Valley, CA 91352 Phone: 888-VITEK-70 / 818-771-0300 Fax: 818-771-0400 WWW.VITEKCCTV.