
System information


9!
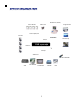
• Connect up to 16 CAMERA INPUTS as necessary. !
• Connect one or more monitors to the DVR using the COMPOSITE or DVI connections!
• Connect power to the DVR. The DVR checks for proper power connection and emits two be
eps."
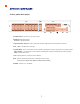
Press the POWER BUTTON on the front panel of the DVR to begin operation.!
The DVR startup screen detects and checks the status"
of hard drives and the CDRW / DVR-RW drive.!
After startup diagnostics are complete, the operator m
ust"
logon to the system. The default user name is ‘ADMIN’
.!
Using the CHANNEL SELECTION buttons, key in"
the default password of ‘1234’ and press the ENTER"
button.!
The DVR begins normal operation and shows the "
default display of all 16 channels.!
The status bar(Include menu control) at the bottom o
f the screen shows menu first time. after that, it will
show the current time and date.!
A title for each channel is shown.!
The red square and letter ‘T’ in the top right of each
channel display shows that the channel is recording i
n Timer / Schedule mode.!