
Specifications

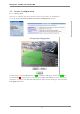
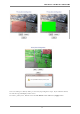
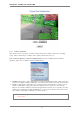


Table Of Contents
- 1. Box Contents
- Included Accessories
- 3. Available Accessories
- 4. Mighty Dome Layout
- 5. VTD-MV-VN / VTD-MV-VRN Installation
- 6. Camera Software Installation
- 7. VTD-MV-VN / VTD-MV-VRN Features
- 8. IP Installer: Introduction
- 9. Installing and Uninstalling
- 10. Using IP Installer
- 11. ENVI Admin Menu
- 12. QuickConfiguration
- 13. System Configuration Menu
- 14. Network Configuration
- 15. Device Configuration
- 16. Advanced Configuration
- 17. Recording Configuration for Cameras with microSD card
- 18. Utilities
- 19. ENVI Series Viewer
- 20. Installing and Uninstalling
- 21. Starting ENVI Series Viewer
- 22. EN-V-R: Introduction
- 23. Requirements for Installation
- 24. Installing EN-V-R
- 25. Uninstalling EN-V-R
- 26. Components of EN-V-R Program
- 27. Starting EN-V-R Configurator
- 28. Quick Start Guide
- 29. ENVI Smart Player
- 30. Installing and Uninstalling
- 31. Configuring& Viewing Player
- 32. Searching Video
- 33. Video Playback Controls
- 34. Extra Features
- EN-V-R Configuration
- 36. IP-CCTVDNS Registration
- 37. IP-Device Registration
- 38. Using EN-V-R Controller
- 39. Connecting to EN-V-R

ENVI Series: VTD-MV-VN / VTD-MV-VRN
56
Image Quality Setup
In Image Quality level setup, select “Low Compression” for higher image quality, but it requires
higher network bandwidth. Selecting the “Lowest” requires lower network bandwidth, but gives
decreased image quality.
After configuration is finished, click Apply button to save the setting. If you click Default button,
the entire configuration will be reset to the original values.
Camera Control (Select Models)
Select Camera Control on the bottom of Camera & Motion Configuration menu.
• Power Frequency: Select NTSC (60Hz) or PAL (50Hz) according to the region.
• Environment: Indoor or Outdoor
• Noise Filter: To reduce static on image
• Brightness: Select the brightness of image between 0 and 256.
• Contrast: Select the contrast of image between 0 and 30.