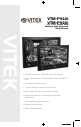
VTM-PV22i VTM-PV26i 22” & 26” Public View Monitors with Integrated WDR Camera VITEK • 22" & 26" Public View 16:9 Widescreen LCD Displays • Built-in High Resolution Varifocal WDR Camera with 540 TV Lines • Two Looping Composite Inputs • 1 Camera Output for Internal Camera Video • Built-In Motion Sensor for Auto Camera Call-up • Integrated SD Memory Card Reader for Multimedia Presentations • Adjustable PIP (Picture-in-Picture) • Remote Control Included • VESA 100mm Mounting BLACK
Contents . . . . . . . . . . . . . . . . . . . . . . . . . . . . . . . . . . . . . . . . . . . . 2 Imprtant Safety Instructions . . . . . . . . . . . . . . . . . . . . . . . . . . . . 3 Regulatory Notices . . . . . . . . . . . . . . . . . . . . . . . . . . . . . . . . . . . . 6 Package Contents . . . . . . . . . . . . . . . . . . . . . . . . . . . . . . . . . . . . 7 Installation . . . . . . . . . . . . . . . . . . . . . . . . . . . . . . . . . . . . . . . . . . 8 Rear Panel Connectors . . . . . . . . . . .
1. Use at the rated power voltage. Use of non-rated voltage may cause fire, electric shock and breakdown. 2. Do not open the cabinet and external cover. The high voltage inside of this product may cause the electric shock. 3. Do not remodel or disassemble this product. Remodeling or disassembling in wrong method may cause fire, electric shock or breakdown. 4. Do not insert or drop any foreign substance such as metals or flammable object inside from the air hole.
18. Do not install it at the place with poisonous gas. It may cause the fire. 19. Do not install it at the location with continuous vibration. It may be tipped over as it loses balance or damaged as it is fallen down. 20. Do not install it at the place on the strong magnetic field or current field. It may cause fire, electric shock or break down. This equipment may be observed deterioration of the picture by electromagnetic radiation in electromagnetic environment. 21.
Explanation of Safety Related Symbols CAUTION RISK OF ELECTRIC SHOCK DO NOT OPEN CAUTION : TO REDUCE THE RISK OF ELECTRIC SHOCK, DO NOT REMOVE COVER (OR BACK). NO USER-SERVICEABLE PARTS INSIDE. REFER SERVICING TO QUALIFIED SERVICE PERSONNEL.
This marking shown on the product or its literature, indicates that it should not be disposed with other household wastes at the end of its working life. To prevent possible harm to the environment or human health from uncontrolled waste disposal, please separate this from other types of wastes and recycle it responsibly to promote the sustainable reuse of material resources.
Q'ty Description 1 1 2 1 1 22/26-inch LCD public view monitor with WDR camera Remote control unit AAA batteries Installation/ Operation manual Power Cord
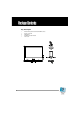
Mounting The monitor accommodates mounts that adhere to the VESA 100x100 standard. with VESA MOUNTED BRKT(100X100) SCREWS M4X0.5, L=12mm(4EA) 1. VESA mounted bracket at the screw holes (4 places) located in the middle part of the rear LCD MONITOR, with screws. Do not use longer screw than 12mm length except mount parts when you use vesa mount bracket.
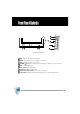
Rear Panel Connectors 1. AC POWER: Power receptacle, which can be connected to a 100-240 VAC, 60/50 Hz source 2. VIDEO1(loop through): Input connections from DVD players or time-lapseVCRs. Video loops through the BNC video output. 3. VIDEO2(loop through): Input connections from DVD players or time-lapseVCRs. Video loops through the BNC video output. 4. CAMERA OUT: Output signal of internal camera video 5. MEDIA CARD IN: Input media card(USB , SD card).
Front and Side Panel Controls MENU: Displays the main on-screen menu (monitor). SOURCE: Selects the input source and confirms your choice in menu. and : Navigates through the on-screen menu. /Vol+ and /Vol-: Increases or decreases the volume. Also selects or adjusts items on the on-screen menu. Power : Turns on/off the monitor. Motion Sensor : Motion detection sensor. Photo Sensor : Brightness detection sensor. Remote control signal receiver : Receives remote control signal.
Battery Installation 1. Open and remove the back cover of the remote control. 2. Install two AAA size batteries (supplied). Match the positive (+) and negative (-) signs on the batteries to the signs on the battery compartment. 3. Close the battery cover. Make sure the lock snaps closed. WARNINGS: Dispose of batteries in a designated disposal area. Do not throw batteries into a fire. Do not mix battery types.
POWER: Turns the monitor on or off. MUTE: Temporarily silences the sound. To return the sound: press MUTE again, VOL +, or VOL -. Press the button to select the desired input source. VIDEO1/VIDEO2/MEDIA/CAMERA: Displays all the available input sources. Press the button to select the desired input source. COLOR TEMP: Adjusts the color temperature(Kelvin) of the screen. RESERVED: For future use only.(Mirror... etc) (PIP): Controls the PIP as follows: PIP ON/OFF: Activates/deactivates PIP/PBP mode. P.
INPUT SOURCE DISPLAY Input source name is displayed on the upper right-hand corner in case of changing input source, or pressing ENTER key on the remote controller. To use the menus: 1. Press the MENU button to access the Main menu. 2. Use the and arrow buttons to highlight a selection. 3. Press ENTER( /VOL+) to select an item. 4. Use the and arrow buttons to highlight a selection. 5. Use the / VOL- and /VOL+ arrow buttons to adjust the setting on a selected item.
Menu Tree
MENU FIELD DEFINITIONS UTILITY MENU Auto Power ON Video Loss Sleep Light Sensor Motion Sensor Search Select Select Mode Sensitivity Delay Mode Sensitivity Display Input Display Time Mode Video1 Time Video2 Time Camera Time Media Time ON, OFF OFF, VIDEO1, VIDEO2, CAMERA, MEDIA ON, OFF 1 to 100 5 to 30 OFF, FULL, PIP, PBP LOW, MIDDLE, HIGH VIDEO1, VIDEO2, CAMERA 5 to 20 Off, FULL, PIP, PBP Off, 5 to 30 Off, 5 to 30 Off, 5 to 30 Off, 5 to 30 Select the video input when the power is turned on after returni
MENU FIELD DEFINITIONS Source: Select VIDEO 1, VIDEO 2, CAMERA, or MEDIA. Contrast: Adjusts black level of the video screen image (0 to 100). Brightness: Adjusts white level of the video screen image (0 to 100). Sharpness: Adjusts the picture softer or sharper (0 to 15). Color: Adjusts the color saturation of the video signal (0 to 100). Tint: Adjusts the range of color: green to red (0 to 100). 3D NR: Reduces the background noise of the video signal (NR ON or OFF).
* Camera control is optional.
Setup Menu PRESET menu PRESET menu is provided to help the settings with the possible parameters obtained and assumed by the factory tests for the most common environments. MENU(Ver3.2e) PRESET >> PRESET EXPOSURE AGC SHUTTER LIMIT PICTURE CONTROL RESTORE FACTORY VIDEO STANDARD < INDOOR INDOOR > WDR MID MIDDLE 2X ESS SETTINGS NTSC "PRESETs may not be the best optimized settings for the actual installations. In such cases, find the optimal settings in CUSTOM setting of EXPOSURE menu".
CUSTOM menu To enter CUSTOM menu, press ENTER button at of EXPOSURE menu. WDR CUSTOM > WINDOW WINDOW RANGE BIAS PREVIOUS WDR CUSTOM 0 36 -10 10 PAGE DESCRIPTIONS WINDOW Metering of the dynamic control is weighted to the selected window from SAFE AREA, ZONE ADJUST, CENTER 1/3 AND LOWER 2/3. RANGE Adjusts the strength of the dynamic range control. BIAS Adjusts the base level of the dynamic range control.
ZONE ADJ menu (In Window menu) Adjusts the size and the location of the metering zone for the dynamic range control. Dynamic range control is very sensitive to the size and the location of the zone. The default window size is SAFE AREA. To enter ZONE ADJ menu, press ENTER button at of WDR CUSTOM menu.
AGC MENU MENU(Ver3.2e) PRESET EXPOSURE >AGC AGC SHUTTER LIMIT PICTURE CONTROL RESTORE FACTORY VIDEO STANDARD INDOOR WDR MID 2X ESS SETTINGS NTSC Press 'MENU' to save/return AGC DESCRIPTIONS MIDDLE Medium level of the Automatic gain control HIGH Increases the Automatic gain control. LOW Decreases the Automatic gain control SHUTTER LIMIT MENU MENU(Ver3.
PICTURE CONTROL MENU WHITE BALANCE menu PICTURE CONTROL > WHITE BALANCE WHITE BALANCE BRIGHTNESS DNR SHARPNESS FLIP COLOR SELECT SATURATION 1 PREVIOUS PAGE < Desat > MID-LOW OFF MIDDLE OFF COLOR 3 -2 2 To enter PICTURE CONTROL sub-menu, press "ENTER" button at PICTURE CONTROL of MENU. WHITE BALANCE DESCRIPTIONS ATW Normal White balance is compensated automatically in range of 2800K-7500K ATW Desat White balance is compensated automatically in range of 2000K-11000K.
BRIGHTNESS, DNR, SHARPNESS, FLIP, COLOR SELECT and SATURATION menus (in PITURE CONTROL menu) PICTURE CONTROL WHITE BALANCE BRIGHTNESS > BRIGHTNESS DNR SHARPNESS FLIP COLOR SELECT SATURATION 1 PREVIOUS PAGE PICTURE CONTROL BRIGHTNESS DNR SHARPNESS FLIP COLOR SELECT SATURATION OFF MIDDLE OFF COLOR 3 -2 2 DESCRIPTIONS BRIGHTNESS level is a kind of video output gain and is different from the iris level control. It can be set to MID-LOW, MIDDLE, MID-HIGH, HIGH and LOW.
Connecting USB device 1. Connect USB device to USB slot which is on the slide of the TV set. 2. Press USB key on the remote or select USB in main menu special mode. Removing the USB device from Monitor. 1. Return to main menu. 2. Remove the USB device from Monitor. When you plug a USB, SD or MS memory card, the below screens will be displayed. Notes : Don't extract the USB device while operating. Music files (MP3), image files (JPG)and AVI files can be played. USB HUB connection is not available.
- Using the remote control Select the S/W Version Show the S/W Version. 1. Press the USB button and then use button to select the Setup. 2. Press the ENTER button to enter the Setup menu. button to select the SYSTEM SETUP. 3. Press the button to select S/W VERSION. 4. Press the and then use 5. Press the . 6. Press the STOP/EXIT button to return to the Main menu. Select the Default Use the Default option to initialize the adjusted settings. 1. Press the USB button and then use button to select the Setup. 2.
Select the Photo Effect The picture display effect for the slide show. 1. Use button to select the Setup. 2. Press the ENTER button to enter the Setup menu. button to select the PHOTO SETUP. 3. Press the 4. Press the and then use D/E button to select EFFECT. 5. Press the and then use D/E button to select the desired Effect. 6. Press the STOP/EXIT button to return to the Main menu. Select the Frequency The picture display interval for the slide show. 1. Use button to select the Setup. 2.
Select the Movie, Music or Photo Media When you plug a USB, SD card, on the right screens will be displayed. 1. Press / button to select Movie, Music or Photo. 2. Press the ENTER button to enter the Movie, Music or Photo media. Movie File Playing Operation 1. Use / button to select the Movie. 2. Press the ENTER button. 3. Press the PLAY/PAUSE or ENTER button.Then the movie starts. 4. Press the STOP/EXIT button to stop or return to the main menu.
MP3 File Playing Operation Purchased MP3/music files may contain copyright restrictions. button to select the Music. 1. Use 2. Press the ENTER button. 3. Press the button to select folder and desired music file. 4. Press the PLAY/PAUSE or ENTER button.Then the music starts. 5. Press the STOP/EXIT button to stop or return to the Main menu.
JPEG File Viewing Options When you select Photo in entry menu, you will now see a screen filled with thumbnail photo media. button to select the Photo. 1. Press the USB button and then use 2. Press the ENTER button. 3. Press the button to select photo file. 4. Press the ENTER or PLAY/PAUSE button for slide show. 5. Press the STOP/RTN button to stop slide show or return file list, Main menu. Slide Show (Slide show with music) 1. Press the button to select JPEG file and then press the ENTER button.
28492 CONSTELLATION ROAD VALENCIA, CA 91355 WWW.VITEKCCTV.