
User Manual


video and audio data by way of an integrated mini-plug cable. Since HDMI
technology is based on Digital Visual Interface (DVI), the jack on the back
of your MONITOR is also compatible with DVI devices. HDMI Input lets
you connect a device, such as a digital cable box, with an HDMI output.
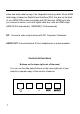
HDMI1[2.0 & downwards];HDMI2&3[1.4 & downwards]
DP: Connect a video output device with DP. Computer / Notebook.
AUDIO OUT: Connect external 3.5mm headphones or active speakers
Controls & Functions
Buttons on the lower-right part of the panel
You can use the side panel buttons on the lower right part of your
monitor to operate many of the monitor’s features.
-- ++ MMEENNUU SSOOUURRCCEE
1. Turn on / off the monitor
2.SOURCE: Accesses the available video input signals (DP),
HDMI1[2.0], HDMI2[1.4], HDMI3[1.4]
3.MENU
::
Bring up the MONITOR main menu.
4.
++
: Turn on the brightness. In the MONITOR menu system, adjusts
menu controls.
5.
--
: Turn on the picture mode. In the MONITOR menu system,
adjusts menu controls.
6. Indicator: In red when standby mode, in green when display.
HOW to use buttons
Use the buttons on the right side control panel to adjust the OSD
1. To access the OSD Menu press ‘MENU’.
2. Use the ‘MENU’ buttons to select the required menu item, then
press the ‘+’ or ‘-’button to select the Sub menu.
3. Continue to use the ‘MENU’ button to highlight the required field,
then press ‘+’ or ‘-’ to adjust the Set.
4. Press the ‘SOURCE’ button to return to previous menu.
5. Press the ‘SOURCE’ button again to exit the OSD Menu completely.
7