
Operation Manual


UR 820 LCD UNIVERSAL CONTROLLER
Vivanco GmbH, D-22926 Ahrensburg, E-Mail: hotline@vivanco.de, Helpline: +49 (0) 4102 231135
2. Press SET for more than 3 seconds and
release it, when CODE SETUP is displayed.
3. Select LEARNING by pressing
▲ or ▼
keys.
4. Press OK, LEARN KEY will be
displayed. Select DELETE KEY by pressing
▲
or ▼ keys.
5. Press OK, SELECT KEY will be
displayed. Then press the target key, e.g.
POWER, which you like to delete.
6. SURE DELET will be displayed. Please
confirm by pressing OK. UR 820 LCD displays
SUCCESS for 1 s. Then SELECT KEY is
displayed and the next key can be deleted
according to step 5 and 6. –If the deleting fails,
WAITING and FAILED are displayed, then
repeat deleting from step 5.
7. You can stop deletion procedure by
pressing any device key (TV, DVB etc.), when
SELECT KEY is displayed.
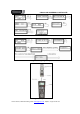
Delete Learnt/Programmed Key Sets For
Single Devices
Please proceed as follows, see Fig. 6:
1. Press the device key of to be controlled
device, e.g. TV.
2. Press SET for more than 3 seconds and
release it, when CODE SETUP is displayed.
3. Select LEARNING by pressing
▲ or ▼
keys.
4. Press OK, LEARN KEY will be
displayed. Select DELETE DEV by pressing
▲
or ▼ keys.
5. Press OK, SELECT DEV will be
displayed. Then press the corresponding
device key key, e.g. TV.
6. SURE DELET will be displayed. Please
confirm by pressing OK. UR 820 LCD displays
SUCCESS for 1 s. Then SELECT DEV is
displayed and the next device key set can be
deleted according to step 5 and 6. –If the
deleting fails, WAITING and FAILED are
displayed, then repeat deleting from step 5.
7. You can stop deletion procedure by
pressing EXIT key several times.
Delete All Learnt/Programmed Keys
Please proceed as follows, see Fig. 7:
1. Press SET for more than 3 seconds and
release it, when CODE SETUP is displayed.
2. Select LEARNING by pressing
▲ or ▼
keys.
3. Press OK, LEARN KEY will be
displayed. Select DELETE ALL by pressing
▲
or ▼ keys.
4. Press OK, SURE DELET will be
displayed. Please confirm by pressing OK. UR
820 LCD displays SUCCESS for 1 s. Then
menu is displayed again.
5. You can stop deletion procedure by
pressing EXIT key several times.
Other settings
Clock Setting
Please proceed as follows, see Fig. 8:
1. Press SET for more than 3 seconds and
release it, when CODE SETUP is displayed.
2. Select CONFIGURE by pressing
▲ or ▼
keys.
3. Press OK, TIME SETUP will be
displayed.
4. Press OK , TIME hh:mm xx will be
displayed. Please enter time and AM or PM for
morning and afternoon. Use numerical and
arrow keys for time input.
5. When time is displayed correctly press
OK. SUCCESS and later TIME SETUP will be
displayed.
6. You return to main menu by pressing
EXIT key several times.
Set volume control priority
With this function you can determine a device
exclusively for volume control, e.g. your audio
amplifier. Then the buttons VOL +, VOL – and
always control the amplifier, regardless of
which device you are controlling.
Please proceed as follows, see Fig. 9:
1 Press and hold SET for 3 seconds, then
set CONFIGURE with the ▲ or ▼ button.
Confirm this function by pressing OK
2 TIME SETUP appears in the display. Set
VOL LOCK with the ▲ or ▼ button. Confirm
this function by pressing OK.
3 Select the device button, e.g. AUX for the
amplifier and set priority=ON using the ► or ◄
button. Confirm this function by pressing OK.
4 Then press EXIT several times to quit the
setting mode.
- You can cancel the priority setting using the same
procedure. Instead of ON, set OFF for all devices.
Lock Or Unlock Device Codes
1 To prevent settings from being changed
accidentally, please proceed as follows, see
Fig. 10:Press and hold SET for 3 seconds,
then set CONFIGURE with the ▲ or ▼ button.
Confirm this function by pressing OK.
2 TIME SETUP appears in the display. Set
DEV LOCK using the ▲ or ▼ button. Confirm
this function by pressing OK.
3 Select the device button, e.g. DVD for the
television and set lock=ON using the ► or ◄
button. Confirm this function by pressing OK.
4 Then press EXIT several times to quit the
setting mode.
- You can cancel the lock setting using the same
procedure. Instead of ON, set OFF for all devices.