IPC118 I QUICK START GUIDE
1.
2.
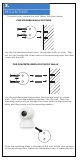
3. MOUNTING To mount your camera to a wall, follow the steps below. FOR WOODEN WALLS OR STUDS Use the included mounting screws for wooden walls or studs. They will first go through the screw holes on the mounting plate, and then screw into the wall. FOR CONCRETE, BRICK OR STUCCO WALLS Use the included mounting anchors for concrete, brick or stucco walls. First screw the mounting anchors into the wall.
4. APP INSTALLATION In order to use your camera, you will first need to download the Vivitar Smart Security 2 App, which is available on the Google Play Store and on the iPhone App Store.
5. APP REGISTRATION To successfully use the Vivitar Smart Security 2 App, you will first need to create an account. To do so, follow the steps below. Open the Vivitar Smart Security 2 App and press “Register.” Agree to the terms of the privacy policy. Enter your e-mail address or phone number to create an account. You will receive a verification code over email or text message. Enter it here. Setup a password for your account. Once finished, you can login to your account.
6. CAMERA SETUP 1. On the rear of your camera is a Micro USB port. Plug the included USB cable into this port, and connect the other end to the included power adapter. 30-60 seconds 2. Wait as your camera gets ready to enter Wi-Fi setup mode. This might take up to a minute. 3. Once in Wi-Fi setup mode, your camera will emit a prompt musical melody and then beep every few seconds.
7. WI-FI CONNECTION Wi-Fi MyNetwork2.4g Go to your phone’s settings menu, and make sure that your phone is connected to a 2.4GHz Wi-Fi network.
8. WI-FI CONNECTION Open your Vivitar Smart Security 2 app. Choose to add a device, and In the Add Device screen, select to add a Smart Camera. Confirm that the LED Indicator Light on your camera is still blinking rapidly, then proceed to the next step. NOTE: For models without an LED Indicator Light, you can continue if your camera is beeping consistently. MyNetwork2.4g PASSWORD Enter your Wi-Fi network name and password. Your app will display a QR code.
9. WI-FI CONNECTION Your camera should emit a beep to indicate that it is ready to connect to your network. Wait as the Wi-Fi connection is established. Once the connection is established, you can use the App to control your camera.
10. USING THE APP On your app’s main screen you will see the connection status of your camera. Press the camera icon to view video. Press the Me icon to access settings and additional help with using your app. View your home, dorm room, office and much more. NOTE: Screen shots displayed in this user’s guide of the Smart Security 2 software application may appear differently than those currently featured in your app as frequent updates and improvements are being made to the software.
11. FCC STATEMENT Changes or modifications not expressly approved by the party responsible for compliance could void the user’s authority to operate the equipment. This device complies with Part 15 of the FCC Rules. Operation is subject to the following two conditions: (1) this device may not cause harmful interference, and (2) this device must accept any interference received, including interference that may cause undesired operation.
10. 12. W AARRRR W AA NN TY TY C ACRADR D This warranty covers the original consumer purchaser only and is not transferable. This warranty covers products that fail to function properly UNDER NORMAL USAGE, due to defects in material or workmanship. Your product will be repaired or replaced at no charge for parts or labor for a period of one year.