INDEX Explanations of Required Symbols ………..….………….………… 2 Antenna Installation Safety…………………………………….…….. 3 Safety Guidelines…………………………………………….……..… 4 Cleaning the LCD TV…………………………………….…………… 5 INSTALLATION Package Contents……………………………….……………………. 6 Front View of the LCD TV…………………..………………………... 6 Rear View of the LCD TV…………………….……………………….6 Side View of the LCD TV………..…………………………………….7 Back View of the LCD TV………..……………………………………8 Remote Control…………………..………………………………….....9 Installation and Setup………….………………….
Explanations of required symbols: SYMBOL DEFINITION RISK OF ELECTRIC SHOCK: This symbol is intended to alert the user to the presence of un-insulated “dangerous voltage” within the product’s enclosure that may be of sufficient magnitude to constitute a risk of electrical shock to persons. NOTE: This symbol is intended to alert the user to the presence of important operating and maintenance (servicing) instructions in the literature accompanying the appliance.
Other Notices Precautions x Avoid touching the screen by hand or any object. Only use an approved cleaning solution with a dry, lint-free cloth when cleaning the LCD screen. x Never remove the rear cover. Your LCD TV contains high-voltage parts. You may be seriously injured if you touch them. x Avoid exposing your LCD TV to direct sunlight or another heat source. Orient your LCD TV away from direct sunlight to reduce glare. x Always handle your LCD TV with care when moving it.
13) Unplug this apparatus during lightning storms or when unused for long periods of time. 14) Refer all servicing to qualified service personnel. Servicing is required when the apparatus has been damaged in any way, such as power-supply cord or plug is damaged, liquid has been spilled or objects have fallen into the apparatus, the apparatus has been exposed to rain or moisture, does not operate normally, or has been dropped.
FCC Compliance Statement x x x x Reorient or relocate the receiving antenna. Increase the separation between the HD LCD TV and receiver. Connect the equipment into an outlet on a circuit different from that to which the receiver is connected. Consult the dealer or an experienced radio/TV technician for assistance. FCC Warning To assure continued FCC compliance, the user must use a grounded power supply cord and the provided shielded video interface cable with bonded ferrite cores.
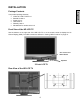
INSTALLATION English Package Contents Your product package includes: x Vivitek 32” LCD TV HDTV x1 x Remote Control x1 x Power cord x1 x User Guide x1 x Warranty card x1 x AA batteries for remote control x 2 Front View of the HD LCD TV Use the buttons on the right side of the HD LCD TV or on the remote control to display the On Screen Display (OSD). The OSD controls are defined in “Viewing OSD Functions” on page 13.
Side View of the LCD TV Adjust (VOL + / -) sound volume or adjust a highlighted control while in the OSD Menu. 2. VOL + / - 3. CH + / - Adjust (CH + / -) channel when input is TV or adjust a highlight control while in the OSD Menu. 4. INPUT Select Active Video Input or choose a selection while in the OSD MENU. 5. Power Button Power ON/OFF 7 English Turn OSD Menu ON/OFF 1.
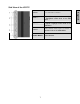
Back view of the LCD TV 8 English 1. VGA Audio IN Connect to the Audio out (Green) from a computer. 2. VGA Using a 15-pin VGA cable, connect to a computer or other device with a VGA output. 3. YPbPr1 Input Connect an external video device with component output to these jacks. 4. YPbPr2 Input Connect an external video device with component output to these jacks. 5. YPbPr1 Audio 1 Input (Left / Right) Connect an external audio source to this jack. 6.
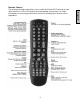
Remote Control 9 English The included universal remote allows you to control the Vivitek LCD-TV as well as other name brand TV's, VCR's, DVD players and cable/satellite set top boxes. For further information on how to program the remote control for operating other devices, refer to Appendix B.
Remote Control Selecting the signal source: Switch to TV mode. AV Switch to composite video mode. S-Video Switch to S-Video mode. COMP Switch to component mode (Y/Cb/Cr or Y/Pb/Pr). VGA Switch to PC mode. HDMI Switch to HDMI mode. MENU setting: Menu Activates OSD Menu. SEL Select - Confirm a selection within the OSD menu. UP / DOWN UP or down - Move up or down within the OSD menu. LEFT / RIGHT Left or right - Move left or right within the OSD menu. Exit Exit the OSD Menu; Cancel.
Transmission range of remote control Insert Remote Control Batteries 1) Remove the battery cover. 2) Insert the batteries corresponding to the (+) and (í) marks within the battery compartment. 3) Re-attach the battery cover. CAUTION: 1) Only use AA batteries. 2) Do not mix new and old batteries. This may result in cracking or leakage, which may pose a fire risk or lead to personal injury. 3) Insert batteries according to (+) and (í) markings.
Installation and Setup Refer to pages 13 - 34 of this user manual for details about each OSD menu option. The first time the Vivitek LCD-TV is powered on, the OSD setup wizard will appear, allowing you to customize various settings based on your preferences and location. Refer to pages 28 - 29 for details on the setup wizard. When navigating any of the OSD menu items, use the up/down/left/right arrow buttons to move through the available options. Then press the SEL button to confirm the selection.
OSD Menus Viewing the OSD Menu To display the OSD main menu, press the Menu key on the right side front of the LCD TV or the MENU button on the remote control. Press arrow buttons to select the desired OSD Menu option then the SEL button to confirm the selection. 1. Picture 13 English There are four main menu options that are common to all input modes. These are Picture, Audio, Settings and Locks. When using the TV tuner mode, two additional options are available as Channels and Guide.
Aspect Ratio: The Aspect Ratio sub-menu option adjusts the manner in which source signal formats are displayed on the screen. Standard Fill Panoramic Zoom Display the image exactly as broadcast. Stretches the image horizontally to fit the screen. Display conventional 4:3 broadcasts with an imitation wide screen effect. The 4:3 picture is stretched horizontally and vertically to fill the screen. Suitable for viewing wide-screen 2.35:1 monographic content in full screen.
Reset Picture: Reset all Picture sub-menu options to the factory defaults. 15 English Color Temp. The Color Temp. sub-menu option allows you to adjust the level of intensity of the white color spectrum as displayed on the screen. The "Cool" item sets the white levels towards the blue end of the spectrum. The "Normal" item sets the white levels as close to neutral as possible. The "Warm" item sets the white levels towards the yellow end of the spectrum.
2. Audio English Bass, Treble & Balance The Bass, Treble and Balance sub-menu adjusts the ranges of high and low sound frequencies as well as the audio balance levels for left and right speaker output. Analog Preference The Analog Preference sub-menu sets the audio output mode to the desired listening preference. The available modes are Mono (single stream), Stereo (left and right stream) and SAP (Secondary Audio Programming such as a foreign language track).
TV Speaker The TV Speaker sub-menu sets the speaker output preference. The available modes are as follows: Reset Audio Reset all Audio sub-menu options to the factory defaults. 17 English Internal Audio from internal speakers only. External Audio from external speakers, such as if the TV was connected to a stereo receiver. Both Audio from both internal and external speakers.
3. Channels English Master List The Master List sub-menu defines which channels are available for viewing when utilizing the analog/digital tuner.
The following sub-menu items allow for modification of the favorite channel lists. Use the arrow buttons on the remote control to scroll through the available channels, then use the SEL button on the remote control to add/remove the selected channel. Select List Unmark All Rename List Sort Mark Select the favorite channels list to be edited. Remove all of channels from the current favorite channel list. Rename the favorite channel list. Sort or unsort marked channels in the list.
After selecting the input source, activate the Scan button to initiate scanning or cancel the scan function by selecting Don't Scan. When selecting Cable as the scan input source, a sub-menu will appear for selecting a cable TV signal type. The signal type is determined by the cable provider. If unsure about the proper signal type, use the "Automatic" option. 20 English Scan Channels The Scan Channels sub-menu automatically scans for available channels based upon the source input selected.
Find Channel The Find Channel sub-menu allows for manual addition of user specified channels. English Channel Name edit The Channel Name Edit sub-menu allows for modification of the friendly name of any channel within the channels list. To modify a channel name, select the Channel Name Edit sub-menu, scroll through the list of available channels and press the SEL button to modify the desired channel name. Enter the new channel name using the on-screen characters.
4. Settings English Menu Language The Menu Language sub-menu toggles the default language for the on-screen display menus. Closed Captions Closed Captions provide on-screen text in conjunction with the audio program for those who are deaf or hard of hearing.
Activation The Activation sub-menu enables/disables closed captioning text. English Basic Selection The Basic Selection sub-menu configures the video frame field setting for closed captioning content. Most closed caption content can be found within CC1.
Advanced Selection (Appearance on Digital Channel Only) The Advanced Selection sub-menu provides enhanced closed caption modes for the CC experience. English Advanced Appearance The Advanced Appearance sub-menu provides customization of the CC text through font, size, color and display options.
Caption preference The Caption Preference sub-menu sets the default captioning mode. If set to Automatic, the mode is determined by the broadcast. English Reset CC Reset all Closed Caption sub-menu options to the factory defaults. Sleep Timer The Sleep Timer sub-menu initiates a timer that will automatically power off the LCD-TV when the desired countdown value has been reached.
Input labels Power Management The Power Management sub-menu configures the power state of the LCD-TV when turned off. Normal mode places the TV into a low power standby state. From this low power state, the TV can be turned on quickly. Energy Saving mode turns off all power to the TV. From the energy saving state, the TV must be fully booted each time it is turned on. 26 English The Input Labels sub-menu allows for modification of the friendly name for the input port list.
System Info Reset All The Reset All sub-menu resets each and every OSD menu item to the factory default setting. Note: Once the system reset has completed, the setup wizard will automatically begin. 27 English The System Info sub-menu provides detailed information about the LCD-TV and its operating status. Information provided includes the system firmware version as well as the current input source and signal types being decoded.
Setup Wizard The Setup Wizard provides guided assistance in configuring the LCD-TV to end user preferences and implementation. Time Zone The Time Zone wizard sets the location of the LCD-TV as pertaining to the programming guide for the digital (ATSC) tuner. Note: The time zone wizard only supports North American locations. 28 English Language Setting The Language Setting wizard sets the default language for the on-screen display menus and message screens.
Daylight Saving The Daylight Saving wizard sets the clock to acknowledge daylight savings time as pertaining to the programming guide for the digital (ATSC) tuner. English RF Input Source The RF Input Source wizard sets the default TV tuner source signal. For over the air analog/digital (including high definition), select Antenna. For analog cable TV, select Cable. When selecting Cable as the scan input source, a sub-menu will appear for selecting a cable TV signal type.
5. Locks A personal identification number (PIN) will need to be created the first time the Locks menu is accessed. Enter the new PIN using the remote control, then confirm the new PIN to save it. Once the PIN has been created, the PIN Entry box will appear whenever attempting to modify the Locks menu. Once the PIN has been configured, the user has access to 4 sub-menu items.
Rating Locks The Ratings Locks sub-menu blocks programming based upon the TV or Movie rating for the country specified. Note: The Ratings Locks menu is only applicable when the input source is the TV tuner. USA TV Ratings as determined by the FCC.
Canadian (French) ratings as defined by the Regie du Cinema. G Canadian (English) ratings as defined by the Regie du Cinema. C Children C8+ Children eight years and older G General programming, suitable for all audiences PG Parental guidance 14+ Viewers 14 years and older 18+ Adult programming Block Unrated Shows When enabled, the Block Unrated Shows sub-menu will prevent any programming that doesn't have a rating lock from being viewed.
Channel Locks The Channel Locks sub-menu provides individual channel blocking regardless of any ratings lock in place. English Change PIN The Change PIN sub-menu allows the user to set up a new PIN. The original PIN is required to make any change.
Reset Locks Reset all channel and rating locks to the factory defaults. (unlocked) English 6. Guide The Guide menu displays program information for the current channel such as signal strength, audio/video signal type, channel number, V-Chip support, closed captioning status and program title. Note: The Guide menu is only applicable when viewing digital television through the TV tuner.
LT32PL3-A LCD TV Specifications LT32PL3-A Model Name 32" (32.02" viewable diagonal area) TFT (Thin Film Transistor), Active Matrix LCD, 1366 x 768 vertical stripe. Anti-glare coating Color True 16,700,000 (8-bits/color) Panel Viewing Angles Input Signal Video/Audio 176° (H) / 176° (V) VGA Analog * 1 (75 ohms, 0.
Troubleshooting x Make sure the power cord is not disconnected or loose. x Make sure the fuse and electricity outlet are working properly. Forget Parental Control Password x Select “PASSWORD EDIT” and enter “0000” to reset the password. AUDIO Interconnection Issues x Check if S-Video and Composite (AV) share the same audio source. Power is ON but No Screen Image x Make sure the antenna or video cable is not disconnected to the LCD TV or loose. x Check input source settings.
APPENDIX A: Detaching the LCD TV Base Caution 2: Ensure that no cables are attached to the TV during the detaching of the base. Please make sure there is no object will cause any scratch or damage on the front bezel, then put the front bezel down on a soft and clear area to start detaching. LT32PL3-A Step-1 Remove the four screws as shown on the following illustration. Step-2 Detach the base from LCD TV. Step-3 Install the small cover on the bottom of LCD head as illustration.
APPENDIX B: Programming the Universal Remote Control Instructions for programming a third party VCR, DVD, PVR, set top box, amplifier, etc..... 1. Turn on the device in question. 2. Press the button on the remote control that relates to the device to be programmed. (VCR, CBL, AUX). 3. Press and hold the SET button on the remote control until the red L.E.D. light flashes twice. 4. Enter the corresponding 5 digit device code from the list of available devices found in the back of this user manual.
Device program codes ###### Setup Codes For TVs (T) ###### Apex Digital Audiovox Baile Beijing Bell & Howell BenQ Bradford Broksonic Cailing Candle Carnivale Carver Celebrity Celera Changcheng Changhong Ching Tai Chun Yun Chung Hsin Cinema Citizen Clarion Commercial Solutions Conrowa Contec Craig Crown Curtis Mathes CXC Daewoo Dayu Dell Denon Dumont Durabrand Electroband Emerson Envision Ether Firstar Fisher Fortress Fujitsu Funai Furi Futuretech Gateway GE Gibralter 10092 10093, 10463 10761, 10842 100
Optimus Optonica Orion Panasonic Philco Philips Pilot Pioneer Portland Prima Princeton Prism Proscan Proton Pulsar Qingdao Quasar RadioShack RCA Realistic Rowa Runco Sampo Samsung Sansui Sanyo Sanyuan Scotch Scott Seanix Sears Shaofeng Sharp Shen Ying Shencai Sheng Chia Skygiant Skyworth Sony Soundesign Sowa Squareview SSS Studio Experience Supreme SVA Sylvania Symphonic Synco Tacico Tandy Tashiko Tatung Technics Techwood Teco Teknika Telefunken Tera Thomas Tiane TMK TNCi Tobo Toshiba Tuntex TVS V Inc.
MGA MGN Technology Microsoft Mind Minolta Mitsubishi Motorola MTC Multitech NEC Newave Nikko Noblex Northgate Olympus Optimus Orion Panasonic Penney Pentax Philco Philips Pilot Pioneer Polk Audio Profitronic Proscan Protec Pulsar Qisheng Quasar Radix Randex RCA Realistic ReplayTV Runco Sampo Samsung Sanky Sansui Sanyo Scott Sears Sharp Shintom Shogun 20072 21972 20047 20037, 20042, 20055 21972 21972 20042, 20739 21972 20067 20037, 20278 20067, 20038 20072 20035, 20037 20043 20037, 20045, 20042, 20209, 2007
Sansui Sanyo Sharp Sharper Image Sherwood Shinco Shinsonic Sonic Blue Sony SVA Sylvania Symphonic Teac Technics Theta Digital Toshiba Urban Concepts Xbox Yamaha Zenith 20511 20503, 20539, 21976, 21914, 20675 20539 20695 20522 20717 21521, 20521 20717 21003 20503, 20627, 21924, 20792 20651, 21980 20490, 21762, 21990 20503, 20539, 20646, 21914 20525, 20571 21086, 21061 20539 20770 20522 20651 20522, 20571, 20717, 20822 20869 20623 20752, 20698, 20490, 20573, 21932, 21075, 20820 20695 20695 20630, 20752 21117
USDTV Voom Zenith 01535 00869 00856, 01856 Bose GE JVC Marantz Nakamichi NEC Optimus Realistic Sansui Shure Sony Soundesign Victor Wards Yamaha 30674 30078 30331 30321 30321 30264 30395 30395 30321 30264 30689 30078 30331 30078 30354, 30133 ###### Setup Codes For CD Players (D) ###### Aiwa Burmester California Audio Labs Carver Denon DKK DMX Electronics Dynamic Bass Fisher Garrard Genexxa Harman/Kardon Hitachi Integra JVC Kenwood Krell Linn Magnavox Marantz MCS Miro Mission MTC NSM Onkyo Optimus Panason
Vivitek Corp. P.O. Box 90698 City of Industry, CA 91715 www.vivitekcorp.