
user manual


Table Of Contents
- Revision History
- Chapter One Hardware Installation and Initial Configuration
- Chapter Two NVR LiveClient Configuration
- VAST Server
- LiveClient Configuration
- Opening the LiveClient Interface and Logging in
- LiveClient User Interface
- Pan/Tilt/Zoom (PTZ) Control Panel
- Two Way Audio Control Panel
- How to Manage Devices (Cameras)
- Dual / Multiple Streams
- Fisheye Display Modes
- Refresh
- Streaming Server
- Get Public IP
- Camera Settings
- How to Change the VAST LiveClient Layout
- Switch Video Channels
- Configure Layout Mode
- Rotating Video Pages
- Edit Layout
- How to Manage Stations
- How to Manage User Accounts
- Add a New User Account
- How to Set up Association Management
- How to Set up Event Management
- How to Configure the Station General Settings
- How to Configure Station Network Settings
- How to Edit Recording Stoage
- Default Storage Group Settings
- Add New Storage Group(s)
- How to Edit Recording Schedules
- Add Schedules
- Rename Schedules
- Delete Schedules
- Load/Save Schedule Templates
- Add New Time Frames
- Recording Settings
- Repeat Frequency: Daily Setting
- Repeat Frequency: Weekly Setting (Day-based)
- Repeat Frequency: Monthly Setting (Day-based)
- Repeat Frequency: Yearly Setting (Day-based)
- How to Manually Begin /Stop Recording
- How to Edit Scheduled Backup Settings
- How to Configure Station Server Settings
- How to Use the Talk Panel
- How to Configure E-map Settings
- Quick Access Bar
- Status Panel
- Open Live View Dialog
- Send to Single View
- How to Configure Client Settings
- Taking a Snapshot
- Type 1: Record to EXE
- Type 2: Record to 3GP
- Type 3: Record to AVI
- Built-in Media Player--EXE
- Display Location
- Date and Time Format
- Video Display Mode
- Font Settings
- System Settings
- Event Settings
- Rotation Settings
- Display Settings
- Enable Joystick
- How to Use PiP (Picture-in-Picture)
- Global View
- ROI (Region of Interest)
- Digital Zoom In
- Snapshot Zoomed In Image
- PiP Settings
- How to Configure Video Enhancement
- Apply a Preset Defog Profile
- Create a New Defog Profile
- How to Search for a Device on the Hierarchical Device Tree
- How to Lock LiveClient for Security Concerns
- How to Log out from the VAST Server
- How to Exit VAST LiveClient
- Lauch Playback
- Second View
- Chapter Three NVR Playback Configuration
- Activating VAST Playback and Logging in to a Server
- VAST Playback User Interface
- How to Playback Recorded Video
- How to Change the Playback Layout
- Switch Video Channels
- Layout Mode
- How to Backup Recorded Video
- How to Search for a Video Clip Taken at a Specific Time
- How to Add a Bookmark
- How to Search for Events
- Event Category- All Events
- Event Category- All Motion Events
- Event Category- All IVA events
- Event Category- All DI Events
- Event Category- Named DI Events
- How to Search for a Bookmark
- How to Search Logs
- Search All Local Logs
- Search Login History
- Search Login Activities
- How to Configure Client Settings
- System Settings
- Display Settings
- How to Configure Video Enhancement
- How to Search for a Device on the Hierarchical Management Tree
- How to Lock VAST Playback for Security Concerns
- How to Log out from the VAST Server
- How to Exit VAST Playback
- Chapter Four Auxiliary Utilities
- Appendix Rebuilding a RAID Volume
- Appendix B ONVIF Support
VIVOTEK
User's Manual - 31
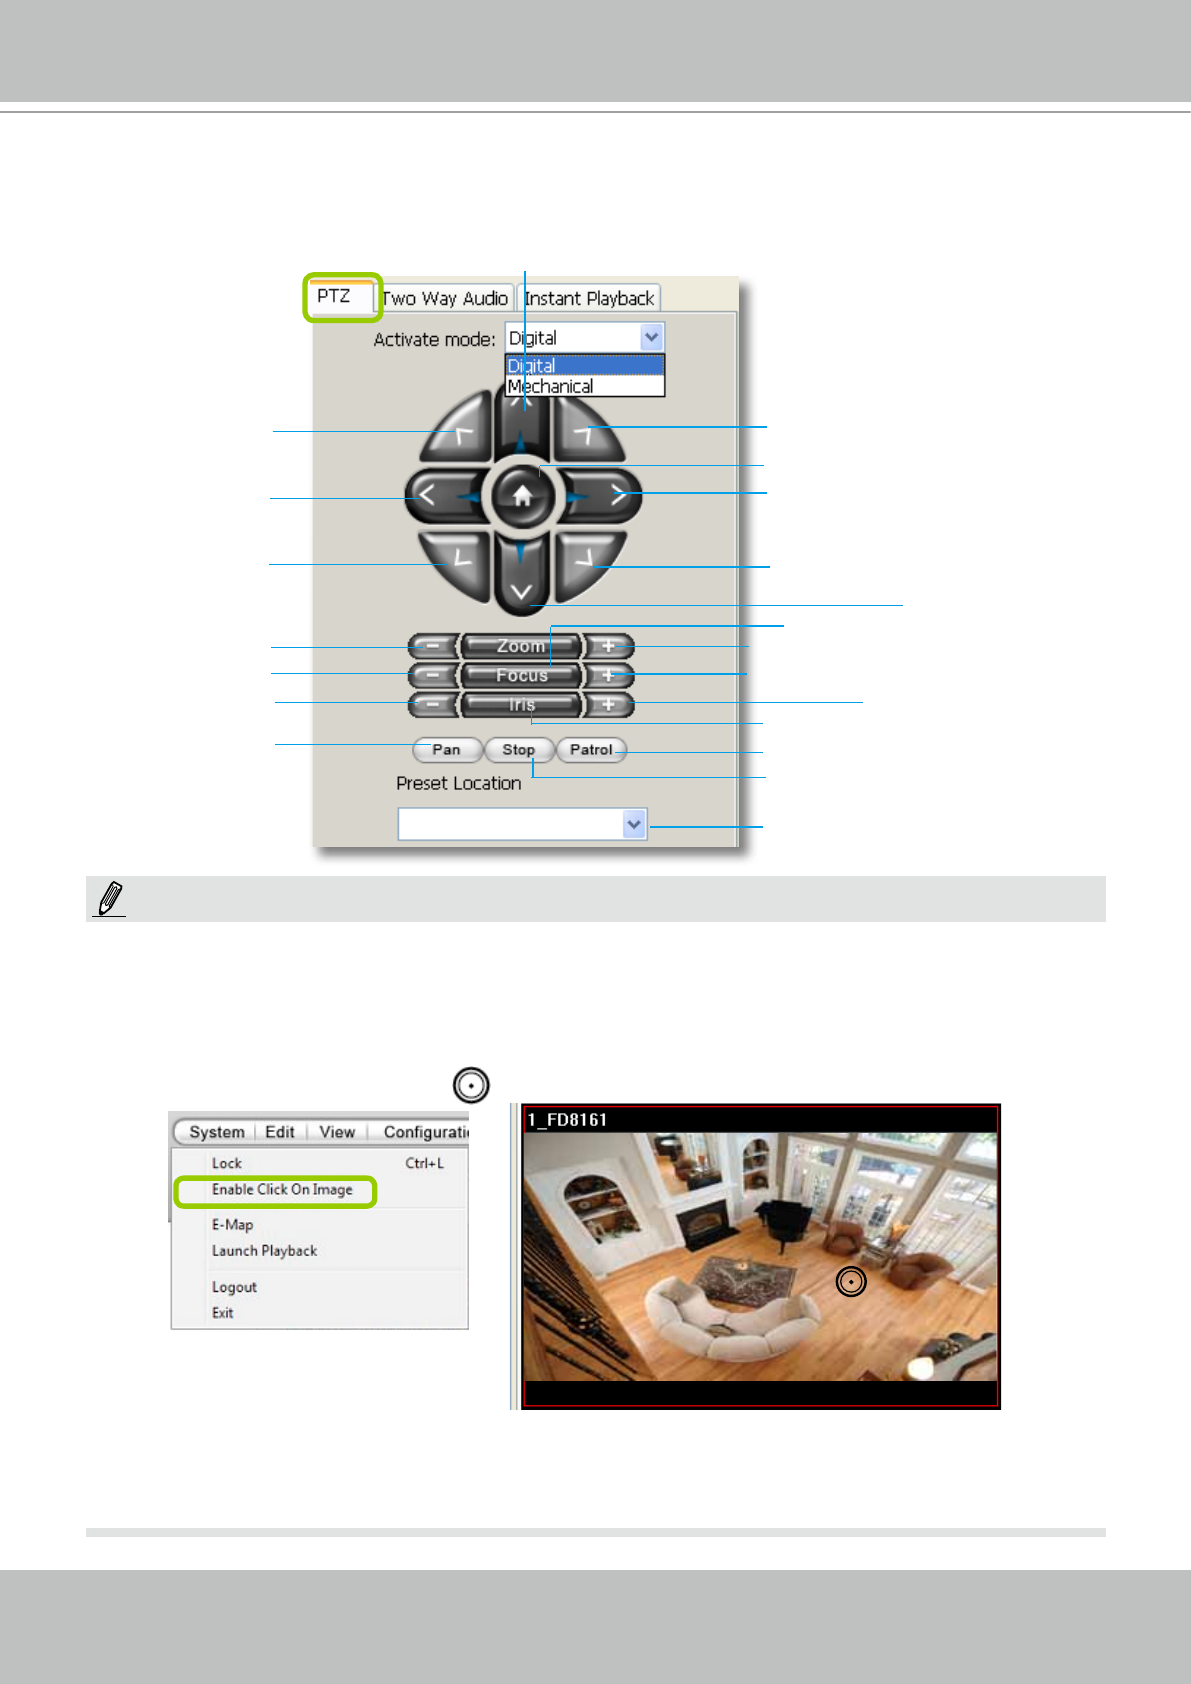
Camera Control Panel
Pan/Tilt/Zoom (PTZ) Control Panel
There are two types of PTZ control: Digital (E-PTZ for megapixel cameras) and Mechanical (PTZ cameras or
fixed cameras with camera control via RS-485). If the connected cameras support PTZ/E-PTZ function, the
PTZ option(s) will appear on the drop-down list. For detailed camera control settings, please refer to the user's
manual of VIVOTEK network camera .
Click System > Enable Click On Image to use the mouse for the control of the PTZ and e-PTZ functions in the
video cells for linked cameras. An icon
will appear in the video cell as shown below.
You can control the PTZ function through a joystick as well. For more information regarding to the joystick
conguration, please refer to instructions on page 139.
T
op left
Left
Bottom left
Focus near
Close
Start to auto pan
Zoom out
Up
Return to home position
Bottom right
Right
Top right
Down
Focus far
Zoom in
Open
Start to auto patrol
Stop auto panning/patrolling
Drop-down list of preset positions
Auto focus
Auto iris
2012/12/10 17:08:56
NOTE: