
Manual
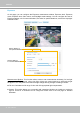
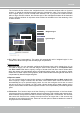
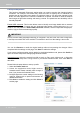
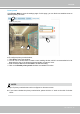
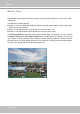
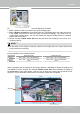
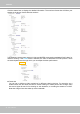

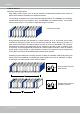
Table Of Contents
- Overview
- Ready to Use
- Software Installation
- Accessing the Network Camera
- Using VIVOTEK Recording Software
- Using 3GPP-compatible Mobile Devices
- Using RTSP Players
- Main Page
- Client Settings
- Configuration
- System > General settings
- System > Homepage layout
- System > Logs
- System > Parameters
- System > Maintenance
- Media > Image
- Media > Video
- Media > Video
- Media > Audio
- Network > General settings
- Network > Streaming protocols
- Network > SNMP (Simple Network Management Protocol)
- Network > FTP
- Security > User accounts
- Security > HTTPS (Hypertext Transfer Protocol over SSL)
- Security > Access List
- PTZ > PTZ settings
- Event > Event settings
- Applications > Motion detection
- Applications > Tampering detection
- Applications > Audio detection
- Applications > Package management - a.k.a., VADP (VIVOTEK Application Development Platform)
- Recording > Recording settings
- Local storage > SD card management
- Local storage > Content management
- Appendix

VIVOTEK
54 - User's Manual
Please follow the steps below to set up a prole:
1. Select the Prole mode tab.
2. Select the applicable mode: Night mode or
Schedule mode. Please manually enter a range of
time if you choose the Schedule mode.
3. Congure Exposure control settings in the folowing
columns. Please refer to previous dicussions for
detailed information.
4. Click Save to enable the setting and click Close to
exit the page.
You can click Restore to recall the original settings without incorporating the changes. When
completed with the settings on this page, click Save to enable the settings.
If you want to congure another sensor setting for day/night/schedule mode, please click Prole to
open the Prole of exposure settings page as shown below.
Activated period:
Select the mode this profile to apply to: Day mode, Night mode, or Schedule
mode. Please manually enter a range of time if you choose Schedule mode. Then check Save to
take effect.
Enable WDR enhanced:
This function allows users to identify more image details with an extreme
contrast from an object of interest with one shadowed side against a bright background, e.g., an
entrance. You may select the Enable WDR enhanced checkbox, and then adjust the strength (low,
medium, high) to reach the best image quality.
■
AE Speed Adjustment:
This function (Automatic Exposure) applies when you need to monitor fast changing lighting
conditions. For example, the camera may need to monitor a highway lane or entrance of a
parking area at night where cars passing by with their lights on can bring fast changes in light
levels. The same applies if the camera is installed on a vehicle, and when it needs to adapt to
fast changes of light when entering and leaving a tunnel. The speed level and sensitivity can be
manually adjusted.
If the IR cut lter setting (Day/Night switching) is congured in the Auto mode, the Prole conguration
in the Exposure window will not be available. The default for the IR cut lter settting is Auto mode.
IMPORTANT: