
User Manual


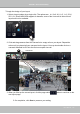


Table Of Contents
- Chapter One Hardware Installation and Initial Configuration
- Section One
- Management over a
- Local Console
- Chapter Two
- Introduction to the Local Console Interface
- Chapter Three
- Configuation Using the Local Console
- The Main Control Portal
- 3-2-1. Time Search
- 3-2-2. Alarm Search
- 3-2-3. POS Search
- 3-2-4. Storyboard
- 3-4-1. Settings - Overview
- 3-4-2. Settings - Camera - Management
- 3-4-3. Settings - Camera - Recording
- 3-4-4. Settings - Camera - Media
- 3-4-5. Settings - Camera - Image
- 3-4-6. Settings - Camera - Motion Detection
- 3-4-7. Settings - Camera - PTZ settings
- 3-4-8. Settings - Alarm - Alarm
- 3-4-9. Settings - Alarm - Email
- 3-4-10. Settings - System - Information
- 3-4-11. Settings - System - Maintenance
- 3-4-12. Settings - System - Display
- 3-4-13. Settings - System - UPS
- 3-4-14. Settings - System - Log
- 3-4-15. Settings - System - VIVOCloud service
- 3-4-16. Settings - User
- 3-4-17. Settings - Storage
- 3-4-18. Settings - Storage - Scheduled backup
- 3-4-19. Settings - Network
- Settings - Network - Connection mode
- Settings - Network - IP
- Settings - DDNS
- Settings - Service
- Section Two
- Management over a Web Console
- Chapter Four Login and Getting Started
- 4-1. Login
- 4-2. Graphical Layout and Screen Elements - Liveview
- 4-2-4. Logo & Menu
- 4-2-5. View Cell panel
- 4-2-6. PTZ panel
- Adding Cameras to View Cells
- 4-2-7. Alarm panel
- 4-3. Graphical Layout and Screen Elements - Search recording clips
- 4-3-4. View Cells in Search Recording Clips
- 4-3-6. Calendar Panel
- 4-3-5. Alarm Panel
- Search Recording Clips Control Panel
- Chapter Five System Settings
- Chapter Six Operation
- Technical Specifications
- Safety and Compatibility

VIVOTEK - Built with Reliability
154 - User's Manual
Chapter Six Operation
6-1. Liveview
Legends and denitions of icons on the layout panel have been described on page 127.
6-1-1. Placing Cameras into the Layout
It is presumed that you have properly inserted all network cameras in your deployment as
previously described on page 64. All 8 cameras should be listed on the Camera list.
Please note that ND8312 supports 8 channels, the ND8212W 4 channels.
Camera list
Layout
Layout
contents
1. Before operating the NVR, make sure you have properly installed hard drives and congured
the storage volumes. Otherwise, you will not be able to operate most of the system's
functionality.
2. Since the NVR system comes with 32-bit plug-ins for screen control, if your PC runs a default
64-bit IE browser and you manually enter the NVR's address on the browser, your browser
session may malfunction. Instead, if you double-click on the discovered NVR on the Shepherd
or IW2 utility, a 32-bit IE browser will open.
Note that layout design can only be performed by the system administrator.
IMPORTANT: