
User Manual
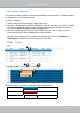
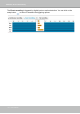


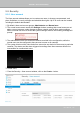
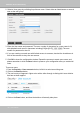
Table Of Contents
- Chapter One Hardware Installation and Initial Configuration
- Section One
- Management over a
- Local Console
- Chapter Two
- Introduction to the Local Console Interface
- Chapter Three
- Configuation Using the Local Console
- The Main Control Portal
- 3-3-1. Basic Search
- 3-3-2. Advanced Search
- 3-3-3. Storyboard
- 3-4-1. Settings - Overview
- 3-4-2. Settings - Camera - Management
- 3-4-3. Settings - Camera - Recording
- 3-4-4. Settings - Camera - Media
- 3-4-5. Settings - Camera - Image
- 3-4-6. Settings - Camera - Motion Detection
- 3-4-7. Settings - Camera - PTZ settings
- 3-4-8. Settings - Alarm - Alarm
- 3-4-9. Settings - Alarm - Email
- 3-4-10. Settings - System - Information
- 3-4-11. Settings - System - Maintenance
- 3-4-12. Settings - System - Display
- 3-4-13. Settings - System - UPS
- 3-4-14. Settings - System - Log
- 3-4-15. Settings - System - EZConnect service
- 3-4-16. Settings - User
- 3-4-17. Settings - Storage
- 3-4-17. Settings - Network
- Settings - Network - IP
- Settings - DDNS
- Settings - Service
- Section Two
- Management over a Web Console
- Chapter Four Login and Getting Started
- Chapter Five System Settings
- Chapter Six Operation
- Technical Specifications
- Safety and Compatibility

VIVOTEK - Built with Reliability
User's Manual - 151
The camera recording schedule can be congured down to an hourly basis. The default settings
for cameras is to record videos at all time.
To set up a schedule,
1. Select a camera from the list using a single mouse click,
2. By default, all days and hours will be selected for continuous recording. If you want to disable
recording for specic time during a week, or enable event-triggered recording during some
time, use the Event recording and No recording buttons.
3. Use them as a paint brush or eraser on the weekly time chart. Click or drag your mouse
cursor across the time chart to change the recording schedule.
Change a non-recording hour to continuous recording by one click on the Continuous
recording button and then click and/or drag on the time chart.
5-3-4. Camera - Schedule
1
2
3
- or -
The color codes for the display on the time chart are shown below:
Continuous recording
Event recording
No recording