
User Manual


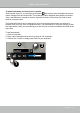

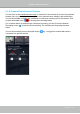


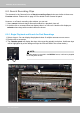

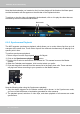
Table Of Contents
- Chapter One Hardware Installation and Initial Configuration
- Section One
- Management over a
- Local Console
- Chapter Two
- Introduction to the Local Console Interface
- Chapter Three
- Configuation Using the Local Console
- The Main Control Portal
- 3-3-1. Basic Search
- 3-3-2. Advanced Search
- 3-3-3. Storyboard
- 3-4-1. Settings - Overview
- 3-4-2. Settings - Camera - Management
- 3-4-3. Settings - Camera - Recording
- 3-4-4. Settings - Camera - Media
- 3-4-5. Settings - Camera - Image
- 3-4-6. Settings - Camera - Motion Detection
- 3-4-7. Settings - Camera - PTZ settings
- 3-4-8. Settings - Alarm - Alarm
- 3-4-9. Settings - Alarm - Email
- 3-4-10. Settings - System - Information
- 3-4-11. Settings - System - Maintenance
- 3-4-12. Settings - System - Display
- 3-4-13. Settings - System - UPS
- 3-4-14. Settings - System - Log
- 3-4-15. Settings - System - EZConnect service
- 3-4-16. Settings - User
- 3-4-17. Settings - Storage
- 3-4-17. Settings - Network
- Settings - Network - IP
- Settings - DDNS
- Settings - Service
- Section Two
- Management over a Web Console
- Chapter Four Login and Getting Started
- Chapter Five System Settings
- Chapter Six Operation
- Technical Specifications
- Safety and Compatibility

VIVOTEK - Built with Reliability
190 - User's Manual
Note that the bookmarks you inserted on the Liveview window will be listed on the Alarm panel,
and the bookmarks will also appear on the slide bar of the Playback window.
To retrieve or view the video clip tagged by the bookmark, click on it to play the video that was
recorded by the time bookmark was inserted.
Bookmarks
6-2-3. Synchronous Playback
The NVR supports synchronous playback, which allows you to review video clips from up to 4
cameras at the same time. These video clips will be retrieved simultaneously all playing for a
specic point in time.
To perform synchronous playback:
1. Select a layout from the Layout panel, e.g., a 2x2 layout.
2. Click on the Synchronous playback
button.
3. Double-click to select a camera from the camera list. This camera becomes the Master
camera.
4. When the Calendar panel appears, click to select a date you prefer.
5. Click and drag other cameras from the camera list to the empty view cells. These cameras
will play back videos according to your operation on the Master camera.
1
2
Note the following when using the Synchronous playback:
1. Only the alarms triggered on the Master camera will be shown. In the Synchronous mode,
you can not nd the alarms or bookmarks generated for other cameras.
2. The playback speed, selection of video clips, and alarm playback of all cameras are made
synchronous.