
User Manual
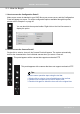
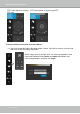
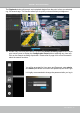
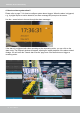
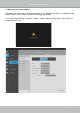
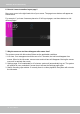
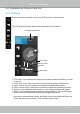
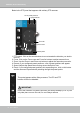
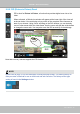

Table Of Contents
- Chapter One Hardware Installation and Initial Configuration
- Section One
- Management over a
- Local Console
- Chapter Two
- Introduction to the Local Console Interface
- Chapter Three
- Configuation Using the Local Console
- The Main Control Portal
- 3-3-1. Basic Search
- 3-3-2. Advanced Search
- 3-3-3. Storyboard
- 3-4-1. Settings - Overview
- 3-4-2. Settings - Camera - Management
- 3-4-3. Settings - Camera - Recording
- 3-4-4. Settings - Camera - Media
- 3-4-5. Settings - Camera - Image
- 3-4-6. Settings - Camera - Motion Detection
- 3-4-7. Settings - Camera - PTZ settings
- 3-4-8. Settings - Alarm - Alarm
- 3-4-9. Settings - Alarm - Email
- 3-4-10. Settings - System - Information
- 3-4-11. Settings - System - Maintenance
- 3-4-12. Settings - System - Display
- 3-4-13. Settings - System - UPS
- 3-4-14. Settings - System - Log
- 3-4-15. Settings - System - EZConnect service
- 3-4-16. Settings - User
- 3-4-17. Settings - Storage
- 3-4-17. Settings - Network
- Settings - Network - IP
- Settings - DDNS
- Settings - Service
- Section Two
- Management over a Web Console
- Chapter Four Login and Getting Started
- Chapter Five System Settings
- Chapter Six Operation
- Technical Specifications
- Safety and Compatibility

VIVOTEK - Built with Reliability
38 - User's Manual
List of preset positions
Focus far
Focus near
Starts patrol
Zoom out
Zoom in
Speed selector
1. PTZ control: Click on the arrow buttons to move towards the direction you wish to
move to.
2. Focus: Click on the Focus near and Focus far buttons to adjust camera focus.
3. Zoom: Use the Zoom in and Zoom out buttons to adjust the camera's zoom ratio.
4. Presets: If you congured preset positions, a list of preset positions will appear.
5. Speed: Adjusts the speed when moving across the eld of view.
6. Patrol: If you congured preset positions into a patrolling tour, click on this button
and the camera will proceed with patrolling through the preset points.
Below is the PTZ panel that appears with ordinary PTZ cameras.
This portal appears with a sheye camera. The PiP and PTZ
buttons will then be disabled.
Due to the limitation of system resources, the sheye dewarp (1R & 1P) can
only take place on one view cell, for one sheye camera.
IMPORTANT: