
User Manual


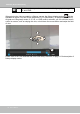

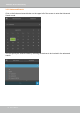


Table Of Contents
- Chapter One Hardware Installation and Initial Configuration
- Section One
- Management over a
- Local Console
- Chapter Two
- Introduction to the Local Console Interface
- Chapter Three
- Configuation Using the Local Console
- The Main Control Portal
- 3-3-1. Basic Search
- 3-3-2. Advanced Search
- 3-3-3. Storyboard
- 3-4-1. Settings - Overview
- 3-4-2. Settings - Camera - Management
- 3-4-3. Settings - Camera - Recording
- 3-4-4. Settings - Camera - Media
- 3-4-5. Settings - Camera - Image
- 3-4-6. Settings - Camera - Motion Detection
- 3-4-7. Settings - Camera - PTZ settings
- 3-4-8. Settings - Alarm - Alarm
- 3-4-9. Settings - Alarm - Email
- 3-4-10. Settings - System - Information
- 3-4-11. Settings - System - Maintenance
- 3-4-12. Settings - System - Display
- 3-4-13. Settings - System - UPS
- 3-4-14. Settings - System - Log
- 3-4-15. Settings - System - EZConnect service
- 3-4-16. Settings - User
- 3-4-17. Settings - Storage
- 3-4-17. Settings - Network
- Settings - Network - IP
- Settings - DDNS
- Settings - Service
- Section Two
- Management over a Web Console
- Chapter Four Login and Getting Started
- Chapter Five System Settings
- Chapter Six Operation
- Technical Specifications
- Safety and Compatibility

VIVOTEK - Built with Reliability
User's Manual - 47
Note that to export a video segment from the playback timeline,
1. Click on the Export button ,
2. Insert a USB drive formatted in the FAT format.
3. Select the "From time" by clicking on the timeline. You can also manually enter the
"From time" and the "To time."
4. Click on the "From time" tab using a single click.
5. Repeat steps 3 and 4 to congure the To time.
6. Click on the Export button.
1
2
The export process is indicated on the right. Depending on the length of footage to be
exported, this process can take minutes.
When completed, a message will display on screen.
The default for export is 5 minutes before and 5 minutes after the point in time that is
currently selected.