
User Manual


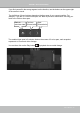
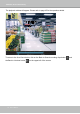

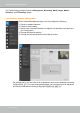


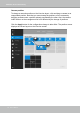
Table Of Contents
- Chapter One Hardware Installation and Initial Configuration
- Section One
- Management over a
- Local Console
- Chapter Two
- Introduction to the Local Console Interface
- Chapter Three
- Configuation Using the Local Console
- The Main Control Portal
- 3-3-1. Basic Search
- 3-3-2. Advanced Search
- 3-3-3. Storyboard
- 3-4-1. Settings - Overview
- 3-4-2. Settings - Camera - Management
- 3-4-3. Settings - Camera - Recording
- 3-4-4. Settings - Camera - Media
- 3-4-5. Settings - Camera - Image
- 3-4-6. Settings - Camera - Motion Detection
- 3-4-7. Settings - Camera - PTZ settings
- 3-4-8. Settings - Alarm - Alarm
- 3-4-9. Settings - Alarm - Email
- 3-4-10. Settings - System - Information
- 3-4-11. Settings - System - Maintenance
- 3-4-12. Settings - System - Display
- 3-4-13. Settings - System - UPS
- 3-4-14. Settings - System - Log
- 3-4-15. Settings - System - EZConnect service
- 3-4-16. Settings - User
- 3-4-17. Settings - Storage
- 3-4-17. Settings - Network
- Settings - Network - IP
- Settings - DDNS
- Settings - Service
- Section Two
- Management over a Web Console
- Chapter Four Login and Getting Started
- Chapter Five System Settings
- Chapter Six Operation
- Technical Specifications
- Safety and Compatibility

VIVOTEK - Built with Reliability
User's Manual - 55
3-4. Settings
Click the Settings button to start the camera and system settings window. A
conrm box will prompt. Enter User name and Password to proceed.
The system will default to the overview page displaying the camera connection and
storage statuses. An empty position will be left in blank, and a disconnected camera will
be indicated as
. The storage volume usage is displayed as the used and unused
spaces.
The Stop Buzzer, Reboot, and Power-down buttons are also available on this page.
There are critical conditions that can sound the system buzzer, such as a disk failure.
3-4-1. Settings - Overview