
User Manual
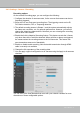

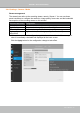


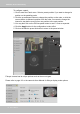
Table Of Contents
- Chapter One Hardware Installation and Initial Configuration
- Section One
- Management over a
- Local Console
- Chapter Two
- Introduction to the Local Console Interface
- Chapter Three
- Configuation Using the Local Console
- The Main Control Portal
- 3-3-1. Basic Search
- 3-3-2. Advanced Search
- 3-3-3. Storyboard
- 3-4-1. Settings - Overview
- 3-4-2. Settings - Camera - Management
- 3-4-3. Settings - Camera - Recording
- 3-4-4. Settings - Camera - Media
- 3-4-5. Settings - Camera - Image
- 3-4-6. Settings - Camera - Motion Detection
- 3-4-7. Settings - Camera - PTZ settings
- 3-4-8. Settings - Alarm - Alarm
- 3-4-9. Settings - Alarm - Email
- 3-4-10. Settings - System - Information
- 3-4-11. Settings - System - Maintenance
- 3-4-12. Settings - System - Display
- 3-4-13. Settings - System - UPS
- 3-4-14. Settings - System - Log
- 3-4-15. Settings - System - EZConnect service
- 3-4-16. Settings - User
- 3-4-17. Settings - Storage
- 3-4-17. Settings - Network
- Settings - Network - IP
- Settings - DDNS
- Settings - Service
- Section Two
- Management over a Web Console
- Chapter Four Login and Getting Started
- Chapter Five System Settings
- Chapter Six Operation
- Technical Specifications
- Safety and Compatibility

VIVOTEK - Built with Reliability
User's Manual - 61
Recording options
On the camera Recording page, you can congure the following:
1. Congure the duration of camera events, for the concern that camera can be too
frequently triggered.
2. Enter the Pre- and Post-event recording time. The triggering events can be DI,
DO, Motion detection, PIR, or Tampering detection.
3. The default recording stream is Stream 1, and the system automatically adjusts
the frame rate, resolution, etc. for optimum performance. However, you can still
change the streaming characteristics. Note that you can not assign the recording
task to other video stream.
4. Enable the Activity Adaptive Streaming feature. This feature records the I-frames
only when there are no activities detected. When activities or alarm are triggered,
the camera raises the recording stream to the full frame rate. This feature can
save tremendous ammount of bandwidth.
5. Enable or disable audio recording. Note that audio transmission through HDMI
cable is currently not available.
6. Change the life expectancy of the recording data.
7. You can apply a typical conguration to all cameras using the Apply to all cameras
checkbox.
3-4-3. Settings - Camera - Recording
You can refer to the User Manuals that come with your network cameras for more
discussions of these congurable options.