
User Manual
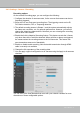

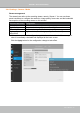

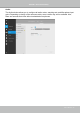
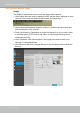


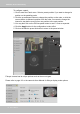
Table Of Contents
- Chapter One Hardware Installation and Initial Configuration
- Section One
- Management over a
- Local Console
- Chapter Two
- Introduction to the Local Console Interface
- Chapter Three
- Configuation Using the Local Console
- The Main Control Portal
- 3-3-1. Basic Search
- 3-3-2. Advanced Search
- 3-3-3. Storyboard
- 3-4-1. Settings - Overview
- 3-4-2. Settings - Camera - Management
- 3-4-3. Settings - Camera - Recording
- 3-4-4. Settings - Camera - Media
- 3-4-5. Settings - Camera - Image
- 3-4-6. Settings - Camera - Motion Detection
- 3-4-7. Settings - Camera - PTZ settings
- 3-4-8. Settings - Alarm - Alarm
- 3-4-9. Settings - Alarm - Email
- 3-4-10. Settings - System - Information
- 3-4-11. Settings - System - Maintenance
- 3-4-12. Settings - System - Display
- 3-4-13. Settings - System - UPS
- 3-4-14. Settings - System - Log
- 3-4-15. Settings - System - EZConnect service
- 3-4-16. Settings - User
- 3-4-17. Settings - Storage
- 3-4-17. Settings - Network
- Settings - Network - IP
- Settings - DDNS
- Settings - Service
- Section Two
- Management over a Web Console
- Chapter Four Login and Getting Started
- Chapter Five System Settings
- Chapter Six Operation
- Technical Specifications
- Safety and Compatibility

VIVOTEK - Built with Reliability
62 - User's Manual
Recording Schedule
By default, all video feeds from cameras are recorded at all time. You can modify the recording
task using the schedule tool:
1. Click to select a recording condition's checkbox - 1. Continuous recording
, Event
recording
, and 3. Clear (no recording).
2. Click and drag on the cells on the time table. For example, to stop the recording during a
period of time, select the the Clear checkbox and move the cursor across the time table. The
minimum unit on the table is half an hour.
3. You may also use the scheduler tool on the right to facilitate the process. You can select a
condition checkbox, and then select the All day, Work hour, Off duty, Working day, Weekend
options to apply a time selection.
4. Repeat the process on individual cameras or select the Apply to all checkbox if the schedule
can apply to all cameras.
5. When done with the conguration,
click on the Apply button.
Note that Event-triggered
recording and continuous
recording can not be take place
at the same time.