Free-bundled
Table of Contents Getting Started �����������������������������������������������������������������������������������2 Minimum system requirements �����������������������������������������������������2 ST7501 Installation �����������������������������������������������������������������������������3 Installing the ST7501 software ������������������������������������������������������3 ST7501 LiveClient Configuration ��������������������������������������������������������4 Activating ST7501 LiveClient ����
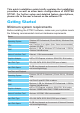
This quick installation guide briefly explains the installation procedure as well as some basic configurations of VIVOTEK ST7501. For further setup and detailed feature descriptions, please refer to the user's manual on the software CD. Getting Started Minimum system requirements Before installing the ST7501 software, make sure your system meets the following recommended minimum hardware requirements.
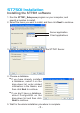
ST7501 Installation Installing the ST7501 software 1. Run the ST7501_Setup.exe program on your computer, and specify a location to install. 2. Select the items you want to install, and then click Next to continue. Server application Client applications 3. Assign a username and password for the ST7501 Server. 4. Choose a database. If you have already installed a database, select it on the drop-down list, enter related information in the blanks, and then click Next to continue.
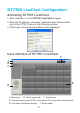
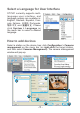
ST7501 LiveClient Configuration Activating ST7501 LiveClient 1. After installation, run the ST7501 LiveClient program. 2. Enter the IP address, username, password and communication port of the ST7501 Server in the following window. 3. Click Login, the monitoring window will be displayed. User interface of ST7501 LiveClient F A B C E D A. Menu bar B. Quick access bar C. Device tree D. Camera control panel (PTZ control panel / Two way Audio control panel) E. Live video monitoring window F.
Select a Language for User Interface ST7501 currently supports multilanguage user interface, and language options are availabe in: English, Deutsch, Español, Français, Italiano, 日本語, Português, 簡体中文 and 繁體中文 . Please click System > Language on the menu bar to select a desired language. How to add devices Select a station on the device tree; click Configuration > Cameras management on the menu bar (or right-click the target station, and then select Cameras Management).
a. Enter the device's IP address and Camera Name (Use Name and Password if necessary), then click Detect Model to detect the camera/video server. b. The model name and MAC address of the device will show up in the blanks if the connection is successful. Specify the channel index for multi-channel video server; specify the recommended monitoring and recording stream for camera. c. You can also click Search Camera to search for a list of cameras/video servers in the same LAN. d.
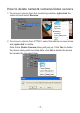
How to delete network cameras/video servers 1. To remove a device from the monitoring window, right-click the video cell and select Remove. 2. To remove a device from ST7501, select the device on device tree and right-click to delete. Note that a Delete Camera dialog will pop up. Click Yes to delete the device along with recorded data; click No to delete the device but remain the recorded data.
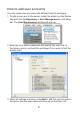
How to add user accounts You can create user accounts with different level of privileges. 1. To add a new user to the server, select the station on the Device tree and click Configuration > User Management on the Menu bar. The User Management window will pop up. 2. Enter the user name, password and specify the user role. In the below column, uncheck the privileges if you want to limit the access right. 3.
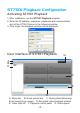
ST7501 Playback Configuration Activating ST7501 Playback 1. After installation, run the ST7501 Playback program. 2. Enter the IP address, username, password and communication port of the ST7501 Server in the following window. 3. Click Login, the playback window will be displayed. User interface of ST7501 Playback G A B C D F E A. Menu bar B. Quick access bar C. Query panel (Browsing/ Event search/Log viewer) D. Recorded video playback window E. Video clips list F. Playback control panel G.
How to view recorded videos Please follow the steps below to select a video clip: 1. In the ST7501 Playback window, click the plus sign (+) to expand the device tree. 2. Right-click a device and click Refresh to reveal the recorded video. If you want to update all video clips of a station, click the station on the device tree and Refresh it.
3. The recorded videos will be listed on the video clip list. Select one and then drag-and-drop it to one of the video cells. 4. If you want to review all clips recored on the same date, select a date and then drag-and-drop it to one of the video cells. 5. To remove a video clip from the video viewing window, right-click on the video cell and select Remove.
Free-bundled