VIZIO VU37L HDTV10A User Manual Dear VIZIO Customer, Congratulations on your new VIZIO VU37L HDTV10A High Definition LCD Television purchase. Thank you for your support. For maximum benefit of your set, please read these instructions before making any adjustments, and retain them for future reference. We hope you will experience many years of enjoyment from your new VIZIO VU37L HDTV10A High Definition Television. For assistance, please call (877)-698-4946 or email us at techsupport@vizio.com.
VIZIO VU37L HDTV10A User Manual THIS PRODUCT HAS BEEN DESIGNED AND TESTED FOR COMPLIANCE WITH REGULATORY SAFETY CERTIFICATIONS This product is designed and manufactured to operate within defined design limits, and misuse may result in electric shock or fire. To prevent the product from being damaged, the following rules should be observed for the installation, use and maintenance of the product. Read the following safety instructions before operating the display.
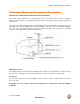
VIZIO VU37L HDTV10A User Manual Television Antenna Connection Protection External Television Television Antenna Grounding If an outside antenna/satellite dish or cable system is to be connected to the TV, make sure that the antenna or cable system is electrically grounded to provide some protection against voltage surges and static charges.
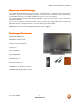
VIZIO VU37L HDTV10A User Manual Opening the Package Your VIZIO VU37L HDTV10A and accessories are carefully packed in a cardboard carton that has been designed to protect it from transportation damage. Now you have opened the carton check that the VU37L HDTV10A is in good condition and that all of the accessories are included. The VU37L HDTV10A weighs approximately 40lb and is about 37” wide; please exercise care when unpacking the HDTV.
VIZIO VU37L HDTV10A User Manual Additional Certified Accessories for the VIZIO VU37L HDTV10A are sold separately Wall Mounts High Definition Cables Extra or replacement Remote VIZIO also offers Installation Services and Extended Warranty Services for your VIZIO VU37L HDTV10A To purchase or inquire about additional accessories and services for your VIZIO product, visit our web site at www.VIZIO.
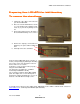
VIZIO VU37L HDTV10A User Manual Preparing Your LCD HDTV for Wall Mounting To remove the stand base 1. Unplug all of the cables and cords from your VU37L HDTV10A. 2. Place the VU37L HDTV10A face down on a soft and flat surface (blanket, foam, cloth, etc) to prevent any damage to the TV. 3. Push up the plastic panel on the back of the stand and lift it away once to release. 4. Remove the eight (8) screws that were hidden by the panel, while holding the base. 5. Carefully remove the stand base.
VIZIO VU37L HDTV10A User Manual Table of Contents Chapter 1 Basic Controls and Connections ................................................................ ................................................................. ................................. 9 1.1 Front Panel..........................................................................................................................................................9 1.2 Side Panel Controls...........................................................
VIZIO VU37L HDTV10A User Manual 4.4.2 Auto Search...............................................................................................................................................46 4.4.3 Partial Channel Search..............................................................................................................................47 4.4.4 Skip Channel .............................................................................................................................................
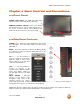
VIZIO VU37L HDTV10A User Manual Chapter 1 Basic Controls and Connections 1.1 Front Panel POWER ‘VIZIO’ LIGHT– The VIZIO name lights white when powered on and orange when powered off. REMOTE CONTROL SENSOR – This is the window through which all of the remote control signals pass to the sensor. Point the remote control directly at this window for the best response to the remote signal. 1.2 Side Panel Controls POWER ( ) – Switch the VU37L HDTV10A on by pressing the button once.
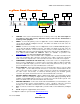
VIZIO VU37L HDTV10A User Manual 1.3 Rear Panel Connections 3 1 2 4 5 6 8 9 10 7 SERVICE – This custom communication port is for factory service only. Use of this input for any purpose other than factory authorized service will void the manufacturer’s warranty of this equipment. 2. HDMI 1 – Connect the primary source for digital video such as a DVD multimedia player or set top box through this all digital connector. The white color band on the rear of the TV indicates this connection. 3.
VIZIO VU37L HDTV10A User Manual 1.4 RightRight-Side Panel Connection 1. HEADPHONE – Connect your headphone here for 1 personalized listening without disturbing others. 2. AV2 – Connect the secondary source for composite video devices, such as a VCR or video game. Use the white and red connectors to connect the external audio from the same source, then use the yellow connector to connect the external video from the same source. The orange color band on the side of the TV indicates this connection.
VIZIO VU37L HDTV10A User Manual 1.5 VIZIO Remote Control GUIDE – This button displays program information. Press this button once and the information of the program being viewed is shown. Press it a second time and the Electronic Programming Guide will appear in the screen. POWER – Press this button to turn the TV on from the Standby mode. Press it again to return to the Standby mode. TV – Press this button to select TV. AV – Press this button to select the Audio Video input.
VIZIO VU37L HDTV10A User Manual 1.5.1 Insertion of Batteries in the Remote Control Insert two AA batteries into the remote control. Make sure that you match the (+) and (-) symbols on the batteries with the (+) and (-) symbols inside the battery compartment. Re-attach the battery cover. Precautionary Tips for Inserting the Batteries: Only use the specified AA batteries. Do not mix new and old batteries. This may result in cracking or leakage that may pose a fire risk or lead to personal injury.
VIZIO VU37L HDTV10A User Manual Chapter 2 Connecting Equipment 2.1 Which Video Connection Should I Use? Use? The VIZIO VU37L HDTV10A has six different ways to connect your video equipment from a basic connection to the most advanced for digital displays.
VIZIO VU37L HDTV10A User Manual 2.2 Connecting Coaxial (RF) 2.2.1 Using Your Antenna or Digital Cable for DTV 1. 2. 3. 4. Turn off the power to the HDTV. Connect the coaxial (RF) connector from your antenna or digital cable (out-of-the-wall, not from the Cable Box) to the DTV/TV CABLE/ANTENNA connector on the rear of the HDTV. Turn on the power to the HDTV. Select DTV using the INPUT button on the remote or side of the HDTV, or directly by pressing the TV button on the Remote Control.
VIZIO VU37L HDTV10A User Manual 2.3 Connecting Your HDTV SetSet-Top Box 2.3.1 Using HDMI Input HDTV Set-Top Boxes that have a HDMI digital interface should be connected to the HDMI input of the LCD HDTV for optimal results. Note: To maintain the display quality, use a VIZIO certified HDMI cable that is 10 meters. See www.vizioce.com or call 1-888-VIZIOCE (1-888-849-4623) for details. Connecting your HDTV SetSet - Top Box (Best): (Best): 1. 2. 3. 4. Turn off the power to the HDTV and HDTV Set-Top Box.
VIZIO VU37L HDTV10A User Manual For HDTV SetSet - Top Boxes with DVI: DVI: 1. 2. 3. 4. 5. Turn off the power to the HDTV and HDTV Set-Top Box. Using a HDMI-DVI cable, connect the DVI end to your HDTV Set-Top Box and the HDMI end to the HDMI 2 Input (white color area) at the rear of the HDTV.
VIZIO VU37L HDTV10A User Manual 2.3.2 Using Component Video Connecting your HDTV SetSet - Top Box (Better): (Better): 1. 2. 3. 4. 5. 6. 7. Turn off the power to the HDTV and HDTV Set-Top Box. Connect the Y (green color) connector on your HDTV Set-Top Box to the corresponding Y (green color) connector in the Component1 group (green color area - row of connectors nearest to you when viewing from the rear of the TV) at the rear of the HDTV.
VIZIO VU37L HDTV10A User Manual 2.4 Connecting Your Basic SetSet-Top Box 2.4.1 Using Composite Video 1. 2. 3. 4. 5. Turn off the power to the HDTV and Set-Top Box. Using the AV Cable, connect the Video (yellow color) connector on your Set-Top Box to the corresponding Video (yellow color) connector in the AV1 input (yellow color area) at the rear of the HDTV.
VIZIO VU37L HDTV10A User Manual 2.5 Connecting Your DVD Player You have several options for connecting your DVD player to your VU37L HDTV10A; HDMI, Component, AV (S-Video or Composite) inputs. Based on your configuration, you can decide which option is right for you. 2.5.1 Using HDMI Input DVD players that have a digital interface such as HDMI (High Definition Multimedia Interface) should be connected to the HDMI input of the VIZIO VU37L HDTV10A for optimal results.
VIZIO VU37L HDTV10A User Manual For DVD Players with DVI: DVI: 1. 2. 4. 5. Turn off the HDTV and DVD player. Using a HDMI-DVI cable, connect the DVI end to your DVD player and the HDMI2 end to the HDMI Input (white color area) at the rear of the HDTV. 3. Connect an audio cable (white and red connectors) to the audio output connectors associated with the DVI output of the DVD player and connect the other end to the audio connectors by the HDMI input (white area) at the rear of the HDTV.
VIZIO VU37L HDTV10A User Manual 2.5.2 Using Component Video Connecting your DVD Player (Better): (Better): 1. 2. 3. 4. 5. 6. 7. Turn off the power to the HDTV and DVD player. Connect the Y (green color) connector on your DVD player to the corresponding Y (green color) connector in the Component1 input (green color area - row of connectors nearest to you when viewing from the rear of the TV) at the rear of the HDTV.
VIZIO VU37L HDTV10A User Manual 2.5.3 Using SS -Video (AV1/S(AV1/S -VIDEO) Connecting your DVD Player (Good): 1. 2. 3. 4. 5. Turn off the power to the HDTV and DVD player. Connect the S-Video jack on the rear of your DVD player to the S-Video jack in the AV1/S-VIDEO input (yellow/red area) at the rear of the HDTV.
VIZIO VU37L HDTV10A User Manual 2.6 Connecting Your VCR or Video Camera 1. 2. 3. 4. 5. Turn off the HDTV and VCR or Video Camera. Connect the S-Video jack on the rear of your VCR or Video Camera to the S-Video jack in the AV input (yellow/red area) at the rear of the HDTV.
VIZIO VU37L HDTV10A User Manual 2.7 Connecting an external Receiver/Amp 1. 2. 3. 4. Turn off the power to the LCD HDTV and Receiver/Amp. Using an audio cable (white and red connectors), connect the cable to the audio input connectors on the Receiver/Amp and connect the other end to the ANALOG OUT (white area) audio connectors at the rear of the LCD HDTV. Turn on the power to the LCD HDTV and Receiver/Amp. Then press the MENU button on the remote control to open the OnScreen Display (OSD) menu.
VIZIO VU37L HDTV10A User Manual 2.7.1 Optical Output of Audio received If your sound system has a SPDIF (optical) digital audio input you can connect it to the optical AUDIO OUT (white area) at the rear of the VU32L HDTV10A. 1. Turn 2. Using an SPDIF cable, connect the cable to the audio input connector on the Receiver/Amp and connect the other end to the OPTICAL OUT (white area) audio connectors at the rear of the LCD HDTV. Turn on the power to the LCD HDTV and Receiver/Amp.
VIZIO VU37L HDTV10A User Manual 2.8 Connecting a PC Computer 1. 2. 3. 4. 5. Turn off the power to the HDTV and PC Computer. Connect a 15-pin D-Sub RGB (VGA) cable to the RGB output of your pc computer and the other end to the RGB PC input (blue area) at the rear of the HDTV. Connect the Audio Out on your pc computer to the RGB PC Audio input (blue area) at the rear of the HDTV. Turn on the HDTV and PC Computer. Select RGB using the INPUT button on the remote or side of the HDTV.
VIZIO VU37L HDTV10A User Manual 2.8.1 Preset PC Resolutions If connecting to a PC through the RGB PC input, set the TV timing mode to VESA 1366x768 at 60Hz for best picture quality (refer to the graphic card’s user guide for questions on how to set this timing mode). Please see the table below for the factory preset resolutions.
VIZIO VU37L HDTV10A User Manual Chapter 3 Setting Up to Watch Television For ‘Preparing Your LCD HDTV for Wall Mounting’, see page 6. 3.1 Basic LCD HDTV Start Up 1. Connecting the Power Cable Connect the power cord to the power cord connector on the back of the HDTV, and then plug the power cord into an AC wall socket. 2. Connect Audio and Video Cables to the HDTV (see pages 14 ~ 28 for detailed steps) 3.
VIZIO VU37L HDTV10A User Manual b. The Channel Scan screen will be displayed; default choice is Scan. Press the button on the remote control to commence the search for available channels to be stored into memory. If you do not want to scan for channels at this time, press the button on the remote to highlight Skip Scan and then press the button.
VIZIO VU37L HDTV10A User Manual c. The screen will now change to show the progress of the search for Analog (NTSC) and Digital (ATSC) channels. Note: DTV digital broadcast is not available in all areas. Refer to www.antennaweb.org to get information about availability in your area, type of antenna and in which direction to point your antenna. The channel availability through cable depends upon which channels your cable operator supplies in Clear QAM; consult your cable operator for more information. d.
VIZIO VU37L HDTV10A User Manual a. Select the correct input connection; RF (DTV/TV) connector, Composite (Yellow, Red and White) connectors, Component (Red, Green, Blue plus Red and White) connectors, HDMI connectors or Separate-Video (S-Video) plus Red and White connectors (if applicable). Make the physical connection or hook up. b. If you have an HD service you must use the HDMI (best) or Component connection. Note: Composite (AV) and S-Video Cables can only be used for SD (480i) pictures. c.
VIZIO VU37L HDTV10A User Manual d. Press the button to select it. e. Press either or button to change setting to Normal, and then press the LAST key again to go back to previous screen. f. Press either or button to select the Picture Mode option. g. Press either or button to change the Picture Mode option to Standard. h. Press the LAST key to exit the on screen display Menu.
VIZIO VU37L HDTV10A User Manual 3.2 Watching a TV Program Before you start watching TV, please make sure that any cable, satellite or off-air antenna connections are secure. Also, verify that the power cord is plugged into a correctly grounded electrical outlet or surge protector. 1. Press the power button on the remote or on the side of the HDTV. The VIZIO logo on the front will change from orange to white. 2. There are 3 options for selecting your programming: a.
VIZIO VU37L HDTV10A User Manual 3.3 Adjusting Basic HDTV Settings Volume To increase the volume, press and hold the VOL+ or VOL- button on the side of the LCD HDTV or remote control until the desired level is reached. TV Channels To step up or down through the available TV channels, press the CH+ or CH- button on the side of the HDTV or remote control once for the next or previous channel, or hold it depressed until the desired channel is reached.
VIZIO VU37L HDTV10A User Manual 3.4 Program Information Press the GUIDE button twice on the remote and program information for the channel you are watching will be displayed. Press the or button to scroll up or down the channels. Each time you pause at a channel, the program list will update with the program schedule for the channel and the window will show the live program for that channel. Press the GUIDE button to exit this feature. 3.
VIZIO VU37L HDTV10A User Manual Chapter 4 Advanced Adjustment of HDTV 4.1 Using the On Screen Display (OSD) The remote control or the control buttons on the right hand side of the TV can control all the function settings. The On Screen Display (OSD) allows you to adjust the save contrast, brightness and other settings. The TV will save changes made to the settings, even if the TV is turned off. The OSD consists of several menu options: Picture Adjust, Audio Adjust, Setup and TV Tuner Setup.
VIZIO VU37L HDTV10A User Manual 4.2 DTV / TV Input Picture Adjustment 4.2.1 Picture Mode When the MENU button is pressed, the On Screen Display (OSD) appears on the PICTURE adjustment page. Press the button to highlight the Picture Mode selection. Use the or and Baseball. button to choose from Custom, Standard, Movie, Game, Vivid, Football, Golf, Basketball Picture Adjustments are available for you to set them to your preferred settings.
VIZIO VU37L HDTV10A User Manual 4.2.3 Brightness Press the button to highlight the Brightness selection. Press the button to start adjusting the brightness and the menu page will disappear and be replaced by a small Brightness Indicator Bar so you can see the brightness level between the minimum and maximum available levels. Use the or button to adjust the level. The Brightness adjusts the black levels in the picture.
VIZIO VU37L HDTV10A User Manual 4.2.6 Tint Press the button to highlight the Tint selection. button to start adjusting the tint and the menu page will disappear and be replaced by a Press the small Tint Indicator Bar so you can see the tint adjustment to the left or right of the nominal position. Use the or button to adjust the level. The Tint adjusts the hue of the picture. The easiest way to set tint is to look at flesh tones and adjust for a realistic appearance.
VIZIO VU37L HDTV10A User Manual Color Enhancement Press the button to highlight Smart Color Enhancement. Use this feature to increase the picture reproduction performance of the picture. Press the or button to choose from Off, Normal, Rich Color, Green/Flesh and Green/Blue setting. Once the adjustments are completed press the LAST button repeatedly to exit the OSD completely. Advanced Adaptive Luma Press the button to highlight Advanced Adaptive Luma.
VIZIO VU37L HDTV10A User Manual 4.2.9 Reset Picture Mode Press the button to highlight the option for Reset Picture Mode selection button to return on Picture settings to Press factory default. Once the adjustments are completed press the LAST button repeatedly to exit the OSD completely. Note: Only settings under the pictures adjustment tab will be reset. Version 3/12/2008 42 www.VIZIO.
VIZIO VU37L HDTV10A User Manual 4.3 DTV / TV Input Audio Adjustment 4.3.1 Audio Mode When the MENU button is pressed, the On Screen Display (OSD) appears on the PICTURE adjustment page. Press the ADJUST page. Press the selection. button to display the AUDIO button to highlight the Audio Mode Use the or button to choose from Flat, Rock, Pop, Classic or Jazz. Equalizer adjustments are available for you to set them to your preferred settings.
VIZIO VU37L HDTV10A User Manual 4.3.3 Balance Press the button to highlight the Balance selection. button to start adjusting the balance and the menu page will disappear and be replaced by a Press the small Balance Indicator Bar, as before, so you can see the balance adjustment to the left or right of the nominal position. Use the or button to adjust the left/right balance. Once the adjustments are completed press the LAST button repeatedly to exit the OSD completely. 4.3.
VIZIO VU37L HDTV10A User Manual Press either or button to turn the audio out signal to Fixed or Variable. When it is set to variable, volume from the external speakers will change according to the volume setting on the TV. If it is fixed, the volume can only be changed by the settings on the external stereo system. Press the LAST key once to return to the previous screen or repeatedly to return to your program if task has been completed. 4.3.
VIZIO VU37L HDTV10A User Manual 4.4 DTV / TV Tuner Setup When you first used your HDTV you will have setup your TV for DTV / TV channels using the Initial Setup screens. If you did not do this or if your setup has changed, you can do this from the TV TUNER SETUP menu. Once the adjustments are completed press the LAST button repeatedly to exit the OSD completely. 4.4.1 Tuner Mode When the MENU button is pressed, the On Screen Display (OSD) appears on the PICTURE adjustment page. Press the the TV page.
VIZIO VU37L HDTV10A User Manual 4.4.3 Partial Channel Search If you believe channels are missed from the auto search, you can do a partial channel search to look for channel in a certain channel range again. Press the button to highlight the Partial Channel Search selection. Press the button to enter the submenu. Press the button to select scan mode to look for Analog, Digital, or both Analog/Digital channels. Press the button to highlight the “To” and “From” selection.
VIZIO VU37L HDTV10A User Manual 4.4.7 Daylight Daylight Saving As for Time Zone, setting the daylight saving time for your area will ensure that the correct program times are shown after pressing the GUIDE button on the remote control. Press the button to highlight the Daylight Saving selection. Press the or button to select On or Off. Once the adjustments are completed press the LAST button repeatedly to exit the OSD completely. 4.5 DTV / TV Input Setup 4.5.
VIZIO VU37L HDTV10A User Manual 4.5.2 Sleep Timer Press the selection. button to highlight the Sleep Timer Press the button to select the timer to turn-off the TV in 30, 60, 90 or 120 minutes. Once the adjustments are completed press the LAST button repeatedly to exit the OSD completely. 4.5.3 Wide The Wide option is the feature which allows you to select how your display would be size wise. When in TV mode; the selections are Normal, Wide and Panoramic views.
VIZIO VU37L HDTV10A User Manual 4.5.4 Input Naming This feature has been added to facilitate you, the user in identifying or label the input and signal which is being watched. You could use up to 8 characters; either letters or numbers or combinations of both. Press Press button to highlight this option. button to obtain the next screen which shows the different inputs. Press button to select the desired input which you want to label or name (Examples: VCR, DVD,.., etc.
VIZIO VU37L HDTV10A User Manual 4.5.5 CC (Closed Caption) Press the Press the button to highlight the CC(Closed Caption) selection. button. A separate menu will appear with the following CC settings Closed Caption on Mute When selecting Closed Caption as a feature to be used; Closed Caption On Mute will provide you with the option to obtain closed captioning when you press the key labeled mute on your Remote Control. Press button as many times as it takes to get this option highlighted.
VIZIO VU37L HDTV10A User Manual recommendations of setting these parameters since you, the user would have your own taste or like of them. Press the key labeled LAST as many times as it takes to exit the menu screens. 4.5.6 H/V Position Press the selection. button to highlight the H/V Position Press the button. A separate menu will appear with the following H/V Position settings H. Position Press the button to highlight the Horizontal Shift selection.
VIZIO VU37L HDTV10A User Manual 4.5.7 DTV / TV TV Input Parental Control If you want to restrict certain channel and program viewing, you can do this by turning on the Parental Control. Selected programs, movies and channels can then be made available only after an authorized password has been entered and accepted by the TV. When the MENU button is pressed, the On Screen Display (OSD) appears on the PICTURE adjustment page. Press the Press the press the button to display the SETUP page.
VIZIO VU37L HDTV10A User Manual 4.5.9 US TV Rating Follow the procedure in the previous section to display the Parental Control menu and then press the button to highlight the US TV Rating selection. Press the button and the Block TV Rating panel will be displayed.
VIZIO VU37L HDTV10A User Manual 4.5.10 US Movie Rating (For US) Press the button to highlight the US Movie Rating selection. Press the button and the Block Movie Rating panel will be displayed.
VIZIO VU37L HDTV10A User Manual 4.5.12 Canadian French Rating Press the button to highlight the Canadian French Rating selection. Press the button and the Block Canadian French Rating panel will be displayed.
VIZIO VU37L HDTV10A User Manual 4.5.14 Blocked Unrated Programming Follow the procedure in the previous section 4.5.7 to display the Parental Control menu and then press the button to highlight the Block Unrated TV selection. Press the button to turn-on or turn-off the blocking of programming that does not have a rating. Once the adjustments are completed press the LAST button repeatedly to exit the OSD completely. 4.5.15 Change the Password button to highlight the Access Code Press the Edit selection.
VIZIO VU37L HDTV10A User Manual 4.5.16 Reset All Settings Press the button to highlight the Reset All Settings selection. Press the button to reset the TV to the default factory settings. Once the adjustments are completed press the LAST button repeatedly to exit the OSD completely. Note: This does NOT reset the Parental Control Password. Version 3/12/2008 58 www.VIZIO.
VIZIO VU37L HDTV10A User Manual 4.6 HDMI Input Picture Adjustment The Picture Adjust menu operates in the same way for the HDMI Input as for the DTV / TV input in section 4.2. Once the adjustments are completed press the LAST button repeatedly to exit the OSD completely. 4.7 HDMI Input Audio Adjustment The Audio Adjust menu operates in the same way for the HDMI Input as for the DTV / TV input in section 4.3. 4.
VIZIO VU37L HDTV10A User Manual 4.9 Video Input Picture Adjustment The Picture Adjust menu operates in the same way for Video Inputs (Component and AV) as for the DTV / TV input in section 4.2. The menu difference is that there is no icon along the top for DTV / TV adjustments. 4.10 Video Input Audio Adjustment The Audio Adjust menu operates in the same way for Video Inputs (Component and AV) as for the DTV / TV input in section 4.3.
VIZIO VU37L HDTV10A User Manual Auto Phase (for Component input) Press the button to highlight the H/V Position. Press the button and the new H/V Position submenu will be displayed. Press the button to highlight Auto Phase. Press the button to execute this option. The TV will automatically look for the phase of the signal to fine tune the picture. Once the adjustments are completed press the LAST button repeatedly to exit the OSD completely. Version 3/12/2008 61 www.VIZIO.
VIZIO VU37L HDTV10A User Manual 4.12 Video Input Parental Control The Parental Control menu operates in the same way for Video Inputs (Component and AV) as for the DTV / TV input in section 4.5.7. The menu difference is that there is no icon along the top for DTV / TV adjustments. 4.13 PC Input Picture Adjustment The Picture Adjust menu operates in the same way for the PC Input as for the DTV / TV input in section 4.2 for Backlight, Contrast, Brightness and Color Temperature. 4.13.
VIZIO VU37L HDTV10A User Manual The Backlight level does not affect the Brightness (black level) or Contrast (white level) of the picture, it adjusts the lamp current and this affects the overall brilliance of the picture. Once the adjustments are completed press the LAST button repeatedly to exit the OSD completely. 4.13.3 Brightness Press the button to highlight the Brightness selection.
VIZIO VU37L HDTV10A User Manual 4.13.5 Color Temperature Press the button to highlight the option for Color Temperature selection. The default is the 9300K (Cool) setting. Press the or button if you want to choose the 9300, 6500 or Custom option. Once the adjustments are completed press the LAST button repeatedly to exit the OSD completely. If you choose the Custom option, then a new menu will be displayed showing the primary color items, Red, Green and Blue.
VIZIO VU37L HDTV10A User Manual 4.13.8 V. Position Press the button to highlight the Vertical Shift selection. Press the button to start adjusting the vertical position of the picture. Use the or button to adjust the vertical position. Once the adjustments are completed press the LAST button repeatedly to exit the OSD completely. 4.13.9 Fine Tune Press the button to highlight the Fine Tune selection. Press the button to start tuning the to the PC signal. Use the or button to adjust the tuning.
VIZIO VU37L HDTV10A User Manual 4.16 Understanding Viewing Features Your HDTV features the following viewing modes. You can switch viewing modes using the remote control, please follow the instructions in page 35. 4.16.1 Viewing Modes Normal Mode The original 4:3 aspect ratio (1.33:1 source) is preserved, so black bars are added to the left and right of the display image. Standard TV broadcasts are displayed with a 4:3 Aspect Ratio.
VIZIO VU37L HDTV10A User Manual Chapter 5 Maintenance and Troubleshooting 5.1 Maintenance Important 1. 2. Make sure that the power cable is removed from the socket before cleaning the TV. Do not use volatile solvent (such as toluene, rosin and alcohol) to clean the TV. Such chemicals may damage the housing, screen glass and remote control, and cause paint to peel. Cleaning the Housing and Remote Control 1. 2. Use the VIZIO soft cloth (included) for cleaning.
VIZIO VU37L HDTV10A User Manual Problem Solution Power is ON but no screen image. Make sure the video cable supplied with the TV is secured to the correct video output port on the back of the VCR and the TV. Make any cable you have attached to the TV is secured to the correct output your Set-Top Box, DVD, etc. A djust brightness and contrast. Check Source settings. Wrong or abnormal colors appear.
VIZIO VU37L HDTV10A User Manual Tips for High-Definition Users. The LCD HDTV is an ideal platform for viewing High Definition Content. Best Image Quality will be achieved by the HDMI Input, then YPbPr, then RGB. However, due to variances in broadcast practices, it is possible some image distortions can occur. Tips for Letterbox Content Users. Letterboxed (or “Widescreen”) versions of DVD movies are most commonly formatted for standard 4:3 Televisions.
VIZIO VU37L HDTV10A User Manual 5.4 Compliance Caution: Always use a power cable that is properly grounded. Please use the AC cords listed below for each area. USA Canada Germany UK Japan UL CSA VDE BASE/BS Electric Appliance Control Act 5.5 FCC Class B Radio Interference Statement NOTE: This equipment has been tested and found to comply with the limits for a Class B digital device, pursuant to Part 15 of the FCC Rules.
VIZIO VU37L HDTV10A User Manual Chapter 6 Miscellaneous Information 6.1 Specifications Specifications Panel 37” Diagonal, 16:9 Aspect Ratio Resolution 1366 x 768 pixels Pixel (Dot) Pitch 0.6 mm (H) x 0.6 mm (V) Display Compatibility HDTV (720P) Colors 16.7 Million Brightness 450 cd/m (typical) Contrast 1100:1(typical), 5500:1 with DCR Response Time 6.
VIZIO VU37L HDTV10A User Manual 6.2 Glossary – Standard Definitions Analog TV: Today’s TV system using radio frequency waves to transmit and display pictures and sound. Aspect Ratio (4x3): Traditional TV “aspect ratio”, that is, the screen’s width as compared to its height. For example, a “32 inch TV screen” would be 25 inches wide and 19 inches tall. Aspect Ratio (16x9): “Wide screen TV” aspect ratio which is more like a movie screen than a traditional TV.
VIZIO VU37L HDTV10A User Manual 6.
VIZIO VU37L HDTV10A User Manual P Parental Control Block Unrated Programming, 57 Canadian English Rating, 55 Canadian French Rating, 56 Channel Block, 53 DTV Rating, 56 Movie Rating, 55 Password change, 57 TV Rating, 54 PC Input Audio Adjustment, 65 Auto Adjust, 62 Picture Adjustment, 62 Setup, 65 PC Picture Adjust Fine Tune, 65 H/V Position, 52 Horizontal Position, 52, 64 Horizontal Size, 52, 64 Vertical Position, 52, 65 R Remote, 12 Batteries, 13 Range, 13 Remote:, 13 RGB Connecting your PC, 27 S Scree