VlZtOVW32LHDTV10A UserManual DearVlZlOCustomer, Congratulations on yournewVlZtOVW32LHigh DefinitionLCDTelevisionpurchase. Thankyou foryoursupport.Formaximumbenefitof yourset, pleasereadtheseinstructionsbeforemakingany adjustments, andretainthemforfuturereference. We hope you will experiencemany years of enjoymentfrom your new VlZtO VW32L High Definition Television. For assistance,pleasecall714-668-0588 or emailus at techsupport@vinc.com.
VlZtOVW32LHDTV10A UserManual THIS PRODUCT HAS BEEN DESIGNED AND TESTED FOR COMPLIANCE WITH REGULATORY SAFETY CERTIFICATIONS This product is designed and manufactured to operate within defined design limits, and misuse may result in electric shock or fire. To prevent the product from being damaged, the following rules should be observed for the installation, use and maintenance of the product. Read the following safety instructions before operating the display.
VlZlOVW32LHDTV10A UserManual TeLevision External Antenna TeLevision Connection Antenna Protection Groundinq If an outside antenna/satellite dish or cable system is to be connected to the TV, make sure that the antenna or cable system is electrically grounded to provide some protection against voltage surges and static charges.
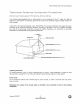
VlZtOVW32LHDTV10A UserManual the Opeoioq Paokaqe Your VlZIO VW32L HDTV10A and it accompanying accessories are carefully packed in a cardboard carton that has been designed to protect it from transportation damage. Now you have opened the carton check that the VW32L HDTVl0A is in good condition and that all of the accessories are included. The VW32L HDTVl0A weighs approximately 32 Ibs and is nearly 32" wide and we advise that you take sensible lifting precautions when you unpack and install the HDTV.
VlZtOVW32LHDTV10A UserManual ImstaLLatiom Preparatiom Please read this user manual carefully before installing your VlZtO HDTV. The power consumption of the TV is about 180W, please use the power cord designated for TV. When an extension cord is required, use one with the correct power rating. The cord must be grounded and the grounding feature must not be defeated. The TV should be installed on a flat surface to avoid tipping.
VlZlOVW32LHDTV10A UserManual TabLe off Contents Chap_em i Bas_o Contmo_.s and Connections .................................................................. 8 1.1 Front Panel .......................................................................................................................................................... 8 1.2 Right Side Panel Controls ................................................................................................................................... 1.
VlZtOVW32LHDTV10A UserManual 4.5.3 Analog Closed Caption .............................................................................................................................. 4.5.4 Digital Closed Caption ............................................................................................................................... 4.5.5 Digital Closed Caption Style ...................................................................................................................... 35 35 36 4.5.
VlZtOVW32LHDTV10A UserManual Ehapter 1 1.1 Panel Front Basic EontroLs and Eonneations Power 'VlZlO' light - The VlZlO name lights white when powered on and orange when powered off. Remote Control Sensor - This is the window through which all of the remote control signals pass to the sensor. Point the remote control directly at this window for the best response to the remote signal. Riqht Side manet Eontrots Power ( _ ) - Switch the VW32L on by pressing the button once.
VlZtOVW32LHDTV10A UserManual l, 3 Ream . Pane[ Connections AC IN - Plug-in the supplied AC Power Cord here. 2. SERVICE - This custom communication 3. HDMI 1 - Connect the primary source for digital video such as a DVD multimedia player or set top box through this all digital connector. The white color band on the rear of the TV indicates this connection. Your VlZtO Certified HDMI cables are available for purchase from www.VIZIO.com or by calling 888-VIZIOCE (888-849-4623). . .
VlZtOVW32LHDTV10A UserManual ,1,4 WIZIO Remote Control Remote LED - Blinks when the remote operates. POWER - Press this button to turn the TV on from the Standby mode. Press it again to return to the Standby mode. Number Button Pad - Use these buttons to select a channel or enter a password. INPUT - This button allows the user to cycle through the inputs. - (Dash) - When selecting a digital channel directly use this button for the separation of main and sub-channels.
VlZtO VW32L HDTV10A User Manual WIDE - This button cycles through the available screen formats. The options for SD (Standard Definition 4:3) are Normal, Wide and Panoramic.. The only option for HD (High Definition 16:9) is Wide and the options RGB PC are 4:3 and 16:9. SLEEP - This button allows the user to select the sleep options by adjusting the timer for 30, 60, 90 or 120 minutes.
VlZlO VW32L HDTV10A User Manual i°qol Mosembion of Batteries in the Remote Control Inserttwo AA batteries intotheremote control.Make surethatyou match the(+)and (-)symbols on the batteries with the (+) and (-) symbols inside the battery compartment. Re-attach the battery cover. Precautionary Tips for Inserting the Batteries: Only use the specified AA batteries. Do not mix new and old batteries. This may result in cracking or leakage that may pose a fire risk or lead to personal injury.
VlZlOVW32LHDTV10A UserManual Chapter a°i Which 2 Connectinq Video Equipment Connection I Use? Should The VlZlO VW32L has six different ways to connect your video equipment from a basic connection to the most advanced for digital displays. HDMI (High-Definition Multimedia the first and only industry-supported, Best White (digital) all-digital audiolvideo interface.
VtZtOVW32LHDTV10A UserManual _,_ Connectinq aosol . 2. . 4. 2_2_2 . 2. . 4. Using Your Coaxial [RF] Antenna or Diqibal Cable fior OTW / TV Turn off the power to the HDTV. Connect the coaxial (RF) connector from your antenna or digital cable (out-ofthe-wall, not from the Cable Box) to the DTV/TV CABLE/ANTENNA connector. Turn on the power to the HDTV. Select TV using the INPUT button on the remote or side of the HDTV, or directly by pressing the TV button on the Remote Control.
VtZlOVW32LHDTV10A UserManual a,3 Connecbinq 2o3oi Usinq Your HDTV SeboTOp Box HDMI HDTV Set-Top Boxes that have a HDMI digital interface should be connected to the HDMI input of the LCD HDTV for optimal results. Connectinq . 2. . 4. vour HDTV SeboTop Box [Bes_]: Turn off the power to the HDTV and HDTV Set-Top Box. Connect a HDMI cable to the HDMI output of your HDTV Set-Top Box and the other end to the HDMI Input (white color area) at the rear of the HDTV.
VlZlOVW32LHDTV10A UserManual For HDTU . Seb_Top Boxes with DVI ° Turn off the power to the HDTV and HDTV Set-Top Box. 2. Using a HDMI-DVl cable, connect the DVl end to your HDTV Set-Top Box and the HDMI end to the HDMI Input (white color area) at the rear of the HDTV. .
VlZlOVW32LHDTV10A UserManual a°3,a Usinq Connecbinq Componenb vour HDTV Video SetoTop Box {Setter}: Turn off the power to the HDTV and HDTV Set-Top Box. I. 2. . . . . 7. Connect the Y (green color) connector on your HDTV Set-Top Box to the corresponding Y (green color) connector in the Component 1 group (green color area - row of connectors nearest to you when viewing from the rear of the TV) at the rear of the HDTV.
VlZlOVW32LHDTV10A UserManual s,4 Connecbinq 2o4oi . 2. . UsinQ Your Composibe Basic SeboTOp Box k/ideo Turn off the power to the HDTV and Set-Top Box. Using the AV Cable, connect the Video (yellow color) connector on your Set-Top Box to the corresponding Video (yellow color) connector in the AVl group (yellow color area) at the rear of the HDTV.
VlZtO VW32L HDTV10A User Manual s,S Eonnectinq s.Sol Your DUD Player HOMI Using DVD players that have a digital interface such as HDMI (High Definition Multimedia Interface) should be connected to the HDMI input of the VlZtO VWS2L for optimal results. Eonnectinq your DUD Player . 2. . 4. For DUD Players with [Best): Turn off the power to the HDTV and DVD player.
VlZlOVW32LHDTV10A UserManual 2.5_2 Usinq Connecbinq . 2. . . . . 7. Componenb vour OWO Video Player {Better}: Turn off the power to the HDTV and DVD player. Connect the Y (green color) connector on your DVD player to the corresponding Y (green color) connector in the Component 1 group (green color area - row of connectors nearest to you when viewing from the rear of the TV) at the rear of the HDTV.
VlZtO VW32L HDTV10A User Manual 2.S 3 Usinq Connecbinq . Composite your OVO (RV} Player t/idea {Good} Turn off the power to the HDTV and DVD player. 2. Connect the Video (yellow color) connector on your DVD player to the Video (yellow color) connector in the AVl group (yellow color area). . Connect the R (red color) and L (white color) audio connectors on your DVD player to the corresponding R (red color) and L (white color) audio input connectors in the AV1 group (yellow color area). . 5. .
VlZlO VW32L HDTV10A User Manual . 2. Turn off the power to the HDTV and PC Computer. Connect a 15-pin D-Sub RGB (VGA) cable to the RGB output of your pc computer and the other end to the RGB PC input (blue area) at the rear of the HDTV. . Connect the Audio Out on your pc computer to the RGB PC Audio input (blue area) at the rear of the HDTV. . Turn on the HDTV and PC Computer. 5.
VlZlOVW32LHDTV10A UserManual Chapter 3 Se ioq Up to Watch TeLevision For 'Preparing Your LCD HDTV for Wall Mounting', see page 5. 3,1 Basic . . 3. . . LCD HDTU Start Up Connecting the Power Cable Connect the power cord to the power cord connector on the back of the HDTV, and then plug the power cord into an AC wall socket.
VlZtOVW32LHDTV10A UserManual TheLanguage choicescreenwill bedisplayed; thedefaultEnglish optionis highlighted.If youwish tochangetheOSDlanguage to Fran£aisor Espa_ol,pressthe buttonontheremotecontrolto selectthelanguage youwant. Pressthe _ buttononthe remotetogotothenextscreen. C. The Tuner screen will be displayed; default choice is Antenna. If you are using Cable, press the _ button to highlight CABLE. Press the I_ button on the remote to go to the next screen. d.
VlZtOVW32LHDTV10A UserManual e. The screen will now change to show the progress of the search for Analog (NTSC) and Digital (ATSC) channels. Noe:DTVcigila broadcas is no avaiabeina aeas. Re[e_ o www.antennaweb.or,q o ge inI_>rma ion abou avaiabiily ir_ you_ aea ype o an e Ina arid i__which di_ectio _o poir_l you_ anenna Thechanne avaiabiily __oughcabe depends uponw ichcha_esyou cabeoperao suppiesinCea_QAM consu you cabe opera o_ mo_e in o_ma ion.
VlZtOVW32LHDTV10A UserManual 3,a Wabchinq a TY Proqram Before you start watching TV, please make sure that any cable, satellite or off-air antenna connections are secure. Also, verify that the power cord is plugged into a correctly grounded electrical outlet or surge protector. Press the power button on the remote or on the side of the HDTV. front will change from orange to white. . 2. There are 3 options for selecting your programming: a.
VlZtO VW32L HDTV10A User Manual Proqram Information Press the GUIDE button on the remote and program information for the channel you are watching will be displayed on the screen. Press the D or _ button to scroll up or down the channels. Each time you pause at a channel, the program list will update with the program schedule for the channel. Press the GUIDE button to exit this feature.
VlZlOVW32LHDTV10A UserManual Ehaptem 4 Rdvanced 4.,i Usin9 the On Rdoustment Scmeen Display off HDTW {OSD} The remote control or the control buttons on the right hand side of the TV can control all the function settings. The On Screen Display (OSD) allows you to adjust the save contrast, brightness and other settings. The TV will save changes made to the settings, even if the TV is turned off.
VlZlOVW32LHDTV10A UserManual A,_ DTV 4,_.1 / TV Pictume Imput PictuFe Rd3usbmemt Mode When the MENU button is pressed, the On Screen Display (OSD) appears on the PICTURE adjustment page. Press the _button to highlight the Picture Mode selection. A Use the _ or I_ button to choose from Custom, Standard, Movie and Game. If Standard, Movie or Game is chosen for the Picture Mode, then the only Picture Adjustments available for you are for the Backlight and Advanced Video; the rest are preset.
VlZtOVW32LHDTV10A UserManual 8riqhbness Press the _ button to highlight the Brightness selection. Press the _ button to start adjusting the brightness and the menu page will disappear and be replaced by a small Brightness Indicator Bar so you can see the brightness level between the minimum and maximum available levels. Use the D or _ button to adjust the level. The Brightness adjusts the black levels in the picture.
VlZtOVW32LHDTV10A UserManual 4.2,7 ShBrpness Press the _ button to highlight the Sharpness selection. Press the _ button to start adjusting the sharpness and the menu page will disappear and be replaced by a small Sharpness Indicator Bar so you can see the sharpness level between the minimum and maximum available levels. Use the D or _ button to adjust the level. The Sharpness adjusts the sharpness of the picture. 4.s.
VlZtOVW32LHDTV10A UserManual 4.m.9 Rdvanced Video Press the _ button to highlight the option Advanced Video selection and press the button. A new menu will be displayed showing advanced functions available for fine tuning of picture. for OK the the DNR Press the _ button to highlight DNR (Dynamic Noise Reduction). Use this feature to diminish picture artifacts caused by the digitizing of image motion content that may be present in the picture.
VlZlO VW32L HDTVIOA User Manual DTV 4,3°1 / TV Input Rudio Rd]ustment Votume When the MENU button is pressed, the On Screen Display (OSD) appears on the PICTURE adjustment page. Press the _ button to display the AUDIO ADJUST page. Press the _ button to highlight the Volume selection. Press the_ button to start adjusting the volume and the menu page will disappear and be replaced by a small Volume Indicator Bar so you can see the volume level between the zero and maximum available levels.
VlZtOVW32LHDTVIOAUserManual 4-3,5 Surround Press the _ Press the _ 4.4 button to highlight the Surround selection. button to select for the simulated surround sound feature to be On or Off. DTW / TV Tuner Setup When you first used your VW32L you will have setup your TV for DTV / TV channels using the Initial Setup screens. If you did not do this or if your setup has changed, you can do this from the TV TUNER SETUP menu.
VlZlOVW32LHDTVIOAUserManual 4°4,4 Time Zooe Setting the correct Time Zone for your area will ensure that the correct program times are shown after pressing the GUIDE button on the remote control. Press the _ selection. Press the _ 4°4°S button to highlight the Auto Search button to select your area. DsvUqht Sswimq As for Time Zone, setting the daylight saving time for your area will ensure that the correct program times are shown after pressing the GUIDE button on the remote control.
VlZtOVW32LHDTV10A UserManual 4,SOS Diqits[ Closed Csptiom Style When selecting Digital Closed Caption you are also able to customize the look of the Closed Caption. Press the _ button to highlight the Digital CC Style selection. The default is Broadcast which means the style is the same as the broadcast channel has chosen for transmission. Press the _ button to select Custom. The Custom page allows you to change the font size and color, the background color, and the transparency of the Closed Caption.
VlZlOVW32LHDTV10A UserManual 4,5 OTY 4°6,1 / TY Channel Input Parental Control Block If you want to restrict certain channel and program viewing, you can do this by turning on the Parental Control. Selected programs, movies and channels can then be made available only after an authorized password has been entered and accepted by the TV. When the MENU button is pressed, the On Screen Display (OSD) appears on the PICTURE adjustment page. Press the _ button to display the PARENTAL page.
VlZtOVW32LHDTV10A UserManual 4.6.2 Ratinq TV Follow the procedure in the previous section 4.6.1 to display the Parental Control menu and then press the _ button to highlight the TV Rating selection. Press the _ button and the Block TV Rating panel will be displayed.
VlZtOVW32LHDTV10A UserManual 4°6°4 Blocked Unrated Proqramminq Follow the procedure in the previous section 4.6.1 to display the Parental Control menu and then press the _ button to highlight the Block Unrated TV selection. Press the _ button to turn-on or turn-off the blocking of programming that does not have a rating. 4_6_5 Chanqe the Password Press the _ button to highlight the Access Code Edit selection. Press the _ button and the new Password panel will be displayed.
VlZtOVW32LHDTV10A UserManual 4°7 HDMI Input Pioture Rdoustment The Picture Adjust menu operates in the same way for the HDMI Input as for the DTV / TV input in section 4.2. The menu difference is that there is no icon along the top for DTV / TV or Parental Control adjustments. 4.B HDMI Input Rudio Rd]ustment The Audio Adjust menu operates in the same way for the HDMI Input as for the DTV / TV input in section 4.3.
VlZlOVW32LHDTV10A UserManual 401o Video Input miobume Adousbmenb The Picture Adjust menu operates in the same way for Video Inputs (Component and AV) as for the DTV / TV input in section 4.2. The menu difference is that there is no icon along the top for DTV / TV adjustments. 4.11 Video Input Audio Adjustment The Audio Adjust menu operates in the same way for Video Inputs (Component and AV) as for the DTV / TV input in section 4.3.
VlZtOVW32LHDTV10A UserManual 4,13 Video Input Parentat Control The Parental Control menu operates in the same way for Video Inputs (Component and AV) as for the DTV / TV input in section 4.6. The menu difference is that there is no icon along the top for DTV / TV adjustments. 4.14 PC Input Picture Ad]ustment The Picture Adjust menu operates in the same way for the PC Input as for the DTV / TV input in section 4.2 for Backlight, Contrast, Brightness and Color Temperature.
VlZtOVW32LHDTV10A UserManual TheBrightness adjuststhe blacklevelsin the picture.If thebrightnessis too lowyouwill notbeableto seethe detailin darkerpartsof the pictureandif the brightnessis too highthe picturewill lookwashed out. 4°14 4 Press the _ Contrast button to highlight the Contrast selection.
VlZtOVW32LHDTV10A UserManual H°SmZE 4.14.6 Press the _ button to highlight the H-Size selection. Press the_button to start adjusting the horizontal size of the picture. the horizontal size. Use the D Press the _ button to highlight the Horizontal Shift selection. Press the_ button to start adjusting the horizontal position of the picture. adjust the horizontal position. 4o1408 Use the D or button to V° Position Press the _ button to highlight the Vertical Shift selection.
VlZtOVW32LHDTV10A UserManual 4,m7 Undecstandinq Viewinq Modes Normal Mode The original 4:3 aspect ratio (1.33:1 source) is added to the left and right of the display image. displayed with a 4:3 Aspect Ratio. Movies in 4:3 to as pan-and-scan or full frame. These movies (widescreen), and then modified to fit a traditional preserved, so black bars are Standard TV broadcasts are Aspect Ratio may be referred were originally filmed in 16:9 TV screen (4:3).
VlZtOVW32LHDTV10A UserManual 4o17°i Settioq the Sleep Timer The Sleep Timer lets you set a time delay to turn off the LCD HDTV automatically. To set the Sleep Timer using the remote control: 1. Press the SLEEP button on the remote control. you screen. The Sleep Timer appears in the center of 2. Press the SLEEP button one or more times to select the time you want. The choices are 30, 60, 90 or 120 minutes.
VlZtOVW32LHDTV10A UserManual 5.s Troubleshootinq Guide If the TV fails or the performance changes dramatically, check the display in accordance with the following instructions. Remember to check the peripherals to pinpoint the source of the failure. If the display still fails to perform as expected, contact the VlZlO for assistance by calling 1-714-668-0588 or email us at techsupport(_,vinc.com. No power.
VlZtOVW32LHDTV10A UserManual on the remote You can see a picture cannot hear sound. but you is not turned is not muted. Make sure that your audio input source You see "noise" the screen. When LCD HDTV is manufactured input your LCD HDTV's digital to The LCD HDTV Best image However, distortions Content is an ideal platform Quality Telephone an securely extremely exceed match high and correctly. level of precision your a digital TV's broadcast display signal, capabilities.
VlZtOVW32LHDTV10A UserManual S04 CompUanoe Caution: Always use a power cable that is properly grounded. Please use the AC cords listed below for each area. S°S FCC Crass USA UL Canada CSA Germany UK VDE BASE/BS Japan Electric Appliance Control Act B Radio Interference Sbabemenb NOTE: This equipment has been tested and found to comply with the limits for a Class B digital device, pursuant to Part 15 of the FCC Rules.
VlZlOVW32LHDTV10A UserManual Ehapter 5.1 6 MisceLtaneous Information Speciffications Panel 32" Diagonal, Resolution 1366 x 768 pixels Pixel (Dot) Display Pitch Compatibility Signal Compatibility 16:9 Aspect 0.51075mm Ratio (H) x 0.51075mm HDTV (720P) 480i (SDTV), 480P (EDTV), Colors 16.
VlZlOVW32LHDTV10A UserManual 5,s G[ossarv - Standard Oefiinitions Analog TV: Today's TV system using radio frequency waves to transmit and display pictures and sound. Aspect Ratio (4x3): Traditional TV "aspect ratio", that is, the screen's width as compared to its height. For example, a "32 inch TV screen" would be 25 inches wide and 19 inches tall. Aspect Ratio (16x9): "Wide screen TV" aspect ratio which is more like a movie screen than a traditional TV.
VlZtOVW32LHDTV10A UserManual 3 index DTV Special A Accessories, Closed Closed 4 Adjustments Closed Caption, Luma, 11 DTV Tuner Setup Auto Search, 34 Daylight Saving, DNR (Dynamic Noise Reduction, Flesh Tone, 32 White Peak Limiter, 32 32 Connecting Connecting 32 Glossary, Cleaning your VIZIO TV, 46 Coax (RF) Connecting for DTV, 14 51 H HDMI Set Top Box, your DVD Player, 18 Connecting Connecting HDMI Input 20 Connecting your HDTV Set-Top Box, 17 Composite (AV) Connecting your Basic Set-To
VlZtOVW32LHDTV10A UserManual TV Rating, 38 PC Input Audio Adjustment, Picture Adjustment, Setup, 44 PC Picture Adjust Balance, 33 Bass, 33 44 Simulated Sun'ound Treble, 33 42 Volume, 33 TV Picture Adjust Advanced Video, Auto Adjust, 42 Fine Tune, 44 Horizontal Position, 44 Horizontal Size, 44 Vertical Position, 44 PC Resolutions, Backlight, Brightness, Color, 30 R Remote Batteries, Sharpness, Tint, 30 30, 42 31, 43 3l TV Special Features Closed Caption, 35 12 Language, 35 Reset, 36 Sleep Timer,