
User's Guide


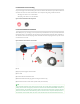


Inside the outer shell (where it faces the inner shell) are the small square keys (block-like bumps). Line up
those keys with the recessed channels on two sides of the inner shell. Then hold the inner shell (1) and
press the outer shell (2) onto the inner shell. Use some pressure to get around the tight corner of the
channel, then rotate the outer shell in the direction shown by the yellow arrow below. Once mated, the
outer shell should be loosely trapped over the inner shell. Now look inside the end of the outer shell
(where 2 is pointing) and make sure the white soft circular washer is laying flat. If not, fix.
Figure: Lining Up and Mating Inner and Outer Shells
(note: Cap is not shown above but is on the cable to the left of the inner shell)
(1) Inner shell with soft plug in place (wide end ridge of soft plug remains outside)
(2) Outer shell
(3) Metal-shielded RJ45 plug
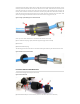
The following photo shows how the inner and outer shells appear after they are mated with each other.
Figure: Mated Inner and Outer Shells
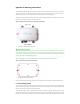
E.8 Connect RJ45 to Female WAPV RJ45
Connect the RJ45 plug to the RJ45 port on the ES1.
Figure: RJ45 Connection
(1) Female WAPV RJ45 port on ES1 enclosure (will be on the bottom when ES1 is mounted)