
User's Guide


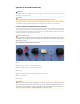


(2) Male metal-shielded RJ45 plug (arrow pointing at the plastic latching tab)
(3) Combined male WAPV inner and outer shell w/ soft plug and soft circular washer
(4) Cap
Note the location of the RJ45 plug’s plastic latching tab, pointed at by arrow (2) in the photo above.
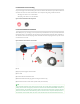
E.9 Mate and Then Cap the WAPV
Look inside the end of the combined male WAPV shell that faces the RJ45 plug. You should be able to see
the soft circular washer laying flat, and directly beneath that see the RJ45-shaped (keystone-shaped).
The keystone-shaped hole is like a rectangle with an extra small rectangular notch on one side. This
notch (at arrow 2 below) will need to be lined up to fit over the plastic latching tab of the RJ45 plug (at ar-
row 2 above) when mating the male connector to the female connector on the enclosure of the Bread-
Crumb ES1.
Figure: View inside the Combined Shells
(1) Soft circular washer laying flat on its shelf in the outer shell
(2) RJ45/Keystone-shaped hole, arrow (2) pointing at the notch
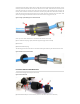
To mate the WAPV male (cable) and WAPV female (enclosure) parts:
• Align the keystone hole’s notch with the plastic latching tab of the RJ45 plug and slide the WAPV
combined shell over the RJ45 plug.
• Next, rotate the outer shell gently left and right while pressing forward until the shell’s rectangular
keys locate the matching channels in the outside of the female WAPV, and push the combined shell
further forward onto the female WAPV.
• Now bayonet the outer shell forward and clockwise (shown below by the yellow arrow below) to
connect the male WAPV to the female WAPV.
• To complete the mating, firmly screw the cap clockwise onto the combined male WAPV shells.
Figure: WAPV: Mating Male and Female WAPV