
User's Guide


F.2 DIN Rail Mounting Bracket
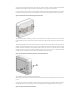
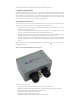
The DIN rail mounting bracket for BreadCrumb ES1 attaches to the back of the ES1 as described below.
This bracket assembly can be attached to a 35 mm top hat DIN rail.
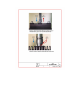
The following diagrams show a BreadCrumb ES1 with DIN rail mounting bracket attached. In these dia-
grams, the DIN rail mounting bracket is attached so the DIN rail clip will be over the left side of the ES1
(the side with the protective vent). It is also possible to attach the mounting bracket with the DIN rail clip
portion over the right side of the ES1. The end of the bracket where the DIN rail clip attaches has a choice
of two screwholes in the middle so the DIN rail clip can be attached in the proper orientation whether the
bracket is mounted over the left or right side of the ES1.
Reminder Regarding Orientation
Reminder Regarding Orientation
The following simplified diagrams do not show the external features of the BreadCrumb ES1 such as the
The following simplified diagrams do not show the external features of the BreadCrumb ES1 such as the
antenna ports, Ethernet port, Status LED. In all vertically-oriented diagrams, the side with the Ethernet
antenna ports, Ethernet port, Status LED. In all vertically-oriented diagrams, the side with the Ethernet
port, M8 port, Status LED is facing down. The flip-up covers on the front of the mounting hole accesses
port, M8 port, Status LED is facing down. The flip-up covers on the front of the mounting hole accesses
are also not shown in the following diagrams.
are also not shown in the following diagrams.
Figure: BreadCrumb ES1 DIN Rail Mounting Bracket Attached (Back Corner View)
Figure: BreadCrumb ES1 DIN Rail Mounting Bracket Attached (Front View)