Family Entertainment System /Elite by ELITE OWNER’S MANUAL
Cont ent s Operating Instructions USB / Memory Card Operations Safety Instructions ......................................... 2 Switching DVD / USB / Memory Card Mode .. 12 Setting Random ........................................ 12 CAUTION ...................................................... 2 Repeating Playback ................................. 12 Welcome ....................................................... 2 WARNING ..................................................... 2 PRECAUTIONS ...........
Operating Ins truc tions Welcome ‧Thanks for purchasing Seat Back Monitor with Universal Stanchion Mount. This manual will help you use the exactly features of your new monitor. ‧Please read all safety and operating instructions in this manual carefully, and keep this manual for future reference. Safety Instructions Be sure to observe the following instructions and precautions to ensure safe using of this monitor.
Operating Ins truc tions Using the remote control PRECAUTIONS Please read all safety and operating instructions in this manual carefully, and keep this manual for future reference. Personal Safety ‧The back seat passenger must fasten the seatbelt while operating this monitor. ‧Do not insert the USB or Memony Card while driving. Failure to do so may result in personal injury. Temperature Do not operate your unit in ambient temperature above +50°C (+122°F) or below 0°C (32°F).
Getting St arted Disc Cleaning Fingerprints, dust, or soil on the surface of the disc could cause the player to skip. For routine cleaning, wipe the playing surface with a clean, soft cloth from the center of the disc to the outer edge. If the surface is heavily soiled, dampen a clean, soft cloth in a solution of mild neutral detergent before cleaning the disc. Monitor Function Overview 7 8 9 On handling compact (CD/CD-R/CD-RW) 10 ‧Do not touch the surface. ‧Do not expose the disc to direct sunlight.
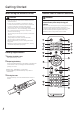
Getting St arted When Using the Remote Control Remote Control Function Overview CAUTION WARNING ‧Point the remote control at the remote sensors within 2 meters. ‧It may not be possible to operate the remote control if the remote control sensor is exposed to direct sunlight or interfere with objects. ‧The remote control is a small, lightweight precision device. To avoid damage, short battery life, operational errors and poor response, observe the following.
Getting St arted 1 Power Switch monitor power ON/OFF 2 3 Eject Stop playback and eject the disc. OSD 4 FM / IR 5 SETUP 6 MENU 7 SUBTITLE OSD Menu Enter or exit on-screen display menu system. FM Modulator (1) Press Once : Switch FM ON/OFF. ( 87.7MHz to 89.9MHz) IR Sensor (2) Press Twice : Switch IR A/ B/ OFF. Speaker (Option) (3) Press Third : Switch Speaker ON/OFF. DVD Setup Menu Disc Menu Subtitle Enter or exit the disc DVD setup menu. Return to disc contents menu.
Ba sic Operations Turning Power ON/ OFF 1. Press to turn ON. 2. To turn off the power, press and hold FM/IR (On/Off) FM ON/OFF (default: OFF) again. Loading Discs/ Unloading Discs Turn on the power before loading and unloading discs. ‧Be sure to switch to DVD soure, before loading and unloading discs. Loading Discs Insert the disc with the label side facing you. Once the disc is partially inserted, it is drawn in automatically. Playback starts.
Moni tor Set up Resetting Picture Adjustment Adjusting OSD Visual brightness, contrast, hue and saturation are adjustable. ‧Each source is independently adjustable. ‧Make adjustments within 10 seconds, otherwise the OSD (On Screen Display) will turn off automatically. 1. Press OSD to select Reset. 2. Press or to resetting adjustment. Reset will be set up in 00(median). To save adjustment or wait 10 seconds until OSD disappear, the adjustment will be save automatically. Reset Adjusting Brightness 1.
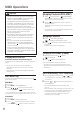
MMD Operations CAUTION ‧Not all function will operate for every DVD. See the individual MMD’s instructions for details on the features supported. ‧Fingerprints on a disc may adversely affect playback. If a problem occurs, remove the disc and check for fingerprints on the playback side. Clean the disc if necessary. ‧When using the remote control, be careful to press a button at time. Pressing multiple buttons at the same time may cause erroneous operation.
MMD Operations Finding the Beginning of Chapters Repeating Display Period (A-B) During playback, press beginning of chapters. 1. During playback, press A-B. or Use this function to set a display period repeatedly. to find the The chapter / track switches each time the button is pressed, and playback of the selected chapter / track starts. Repeat A- -Setting a display period start. Repeat A-B -Setting a display period end. Repeat Off -Canceling the setting of display period.
MMD Operations Displaying Disc Status Switching Subtitles (DVD only) Use the procedure described below to display the status (title number, chapter number, etc.) of the currently playing DVD/VCD/CD on the monitor screen. With multiple subtitle language DVDs, the subtitle language can be switched during playback, or subtitles can be hidden. 1. During playback, press DISPLAY. The playback The subtitle switched between the languages recorded on the disc and OFF each time the button is pressed.
USB / Memory Card Operations Setting RANDOM CAUTION ‧Not all function will operate for every formats. See the individual USB’s instructions for details on the features supported. ‧Do not use USB while driving your vehicle. Always stop the vehicle in a safe location before performing these functions. Failure to do so may result in serious injury or an accident. ‧If you try to perform an invalid operation (based on the type of disc being played), the message “ ” will be displayed on the monitor screen.
MMD Set up DVD Setup Operation The following steps 1 to 2 are common to each of the DVD settings described here. Refer to each section for details. General Setup Page TV display, Angle mark, OSD language, Screen saver and Last memory are adjustable. 1. Press SETUP button on the remote control. The setup menu appears on the monitor. 1. Press and hold SETUP on the remote control. The setup menu appears on the monitor. 2.
MMD Set up Setting Angle Mark (default: On) Setting Screen Saver (default: On) 4. Press or to select angle mark On / Off. 5. Press ENTER to save adjustment. 4. Press or to select screen saver ON or OFF. 5. Press ENTER to save adjustment.
MMD Set up Setting Bass Boost (default: Off) Audio Setup Page Dolby Digital, Equalizer and 3D Processing are adjustable. 1. Press SETUP button on the remote control. The setup 4. Press or to select bass boost On / Off. 5. Press ENTER to save adjustment. menu appears on the monitor. 2. Press 3. Press or to select Audio Setup Page. or to select DOLBY DIGITAL / EQUALIZER / 3D PROCESSING, then press ENTER to confirm a selection.
MMD Set up Setting Audio Language (default: English) Preference Page TV type, PBC, Audio, Subtitle, Disc Menu and Parental are adjustable. 1. Press SETUP button on the remote control. The setup menu appears on the monitor. 2. Press 3. Press or to select Preference Setup. 4. Press 5. Press ENTER to save adjustment.
MMD Set up Setting Disc Menu Language (default: English) 4. Press or language. to select desired disc menu ‧There are 9 kinds of languages can be chosen. (English, French, German, Spanish, Chinese, Japanese, Korean, Russian, Thai and Others.) 5. Press ENTER to save adjustment.
Ins tallation and Conn ections Before installing or connecting the unit, please read the following and page 2~4 of this manual thoroughly for proper use. CAUTION: The back seat passenger must fasten the seatbelt while operating the unit. WARNING: Make the correct connections. Failure to make the proper connections may result in fire or product damage. Use only in cars with A 12 volt negative ground. (Check with your dealer if you are not sure.
Ins tallation and Conn ections Parts Indication 1 2 3 4 5 6 1. LCD Monitor 2. Slide Rail 3. Slide Bolt 4. Slide Block 5. Ball 6. Knob 7. Link 8. Slide Block Linkage 9. Stanchion Washer 10. Power Cable 7 8 9 10 Limitation Before installation, please make sure that the shape of headrest is available for installation.
Ins tallation and Conn ections Installation Setp 1 3 Install the slide block linkage Remove the headrest Remove the headrest from the seat. (Figure 1) The headrest stanchion through the slide block linkage. (Figure 3) Headrest Headrest stanchion Headrest stanchion Slide block linkage Buckle (Figure 3) (Figure 1) CAUTION Be sure to remove the electric sensor before removeing the electric headrest. 2 Measure the diameter of headrest stanchion If the diameter of headrest stanchion is less than 16.
Ins tallation and Conn ections 5 Installation or adjust the monitor CATION: 1) After positioning the slide bolt where you want, then fixed to the slide bolt on the slide block by tighten to the most. (Figure 5-1) If the slide block gets stuck with the knob, please use pliers to remove it. (Figure 5-4) And reinstall from step of this page. ※ CATION: Please tighten the slide block as tight as possible.
Ins tallation and Conn ections 7 Installing the power cable Please choose a way to route the power cable. A. Line through the buckle 1) Push the power cable into the buckle of the headrest stanchion carefully. If you run into any obstacles, please rotate the cable or pull back slightly and push again to pass through. 2) The power cable should pass through the bottom of the seat finally. (Figure 7-1) Monitor Headrest stanchion Buckle Power Cable (Figure 7-1) B.
Ins tallation and Conn ections Connections AV Connectors Yellow Video Input Connector Black This connector is used in combination with the video inputs of other video products (AV head out or TV Tuner). White(L) Audio Input Connectors Red ( R) These connectors are used in combination with a head unit or TV Tuner with audio output connectors.
Ins tallation and Conn ections System Connections Multi Media Station TV Tuner AV Input R V L AV Output V V R R V R L L ( )GND (Black) (Black) R Power Filter V (Black) V L L Body ( ) Remote In AV Output R L AV Input Remoten Out (Blue) (Red) ACC ( ) (Red) (+)ACC (Yellow) Antenna (Green) (Blue) (Black) AV 3 (Figure 1) Seat Back Monitor AV Input AV 3 (As Figure 1) V V V R R R L L L (Blue) Power Cable (Black) Signal Cable Game Player iPod 24
Inf ormation Accessories Screen Slide block x1 Allen key Sliding block linkage x2 Signal cable Stanchion washer - 10mm x2 - 12mm x2 - 14mm x2 x2 AV3 Cable x4 Remote control USB/ DVD RAN DOM x1 AAA Battery (For remote control) x1 User manual x1 Power Filter (Option) Rear-Seat Entertainment US ER M AN UA L ER X FI LT BO TH090MSC Seat Bac k Monito r With Unive rsal Sta nchio n Mount OU T IN x2 25 x1 x1 x1
Inf ormation General Specifications DISPLAY SCREEN Size 9 inch Aspect Ratio 16:10 10.2 inch Type Transparent type TN Liquid Crystal Display System TFT-LCD, Active Matrix Number of Elements 800(W)x480(H)x3 1.152M pixels (WVGA) Back Light LED Brightness 300cd/m 2 Auto Dimmer Built-in USB Interface USB 2.0 (Up to 4G) Card Reader MS/MMC/SD compatible (Up to 4G) GENERAL Operating Voltage Form 10V to 16V (DC) Typical : 12V Power Consumption 1.2A (MAX) 0.82A (TYP) 0.
Inf ormation Troubleshooting CAUTION If you encounter a problem, please turn the power off, then on again. If the unit is still no functioning normally, please review the items in the following checklist. This guide will help you isolate the problem if the unit is at fault. Otherwise, make sure the rest of your system is properly connected or consult your authorized dealer. No function or display. Vehicle’s ignition off.
Inf ormation Image stops sometimes. Disc is scratched. - Replace with an non-scratched disc. Picture is unclear or noisy. Disc is being fast-forwarded or fast-reversed. - The picture may be unclear, but this is normal. Vehicle’s battery power is weak. - Check the battery power and wiring. (The unit may malfunction if the battery power is under 11 volts with a load applied.) Monitor’s fluorescent tube is worn out. - Replace the monitor fluorescent tube. Image stops sometimes. Disc is scratched.
Inf ormation Warranty Card ‧We will delivery the product after it passed the tight quality control and detailed examining. CAUTION: ‧Please record the serial number of your unit in the space provide below and keep it as a permanent record. The serial number plate is located on the back of the monitor. ‧If the units didn’t have serial number or miss it, we will unable to offer warranty for the units.
99-0340-000 12/10