vMix User Guide Copyright © StudioCoast Pty Ltd
vMix User Guide Table of contents Introduction and Features .................................................................................... 6 Getting Started ................................................................................................... 9 Presets ............................................................................................................. 10 New Preset ...................................................................................................
vMix User Guide NDI - Network Device Interface ............................................................... Local Desktop Capture ........................................................................... Desktop Capture ....................................................................................... Stream / SRT ............................................................................................ SRT ........................................................................................
vMix User Guide Recommended Recording Settings .................................................................. 93 Setup ........................................................................................................... 94 Record ......................................................................................................... 97 Second Recorder ........................................................................................... 97 Fault Tolerant Recordings ........................
vMix User Guide Data Sources ................................................................................................... Types of Data Sources ................................................................................. Setting up a new Data Source ....................................................................... Mapping a Data Source to a Title ................................................................... Controlling Data Sources ...................................................
vMix User Guide Introduction and Features Click here to Download this User Guide as a PDF vMix is feature rich live production software that allows you to record and stream professional productions all from a single PC or Laptop. vMix supports SD, HD and 4K productions. The two major system requirements for vMix are Windows 7 or higher and a DirectX 10 compatible graphics card. More detailed requirements can be found on the Supported Hardware page on our web site. http://www.vmix.
vMix User Guide · Video Call / Remote Guests Live Video Mixing Effects · Cross Fade · Cut · 3D Zoom · Slide Effect · Wipe Effect · Cube Effect · FlyRotate Effect · Fly Effect · CrossZoom Effect · Merge Effect · Colour Keying and Chroma Keying with Auto Green or Blue Screen · Stinger Transitions Live Video Filters · Colour Correction · Black/White Level Adjustments · Colour Keying and Chroma Keying (Blue or Green screen) · Luma Key · Key and Fill sources · Deinterlacing
vMix User Guide · Set start time, duration and transition effect for each item in the PlayList Output · Output 4 formats simultaneously (Screen, Recording, External Output, Streaming) · Default output to secondary computer display or projector · Output to web sites such as USTREAM and YouTube Live · Output over NDI - Network Device Interface to other devices on the same network · Output over SRT - Secure Reliable Transport to other devices over the internet or local network.
vMix User Guide · vMix Call allows you to add remote guests to your vMix production with high quality audio and up to HD video. Delay · vMix introduces approximately 2 frames of delay between input and output. This is similar in performance to standard HD switchers.
vMix User Guide 3. Tabs Colour coded tabs on the left hand side can be used to organise Inputs into categories and tabs on the right hand side can be used to dock features such as the Audio Mixer and Instant Replay Controller 3. Input Bar (Bottom row) Each source such as Camera, Video and all other types of Inputs are loaded into this Input Bar. A small real-time preview window is shown for each of these inputs. If you click any of these items they will be queued in the Preview Window ready to go.
vMix User Guide The Preset bar at the top left hand corner of vMix is where you can quickly save your production, including Inputs, recording and streaming settings to file. This Preset can then be recalled again at a moments notice.
vMix User Guide Open Preset Open Preset opens up a file open dialog where you can select an existing Preset. Once a Preset has been selected the Open Preset window will appear. Click Open to close all open inputs and replace them with this Preset. Any settings included with the Preset will also be applied (See here for more information) Click Append to add the inputs in this Preset to the existing session. Any settings included with the Preset will be ignored.
vMix User Guide Video Controls The Preview Window and Output Window have various video controls available: Position Control For non-live inputs (such as Video and DVD) the position control allows you to skip to any point. Restart Button Restarts a non-live input (such as Video or DVD) from the beginning. Play/Pause Button Fullscreen The Fullscreen button can be used to display video through one of the video outputs on your computer Graphics Card.
vMix User Guide Preview Display the input currently selected in the "Preview" area of vMix (left hand side). MultiView Display Preview, Output and 8 or more Inputs in one of the configurations below. All configurations with the exception of Legacy include audio meters and titles. Preview / Output + 8 Inputs Preview / Output + 14 Inputs Preview / Output + 2 Inputs Legacy Preview / Output + 8 Inputs without titles and audio meters. The Preview and Output inputs will be identified by a coloured border.
vMix User Guide The Quick Play button automatically transitions the Preview Window to the Output Window and for video inputs, starts playing input from current position. There is also a Quick Play button for each input. By default Quick Play is set to a half second fade. This can be customised in Settings - Options Cut The Cut button instantly swaps the Preview Window with the Output Window without any delay or transition effect.
vMix User Guide Merge Effect The Merge effect is a unique transition effect that seamlessly animates matching Inputs between Preview and Output. In the above example, clicking the Merge transition will zoom the fireworks graphic out of the double box until it fills the screen. Any other layers or inputs that do not appear in both Preview and Output will transition using the Fade transition effect.
vMix User Guide Note: Stinger Transitions are only supported on vMix editions with more than one Overlay channel such as vMix HD. Stinger Transitions allow the use of an animation instead of a fade or cut when transition between Preview and Output. Configuration 1. Add the animation you wish to use as an Input. The Image Sequence option is recommended as it supports high quality animations with full alpha transparency. 2. In the Overlay settings window, select Stinger 1 from the Number dropdown box. 3.
vMix User Guide When the stinger transition is required, simply click the transition button as you would any other effect FTB (Fade To Black) Fade to black the following: · · · Recordings External Output Fullscreen The Output window will not be affected by the Fade to black in order to make it easier to queue up a source for later.
vMix User Guide Getting Started Two production clocks are available which can enabled by ticking the Production Clocks checkbox in Settings -> Options A 1920x1080 display or higher is recommended, as the Production Clocks will be hidden if there is no space available below the T-Bar. Other elements above the Production Clocks can be disabled from Settings -> Options as well in order to free up space.
vMix User Guide Inverted: By default the display will have a black background. Click the Inverted button to switch this to white. Type: Select the type of time to display out of Clock, Event, Recording and Streaming. Precision: Determine how accurate the time is that is displayed out of Minutes, Seconds and Fractions. The font size will automatically decrease at higher accuracies so the entire time will still be displayed, so if a bigger font is desirable select Minutes here.
vMix User Guide The six categories are RED, GREEN, ORANGE, PURPLE, AQUA and BLUE Each colour has no special significance and can be used for any purpose that suits your production. For example, Titles could be placed in the PURPLE category and Video Clips in the ORANGE category. Adding Labels to Categories Labels can be added to particular categories by right clicking any category button so the Input Categories window appears.
vMix User Guide View All Inputs All inputs can be viewed at any time by clicking the left most button. This button is GREY under the default vMix theme. Currently Selected Category The currently selected category will be indicated by a matching coloured separating line between the category buttons and the inputs as shown below.
vMix User Guide Changing An Input's Category There are two ways to change an Input's category: 1. Drag and drop the inputs preview window (the video thumbnail square, not the title) over the top of the category button you wish to assign it to. 2. Select the Category from the Input Settings window. When an Input has been assigned to a particular category, the Input Settings button will be changed to a matching colour.
vMix User Guide The Overlay Settings window specifies how an Overlay will display. The window can be accessed by clicking the Overlay button in the bottom right hand corner of the main window. Number Select the overlay channel to configure. 4 Channels are supported in the SD and HD editions. Type There are two types of overlay available: Fullscreen Display on top of the currently selected Input. Picture In Picture Display on top of the currently selected Input using the specified Pan and Zoom settings.
vMix User Guide The following is a list of some of the right click menus available Video Show/Hide PlayBack Speed: Displays a dropdown box next to the input to control the speed of video playback in real time. Pictures/PowerPoint SlideShow Settings: Shows the SlideShow settings window. DVD DVD Menu, Next Chapter, Previous Chapter, Jump To Title NDI / Desktop Capture Change the NDI or desktop capture source on the fly using the right click menu Titles Title Editor: Show the Title Editor window.
vMix User Guide Create Virtual Input See the Create Virtual Input section of Input Settings - General Create Snapshot See Snapshot section of this help file. SlideShow Settings The SlideShow Settings window is available for Photos and PowerPoint inputs from a right-click menu. This window can be resized and placed on a separate screen if required.
vMix User Guide Export Export all settings to file. These settings can be imported from any other vMix installation as long as the version is the same. Default Restores settings to when vMix was first installed. Display Theme There are multiple themes available that change the colour scheme of the user interface. Preview/Output Colour Customise the colour to display for the input currently set as Preview or Output. Master Frame Rate All inputs will be converted to this Frame Rate.
vMix User Guide Position By default the Output Screen will be set to fill the entire screen. Output Position can be used to set a custom size if necessary. The four boxes are Top, Left, Width and Height. Hide Cursor: Hide cursor from Fullscreen window. On Top: Fullscreen window will always be on top of other windows if displayed on a different display. If displayed on the same display as vMix this option will have no effect. Minimise: Minimise Fullscreen window when vMix is minimised.
vMix User Guide These additional outputs are available for use with Video Call, Instant Replay, SRT and NDI only. Cameras / Calls / Audio Inputs This option can be enabled to automatically convert any cameras, calls and audio inputs in the current vMix session into live NDI outputs. See the NDI section for more information. Audio Outputs This option can be enabled to convert all enabled audio buses under the Audio Outputs tab into live audioonly NDI outputs. See the NDI section for more information.
vMix User Guide Title Location The headings for each item in the MultiView can be placed either above or below the preview. Preview/Output Headings The headings on the Preview/Output windows is set to display "Preview" and "Output" by default but can be changed here to display the actual input title. Options Select the language vMix will use for buttons, labels and messages. These languages are provided by Google Translate and are not guaranteed to be accurate.
vMix User Guide Automatically clicks the Advanced button on startup. Start Fullscreen display Ticking this open will automatically display the Fullscreen window on startup. Start Maximised Start External Output Automatically start the External Output according to the settings under the External Output tab Remember Window Position If the main vMix window is not maximised, this checkbox will remember the position this window and restore its position each time vMix is opened. Display confirmation for ...
vMix User Guide Controller Plug And Play Enabled When ticked, vMix supports detecting when MIDI and X-Keys controllers are plugged in / unplugged while vMix is running. Performance Graphics Adapter This is for selecting the graphics card vMix will use on systems with multiple graphics cards installed. For best performance this should match the graphics card that monitor displaying the vMix interface is attached to.
vMix User Guide Decoders Preferred Deinterlacing Select the preferred deinterlacing method, when using Progressive output formats in vMix. For example, if you have a camera set to 59.94i and the Master Frame Rate is set to 29.97p, then vMix will deinterlace the camera according to the settings here. Blend: Blends the two fields together to form a single progressive frame. Motion blur may be seen on fast movement. Discard: Uses the first field for each frame and discards the second.
vMix User Guide ffdshow is disabled. Recording Default Folder for Recordings Select a default folder to use when storing recorded videos. Filename Format The filename format is for advanced users that need to change the way video recordings are named. The default is {0} - {1:dd MMMM yyyy - hh-mm-ss tt} Recording Memory Buffer Set the memory buffer to use when recording video. This can be used to reduce dropped frames on systems with slow hard drives. The recommended value is 10.
vMix User Guide Select this option to output to the vMix Video device when External Output is running. vMix Video is a device that appears in 3rd party applications such as Adobe Flash Media Live Encoder and Skype and is also used for the built in Streaming feature. Use Streaming Settings: When ticked this option will match the streaming quality settings and should remain ticked for the best results when streaming.
vMix User Guide Audio Delay This sets a delay on the audio input in milliseconds. For example if the audio is earlier than the video by 200ms, type in 200 here. Audio Automatically mix audio By default vMix will automatically swap the active audio to match the active input. If this box is unticked, vMix will leave the audio as is and any changes will need to be done manually. Show Master Audio Meter in Main Window Display a master audio meter in the middle of the main window.
vMix User Guide Audio Outputs allows up to eight independently controllable audio outputs (excluding Headphones output) If both Master Output and Headphones are set to the same device, Headphones will take priority. Master Output Select the output to send the Master audio mix to. This is the default audio mix used for streaming, recording and external output. Headphones Select the output to send the Headphones audio mix to. This mix is the same as Master Output except when Solo is enabled on an input.
vMix User Guide 5 + 6 This will send a stereo mix out over the output usually used for RearLeft-RearRight VST devices may offer more than 3 outputs in mono or stereo (1+2) configurations which can also be selected here. When selecting a mono output, the stereo mix in vMix will be mixed down to mono automatically. Default Bus for New Inputs Advanced audio scenarios may require inputs to be sent to an auxiliary bus such as A and B when they are added for the first time. This default can be configured here.
vMix User Guide Scripting Add and edit custom programming scripts here in 4K and Pro editions of vMix See Scripting and Automation for more information About Change Registration Key Upgrade your software license here. Advanced Settings The following are Advanced Settings that are only visible when the Show Advanced Settings tick box is enabled. IMPORTANT: These settings should not be changed unless instructed to do so by vMix Support.
vMix User Guide circumstances. Disable Effects on Input Windows Disable render effects such as Deinterlacing and Colour Correction on the Input Windows. Synchronise Output with Refresh Rate Tick this option to eliminate tearing on the Fullscreen Output Window.
vMix User Guide See Recording Audio for more information. Inputs Inputs are the various sources that can be loaded into vMix. For example Camera (Video Camera), Video or a DVD. They will appear along the Input Bar as shown in the screenshot below. There are a couple of mouse shortcuts available: 1. Clicking an Input Window will set it as the current Preview Input. 2. Double Clicking the Title Bar will open up the Input Settings window. 3.
vMix User Guide Adding and Removing rows Multiple rows of inputs can be displayed in the main vMix window by dragging up or down the dividing line as shown below: The number of rows that can be added or removed depends on the display resolution set in Windows. 1920x1080 is recommended and allows up to three rows of inputs to be displayed at a time. If more inputs are added than can be displayed, a scroll bar will appear to the right of the inputs.
vMix User Guide The Start and End points are marketed by a Green square for Start and a Red square for End. To change the Start point, drag the bar to the chosen position and right click to select Mark In from the menu.
vMix User Guide To change the End point, repeat these steps only select Mark Out from the menu instead. DVD Select a DVD drive or folder to load a DVD as an input. Controlling DVD playback vMix supports clicking on DVD menu items from the Preview or Output windows. You can also manually select chapters and go to the menu by right clicking the Input, Preview or Output window where a DVD is currently playing. List The List feature can be used to create a playlist of video and audio files.
vMix User Guide M3U files are supported which can contain a combination of video and audio filenames. List Control To switch between items with the playlist, right click the preview area of the input and left click the item from the dropdown list. Edit Items Click Edit Items in the right click menu to open up the List Editing Tab in the main vMix window. This tab can be undocked and placed on a separate monitor by clicking the pin hand corner.
vMix User Guide Interlaced Individual videos in the list may not be detected as Interlaced in some situations. Toggle this button to enable interlaced processing for a particular video. Add Click the Add button to add one or more items to the list. Files can also be dragged and dropped into the Edit - List window Edit/Remove Click Edit to change the name of the selected item Click Remove to remove one or more items from the list.
vMix User Guide Camera Camera is used to load in supported Video Capture Devices and Video Cameras. Camera Select the device to use here. Input Specify the capture input to select such as SDI or HDMI. Resolution Specify the capture resolution to use. Frame Rate Specify the frame rate to use. Interlaced Untick the interlaced Check Box if the source video is in PsF format.
vMix User Guide Audio Input Some cameras support selecting a particular audio input or channel here. If using an AJA, Blackmagic or Magewell device, EmbeddedAllChannels can be selected to bring up to 16 channels of audio in at once. These channels can be then be mixed from the Channel Mixer. Audio Device Select an Audio Device that matches the video capture device. Audio Format Select the Audio Format for the audio device above.
vMix User Guide In the screenshot above, there are four NDI sources available across two different computers. Adding Remote Desktops You can bring into vMix the desktop of a remote PC or Mac simply by downloading and running the free vMix Desktop Capture application from the vMix web site. http://www.vmix.com/software/download.aspx While the vMix Desktop Capture program is running, any windows open on that computer will appear in the NDI list.
vMix User Guide Additional Settings Low Bandwidth Mode: This will switch NDI to use a low resolution / low bandwidth version of the source video. Audio Only: Disable video, only bring in audio from NDI source. PsF: If NDI source is a camera that sends progressive over interlaced video, tick this box to improve video quality. Increase Buffer Size: On unstable/wireless networks, ticking this option can improve the smoothness of the video. Will increase latency by approximately 5 frames.
vMix User Guide Windows 10 will always work when capturing individual windows regardless of theme. Window Capture Method Select the method used to capture individual Windows. GDI: This will work on the vast majority of systems with the exception of Windows Store apps and browsers such as FireFox and Chrome. WindowsGraphicsCapture: This is available on Windows 10 1809 or higher and captures most applications including browsers and Windows Store apps.
vMix User Guide Transport Stream over TCP Pull Select this option to connect to a remote Transport Stream server such as the Teradek Sputnik using the TCP protocol. Enter the hostname and port of the remote Transport Stream server VLC The VLC option uses the free VLC Media Player software to connect to the stream. This requires installing a special version of VLC which can be downloaded and installed from here: http://www.vmix.
vMix User Guide The following settings are available: Stream Type Listener: Listen on the specified Port on all network adapters on the computer for connections. Hostname is ignored. Caller: Connect to the specified Hostname and Port. Rendezvous: Connect to the specified Hostname and Port. The other side must also be set to Rendezvous with an identical port number specified. This mode allows connecting through most firewalls automatically.
vMix User Guide Any MultiCorder recordings of this input will save the stream directly to file without using the compression settings specified in the MultiCorder window. Instant Replay Full documentation on Instant Replay can be found below: Instant Replay User Guide Image Sequence / Stinger Image Sequence / Stinger can be used to automatically load a series of images as an animation.
vMix User Guide Seconds: Select the delay buffer size in seconds. This is an approximate value based on a 30FPS input. Control Record: Turn on or off the updating of the Video Delay. Speed (100%): The delay can be played back at a variety of speeds including full speed and slow motion such as 50%. Save Seconds (10): Select the number of seconds of the most recent Video Delay footage to save to file.
vMix User Guide Selecting a Transition time By default, the Photos input will remain on the first image until the backward and forward buttons are pressed. You can automatically transition through the list by right clicking the Input and selecting a transition time from the SlideShow Settings window. PowerPoint Load a PowerPoint slideshow with this option. You must have a copy of PowerPoint installed to use this option. A SlideShow Settings window is available for this input.
vMix User Guide The text in each template can be edited through a right click menu on the Input. Editing Title Content (Text Editor) Titles can be edited from the Text Editor right click menu (see above) The four icons, from left to right are: Font Decrease Font Size Increase Font Size Font Colour Ticker Settings (To set Ticker duration/speed and other ticker related settings) Live Mode While the Live button is green, all text typed into the Title Editor window will update the title in real time.
vMix User Guide Click the Live button to display live updating and click it again once all changes have been made. Title Presets Click the + button to save the text from all the elements in the title as a preset. This preset can be selected by right clicking the input in the main vMix window to recall these values at any time.
vMix User Guide NOTE: At this feature relies on Adobe Flash Player for support, a number of restrictions and limitations, particularly with audio apply. To bring in RTMP streams, consider using the Stream input instead with the VLC dropdown option. Flash Settings URL A URL can also be typed in if it refers directly to a SWF file. e.g http://www.example.com/test.
vMix User Guide Camera The Camera Tab provides thumbnail previews of the camera angles available within the Virtual Set. To switch to a camera angle, simply click on the thumbnail. To customise the camera angle, right click on the thumbnail. The speed of the camera zoom is determined by the F (Fast), M (Medium), S (Slow) and C (Cut) buttons above the thumbnail previews. Setup The Setup Tab can be used to adjust the various layers that form a complete Virtual Set.
vMix User Guide URL Type in the full web page URL that you wish to display. For example: http://www.vmix.com/ Width, Height Specify the Width and Height in pixels when rendering the web page. If these are set to a size smaller than the vMix Output Size, the web page will initially be displayed centred and at the reduced size. This is handy for HTML widgets you may wish to use as Overlays as they will show at the correct size and simply need to be moved into position from Input Settings - Position.
vMix User Guide Mix The Mix input allows adding up to three additional "mini mixers" that support basic transitions and cuts between two different inputs. To add a Mix input, click the arrow next to Add Input in the main vMix window and click the Mix option. Note: Mix is only available in 4K and Pro editions of vMix. Once added, the input looks like the following: The Preview and Output dropdown boxes can be used to select the inputs you wish to mix.
vMix User Guide Shortcuts The following shortcuts can be used with an optional Mix parameter, where 1 is equal to the main mix in vMix and 2 is equal to the first Mix input. PreviewInput ActiveInput Fade, Zoom, Wipe etc Restrictions The Mix input is intended as a basic video mixer/switcher only, as a result the following features are not available: · · · Stinger transitions Overlays (inputs can still be setup manually through the standard input MultiView feature) Auto play/pause/restart of inputs.
vMix User Guide · · both the main mix and an input mix) Audio auto mixing. T-Bar transitions Input Buttons Input Buttons are the buttons available underneath each input. Close Close the Input and remove it from the Input Bar. Quick Play Fades directly to the Output Window and for video inputs, starts playing input from current position. Cut Cuts directly to the Output Window and for video inputs, starts playing input from current position.
vMix User Guide Settings (Cog Icon) See the Input Settings section. Live Pause Live inputs such as Camera, NDI and Desktop Capture can be paused without turning off the underlying live feed. Click the pause button under the input to activate this feature. To resume the live video click the button again to play. NOTE: This will not affect MultiCorder, Instant Replay or Video Delay. These will continue to receive the live feed from the inputs as normal while pause.
vMix User Guide Change Click Change to change the source of this input while preserving all settings including colour adjustments, chroma key, position and multi view. Settings Name: Change the name of the input as it displays in the title bar. Mouse Click Action: Select the action to take when the preview window of this input is clicked. By default this is to send the Input to preview. Aspect Ratio: manually change the aspect ratio of the input.
vMix User Guide Premultiplied Alpha: Tick this box if the source is using premultiplied alpha which is often the case with MOV and other video formats containing an alpha channel. Colour Correction vMix allows professional colour correction for every input in addition to the basic tools provided by the Colour Adjust tab.
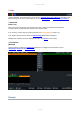
vMix User Guide Colour Bars Press the top button labelled "Display: Colour Wheels" to switch to colour bar mode. Each of these three bars can be dragged up and down to adjust the Red, Green and Blue levels of the image respectively. Hue / Saturation Drag these bars left or right to adjust the image Hue or Saturation respectively. Presets A file containing the Lift, Gamma, Gain, Hue and Saturation settings can be imported and exported from the Presets menu for use in other productions.
vMix User Guide The red green and blue channels will typically look quite similar. In this example however, we can see the highlights (top of each waveform) are well below optimal brightness. To adjust these channels so they match, change the colour wheels to colour bars by pressing the "Display: Colour Wheels" button. Next, slowly drag the red green and blue bars below the Gain heading upwards until the waveforms reach the top line.
vMix User Guide Lift can be used to drag the waveforms towards the bottom line, and finally Gamma can be used to adjust the waveform around the middle of the image. Switching back to Colour Wheels allows us to see how these adjustments look from a different perspective.
vMix User Guide As you can see the colour has been shifted slightly towards the blue/green, with a small amount of overall brightness added to all colour channels. (Black/White bar to the right of the colour wheel) Colour Key Colour Key can be used to select a transparent colour when using an input as an Overlay or inside a Virtual Set. This option can also be used with a green screen, see the options below for more information. Select: Manually select the colour that will be made transparent.
vMix User Guide Auto Chroma Key Presets: Click the 1, 2 or 3 button presets to automatically select settings suitable for use with a green/blue screen. Depending on your green screen setup some of these presets may work better than others. The sliders can then be adjusted slightly to fine tune. Advanced Chroma Key To achieve a high quality chroma key: 1. Click Auto Colour Key at the top of the window and select a colour. 2. Click Auto Chroma Key towards the bottom of the window. 3.
vMix User Guide Select up to 10 inputs to display in one of the selected configurations. For example, split screen and picture in picture. Each of these inputs can be positioned by dragging the windows within the preview box at the bottom of the window. Hold down shift while dragging to resize each input. Alternatively click one of the Position buttons to adjust manually from the Position tab.. Once the positions have been configured, the Add button on the right hand side can be used to create a template.
vMix User Guide Triggers can be used to automate tasks when an Input either begins a transition (OnTransitionIn), begins a transition out (OnTransitionOut) or when a video completes playback (OnCompletion) OnOverlayIn and OnOverlayOut can also be used when an Input is used as an Overlay An unlimited number of tasks can be added, with each task running in the order it appears in the list. In the example above the Title 1 input is turned on as an overlay 1 second after the current input begins a transition.
vMix User Guide MultiView Overlays, only the Input A trigger will be used. The exception to this is OnCountdownCompleted which will trigger regardless. Tally Light See Tally Lights PTZ See PTZ - Pan Tilt Zoom Advanced Filters View and change properties for the DirectShow filters used to display this input. Delay (Capture inputs only) Set a fixed video delay in frames.
vMix User Guide Audio Audio Mixer Audio Settings Control settings such as Gain and add effects including Compression, EQ and Noise Gate here Audio Plugins Recording Audio Audio Meters Audio Mixer Click the Audio Mixer button on the right hand side of the main interface to bring up the Audio Mixer tab as shown below. Each fader also includes an Audio Level Meter for the Left and Right channels respectively.
vMix User Guide Detach Button The Audio Mixer can be detached from the main vMix window by clicking the Pin button. To dock the Audio Mixer back again, click the Minimise button of the detached Audio Mixer window. Outputs The Master audio mix is displayed here alongside Bus A and B if they have been configured. Headphones volume can be configured independently by spinning the Headphone volume control knob. Inputs Each Input that contains audio will be displayed here.
vMix User Guide Click the speaker icon to Mute/Unmute an audio input. Automatically Mix Audio Click the Green and Orange Arrow button to enable/disable automatic mixing of audio. This option is also known as "Follow" on traditional video switchers. Audio Buses vMix allows for up to eight independent audio buses (including Master) to allow for complex audio routing scenarios including mix minus. M M is the Master or Default audio mix and is sent to Recording, Streaming and External Output.
vMix User Guide Audio Settings General Headphones Volume Each audio input can have its own independent headphones volume set. This is great for situations where you want an audio source such as a microphone audible on the final recording or stream but do not want to hear it in your own headphones as the slight audio delay coming from your own microphone can be disorienting. The headphones volume circle can be dragged up to move to the right (more volume) or dragged down to move to the left (less volume).
vMix User Guide These audio meters can be used to monitor the audio audio at the pre-effects stage (for any effects, volume or gain, including delay) and the post-effects stage (after all effects, volume, gain and delay have been applied) Format Displays the current audio format of the input Channel Select the audio channel to use for this input. If you have a Microphone plugged into the left channel or right channel independently. Select SeparateMono here.
vMix User Guide Compressor Compressor is a standard dynamic audio compressor. Ratio: Specify a Ratio other than 1:1 to turn on the compressor. Threshold: Specify the sound level for compression. Any audio above the threshold will be compressed (volume reduced) according to the ratio above.
vMix User Guide Channel Mixer The channel mixer can be used to set the volume level of individual channels. An independent audio meter is also available for each channel. Channel Matrix Channel Matrix is an 16x16 audio router built in to every input. This can be used for simple setups such as routing a mono Microphone channel to both Left and Right, all the way up to advanced scenarios where each of the independent NDI or SDI Embedded audio channels can be routed to one of the eight stereo audio buses.
vMix User Guide Example: Convert Mono Microphone on Channel 1 to Stereo Click all the boxes so they are green like the following: Example: Route 3 independent stereo audio language pairs to the 3 output buses.
vMix User Guide The first two channels are routed to Master/Headphones L+R, the second two are routed to Bus A L+R and the final two are routed to Bus B L + R. Audio Plugins The Audio Plugins feature allows adding 3rd party audio plugins to inputs and outputs in vMix. vMix supports all 64-bit VST3 audio plugins. VST3 is a popular audio plugin standard by Steinberg commonly used by DAW (Digital Audio Workstation) software.
vMix User Guide 4. Click the + button to add a new plugin. Select the plugin to add from the Driver and Plugin dropdown boxes and click OK. There are two boxes because some plugins may have multiple variations available within a single plugin set. In the above example the free "OldSkoolVerb" plugin has been selected, which is an audio reverb plugin. 5. Once added, the plugin will appear in the list. To configure the plugin's settings click Show Editor.
vMix User Guide Temporarily turning on or off individual plugins A checkbox next to each plugin in the list can be used to turn on or off that plugin. Adjusting the plugin processing order Plugins are applied to the audio in the order they appear in the list starting from top to bottom. The two arrow buttons at the right side of the list can be used to change the order. Recording Audio There are a number of ways to use audio in a vMix production.
vMix User Guide controls. More details can be found in the Audio Settings section. The Master audio mix includes all inputs in vMix, including Cameras, Microphones and Videos and will be recorded according to the levels set in the built in Audio Mixer. Make note of the Automatically Mix Audio setting as this determines if audio sources are automatically muted when not in use.
vMix User Guide 2. External Audio Mixer Main Mix / Output connected to vMix This is the final audio mix that should include all audio needed for the recording and stream. This connection from the mixer to vMix can be made using a USB Audio Interface or the built in USB capabilities of some audio mixers (recommended) Or using the Line In / Microphone input on the computer. If using the computers Line In, be sure to confirm the audio mixer output is "unbalanced".
vMix User Guide 5. A negative audio delay should also be used to compensate for the delay of routing all audio externally. This can be done from the Recording Setup window and also Settings -> External Output for the Stream You may need to adjust this to suit your particular setup, but in general a delay of -80 for 30p and -100 for 25p works best.
vMix User Guide Audio Meters vMix displays Audio Meters in four different locations: 1. Main interface (next to transition buttons) 2. Next to each Input containing audio 3. Audio Mixer 4. Audio Settings Each audio meter will display green levels when the audio is turned on and blue levels when muted.
vMix User Guide The audio meters are also colour coded into 5 distinct bands to make it easy to determine the approximate audio level at a glance. Levels are always displayed in dBFS (digital "full scale") where 0 dB equals the maximum possible volume for a given bit rate. Peak Levels So see the maximum peak levels of an audio source at any time, hover the mouse over the audio meters. The peak level displayed here is calculated as the maximum audio volume (amplitude) received in the past ~2 seconds.
vMix User Guide The output of this audio mixes can also be independently selected for the Recording, Stream and External Output as described below. Enabling an Audio Bus/Mix The Master mix is enabled at all times however, the A to G buses will only be enabled if a device is selected from the dropdown. To enable the A to G buses, do one of the following in Settings -> Audio Outputs 1. Select Enabled from the dropdown box. or 2.
vMix User Guide Recording vMix supports recording the Output into a number of formats including AVI and MP4. Recommended Recording Settings Setup Record Second Recorder Fault Tolerant Recordings vMix Video Codec WAV File Record Recommended Recording Settings Highest quality HD and SD vMix AVI Pros: Near Lossless video quality, fast post production editing, fault tolerant. Cons: Very large file sizes, need to install vMix on any computers used for post production.
vMix User Guide MP4 Bit Rate: 25 Mbps (HD) or 8 Mbps (SD) Audio Bit Rate: 192 Kbps Pros: Files can be played anywhere and can be easily uploaded to most web sites Cons: Provides good video quality for file size, but may not be suitable for high quality post production video editing. Setup Click the Cog Button next to Record from the Main Window to bring up the Recording Setup window. These settings will need to be configured before starting a recording.
vMix User Guide Filename File to save the recording to. Frame Rate Frame rate of the recording. (Set this to match the Frame Rate set under the Display tab under Settings) Codec Codec to use when recording. For SD recordings the DV Video Encoder is recommended.
vMix User Guide Select the Bit Rate for the H264 video stream in Mbps (Megabits per second). 25 is recommended for high quality HD (similar to AVCHD) Audio Bit Rate Select the Audio Bit Rate for the AAC audio stream in Kbps (Kilobits per second). A maximum of 192kbps can be selected. 128kbps is the default. Windows 7 File Size MP4 recordings have a maximum file size limit of 4GB under Windows 7. For larger recordings, choose a different recording format or upgrade to Windows 10.
vMix User Guide Record Click Record to start the video recording. Note: The Cog Button must be clicked first to configure the recording prior to starting A duration counter will begin next to the Start button as well as a dropped frame counter. Dropped frames may indicate a computer performance issue, or merely as a side effect of using a different frame rate.
vMix User Guide AVI MKV Yes MPE G-2 MPG Yes MPE G-2 TS Yes MP4 MP4 No MP4 MP4 (with Fault Tolerant checkbo x ticked) Yes WMV WMV Yes FFMP MXF EG Yes FFMP MOV EG Yes FFMP MP4 EG Yes FFMP MOV No EG (Indexed ) FFMP MP4 No EG (Indexed ) vMix AVI is the best fault tolerant format out of the above. vMix Video Codec The vMix Video Codec is a free recording format that provides high video quality with low CPU usage, suitable for use in post production video editing on Windows PCs.
vMix User Guide · · HD1080p60: 200 - 300 Mbps (~110 GB per hour) HD1080p30: 100 - 150 Mbps (~55 GB per hour) Editing recordings on other computers vMix AVI files recorded using the vMix Video Codec can be edited on any Windows PC in most video editors including Adobe Premiere and Magix Vegas Pro. Simply install a copy of vMix on any system used for editing. vMix does not need a license on these computers and does not need to be activated, but does need to be installed.
vMix User Guide 1. Open the streaming window in vMix Click the cog icon next to the Stream button in the main vMix window. 2. The streaming window will appear 3. Enter in your streaming provider details Select your streaming provider from the drop down list or select Custom RTMP Server if your provider is not listed.
vMix User Guide The following information is needed from your chosen streaming provider: URL For example rtmp://example.com/live Stream Name or Key This may also be called Stream or Stream Name. Once you have retrieved this information, type it into the boxes provided. 4. Select a quality setting The Quality setting you select will depend on a variety of factors, including the speed of your internet connection and your viewers. The default setting of 360p 1.
vMix User Guide 1,2,3 Buttons These buttons allow streaming to up to three different streaming providers simultaneously. See Using Multiple Destinations for more information. These buttons will only appear when selecting FFMPEG as the application. (See Applications section below). Profile Create one or more profiles with unique streaming settings, for example one for each streaming provider. Only one profile can be used at a time.
vMix User Guide Stream Key Also known as a Stream Name or Stream. For example myStream Advanced See Streaming - Advanced Quality Select the encoding profile to use for the stream. A number of built in presets are included or you can click the cog icon to customise these. See Streaming Quality for more information Application FMLE Use Adobe Flash Media Live Encoder as the streaming encoder. Requires Adobe Flash Media Live Encoder to be installed which is free from the Adobe web site.
vMix User Guide Save all streaming settings and close the Streaming window. Streaming Quality The Streaming Quality window allows you to customise your streaming quality settings to suit your production. Video Bit Rates Set the video encoding bit rate in kbps. Encode Size Set the resolution of the stream here. These sizes should match the aspect ratio you are using in vMix.
vMix User Guide Set the audio encoding bit rate in kbps. A minimum of 96 is supported for MP4 and a minimum of 64 is supported for AAC. 128 provides good near CD quality audio for both MP3 and AAC. Video Source Select either Output 1 or Output 2 as the source for the stream in vMix 4K and Pro. In all other editions Output 1 will be used and this dropdown will not appear here. To configure what is sent to Output 2, refer to the Settings - Outputs section. Profile Select the H264 encoding profile to use.
vMix User Guide When this is enabled, vMix will try to keep the streaming speed as close to the selected bit rates as possible. Note that this option may reduce the quality of the stream. Keyframe Aligned When sending multiple bitrates, select this option to ensure all streams are aligned on the same keyframe. This can improve seamless switching support at the expense of slightly lower quality.
vMix User Guide 4. Untick Use Stream 1 Quality on each of these streams to configure an independent bitrate from the Quality dropdown box. Multiple Stream Keys If your stream provider has given you a separate stream key for each stream, then configure these streams by selecting Custom Multi-Bitrate as the Destination dropdown and type in the separate URL and Stream Key for each stream.
vMix User Guide By default, all three destinations will use the same quality settings such as video and audio bitrate and encode size. To customise this, untick the Use Stream 1 Quality checkbox as shown below. Independent Stream Control vMix supports up to three independent streams which can be started and stopped independently of each other. Starting/Stopping All Streams Click Stream in the main vMix window to start or stop all configured streams at the same time.
vMix User Guide Starting/Stopping Streams Independently To start or stop a particular stream, click the arrow next to the Stream button in the main vMix window. Streams can also be controlled from the Streaming Settings window by selecting the top stream button to select the stream, then the Start x / Stop x button at the bottom of the window.
vMix User Guide If a particular stream encounters an error, it will be displayed on screen and the stream stopped. However, all other streams will continue to run as normal, and the stream that stopped can be started manually again when the problem is resolved. Advanced Click the Advanced button for the following additional options: Stream Username/Password Specify additional login details if required by the streaming provider.
vMix User Guide Key and Fill Output See the Key and Fill output support section for more information. External Output with AJA, Blackmagic or Bluefish444 cards vMix features the ability to output video to AJA, Blackmagic and Bluefish444 cards. Follow the steps below to begin using the External Output feature. Important Note: Many older Blackmagic cards can only perform one task at a time, either Capture or Output. 1. Click Settings to open up vMix settings 2.
vMix User Guide 3. Click OK to confirm your settings and head back to the main vMix Window. 4. Click the External Button on the bottom right hand corner of the screen next to the Cog Button. The output of vMix should now appear on your external display. If the external display is blank, make sure the correct connector is being used on the device.
vMix User Guide When using the Decklink Duo 2 or the Decklink Quad 2, port 1 will need to be configured in the Blackmagic Desktop Video Utility to group together SDI ports 1 and 2 as shown below: External Output Configuration When selecting a supported device in External Output settings in vMix, an Alpha Channel dropdown box will appear as shown below: None: No alpha channel, send the video output to the device as normal. Straight: Output two channels over the device, Key + Fill on separate SDI ports.
vMix User Guide Blackmagic ATEM Configuration The Key + Fill outputs will be sent over SDI 1 and SDI 2 (or SDI A / SDI B) respectively. These can then be connected to two spare inputs on an ATEM switcher. From the ATEM switcher control panel keyer settings, these two inputs can be selected as Key and Fill to complete the process. Keyboard, MIDI and Controller Shortcuts vMix supports an unlimited number of Shortcuts that can be assigned to anything from Keyboard Keys to MIDI Faders.
vMix User Guide Shortcuts can be assigned to almost any key on the keyboard. Web Interface All shortcuts are available from the built in web interface allowing you to use any web enabled device to control vMix. See Web for more information. Control Surface The vMix Control Surface provides three programmable keys (F1, F2, F3) that can be assigned to a Shortcut. MIDI / X-Keys Shortcuts can be assigned to buttons, faders and knobs on any MIDI compatible device.
vMix User Guide To quickly select the Key or Control you wish to assign this shortcut to, click the Find ... button and then press or move the control you wish to use. MIDI Note: If using a MIDI controller, make sure it has been plugged in and turned on before starting vMix. Then from the Shortcuts tab in Settings click the MIDI Settings button to enable the device.
vMix User Guide Duration If the function selected is a transition, configure the duration here in Milliseconds Input If the function controls a particular Input, select it here. You can also tick Assign Shortcut to Input Number so this shortcut will always control any input assigned to a particular Number, otherwise the shortcut will control the same input even if it has been moved.
vMix User Guide Assigns the shortcut to the currently open Preset, otherwise the shortcut will be available to use with any preset. See Local and Global Shortcuts for more information. Show in Web Controller Untick this box to hide this shortcut from the vMix Web Controller interface. Templates The Shortcut Templates feature allows you to import and export sets of shortcut keys and save graphical layouts for reference and printing purposes. How to load a shortcut template 1.
vMix User Guide This template contains the default keyboard shortcuts that were included with previous versions of vMix. Replay ShuttlePROv2 This template assigns common Instant Replay functions to the ShuttlePROv2 USB controller Local and Global Shortcuts vMix supports two types of Shortcuts: Local and Global. Global shortcuts are saved in the vMix settings and will be remembered each time vMix is opened.
vMix User Guide Channel, Note Channel and Note are automatically detected by clicking Find and pressing the MIDI button or moving the fader or knob. Value If you would like to assign different shortcuts to different positions of a single control, such as a rotary knob, you can tick the Value box and specify a number between 0 and 127. Type For most controls that provide a linear value from 0-127 the Default setting is recommended here.
vMix User Guide Getting Started 1. Go to vMix Settings and click the Activators tab 2. By default no devices (i.e MIDI or X-Keys controllers) are enabled, so to select the controller you wish to use click Enable Devices. Select the controller and click OK NOTE: For best results, also make sure the corresponding controller is enabled under the Shortcuts tab by clicking MIDI Devices X-Keys Controllers are enabled by default under Shortcuts and do not need to be selected. 3.
vMix User Guide For some examples of Activators that can be setup see Activator Examples For help on all the settings available when adding an Activator see Add/Edit Activator Add/Edit Activator Control Select and configure the type of control. For X-Keys controllers this will also be "Note". For MIDI controllers this is usually Note for buttons and ControlChange for things like knobs and faders.
vMix User Guide InputPreview This will turn on when the selected input is currently in Preview InputPlaying This will turn on when the selected Input is playing. InputVolume, InputHeadphones, MasterVolume, MasterHeadphones, BusAVolume, BusBVolume This will assign a MIDI value from 0 to 127 when the volume of an Input, Headphones or Master volume changes.
vMix User Guide This is for MIDI buttons that only have a single color on/off light. Turn X-Keys button blue when Input 1 is playing.
vMix User Guide volume on Input 1 is changed This example may also work on other MIDI controllers with motorized faders.
vMix User Guide vMix Control Surface vMix Control Surface is an optional hardware control surface for vMix that connects via USB. The following is a User Guide that describes the capabilities of each of the buttons and controls. Setting Up Visit http://www.vmix.com/controlsurfacedownload/ to download the latest drivers. Run the installer and accept the prompts to install. Once installed, verify you have the latest version of vMix.
vMix User Guide Preview Bus (Bottom Row) Press the number of the input on the Preview row that you want to assign to Preview. Program Bus (Middle Row) Press the number of the input on the Program row that you want to assign to the Program or Output. This will cut or take the input directly to output without any transitions. Overlay Bus (Top Row) In vMix, graphics placed on top of other sources are known as Overlays.
vMix User Guide shortcuts. 3. Click the Key drop down and scroll down to SurfaceF1, SurfaceF2, SurfaceF3. These correspond to the F1, F2 and F3 keys on the Control Surface. 4. Select the desired Function. Example: if you wanted a button to start recording, select Start Recording. 5. Press Ok and the selected function button is now ready to be used. ALT Button The ALT button can be held down in conjunction with other buttons in order to change their functionality.
vMix User Guide Settings in the main vMix window and then clicking the Web Controller tab. After typing in the Web Site Address into your device's browser, the following page will be displayed: There are four buttons available: Shortcuts Switcher Tally Lights Title Editor Password Protection Password protection can be enabled from the Web Controller tab in Settings by setting a password as shown below.
vMix User Guide Access can be granted to individual pages without requiring a password by ticking the boxes in the list provided. Note: If password is blank, no login will be required, regardless of the access settings. Shortcuts The shortcuts button will display any Shortcuts that have been added to vMix. You can assign each of these Shortcuts a memorable title or description from the Edit Shortcut window in vMix.
vMix User Guide The transition effects along the bottom match the transition buttons seen in the middle of the vMix main window. (See Transition Buttons) Tally Lights The Tally Lights feature allows you to turn any WiFi enabled smart phone into an instant tally light! The entire screen will be used as a tally light allowing you to mount it on top of the camera or place it near your on air talent. Setting up a Tally Light 1.
vMix User Guide 4. Select any Input from the list to start the tally light display. The tally light display will change between the Preview and Output colours depending on the status of that input. WARNING: Most smart phones will automatically switch off or lock the display after a certain period of time. On Apple smart phones this can be turned off through the "Auto Lock" settings.
vMix User Guide Click Revert to go back to the title text the last time it was updated. Presets Presets uses the same presets found within the Title Editor Window. To apply a preset to the Title click Apply. To delete the preset click X Instant Replay vMix Replay is a powerful Instant Replay system that adds full slow motion replay capabilities to vMix for up to four camera inputs. Features · · · · · · · · · · · · · · Four channel continuous recording of up to four camera inputs including audio.
vMix User Guide One Channel HD Four Channel HD Operating System Windows 7 or higher (64 bit only) Windows 7 or higher (64 bit only). Windows 8.1 or higher recommended CPU Quad Core 3.4 Ghz Quad Core 4.0 Ghz (Six Core 3.6 Ghz highly recommended) Memory 8GB 8GB Graphics Card NVIDIA GeForce GTX 1050 or higher NVIDIA GeForce GTX 1060 or higher Storage Dedicated SSD for Replay 200GB Dedicated SSD for Replay 500GB and higher. and higher. 1TB recommended. Storage Connection Internal SATA or M.
vMix User Guide Session Folder This is the location where all Instant Replay recordings will be saved. This must be dedicated SSD based storage After selecting a folder, vMix will display an estimated recording time based on the selected recording format and bit rate. Recording Format The recording format must match all camera sources that will be used. The last mbps setting represents the bit rate quality of the recordings.
vMix User Guide Select any Camera input already added to vMix here, if you add an input later on you can revisit this configuration window by clicking the cog icon in the Instant Replay Controller window. Output is also supported as one of the four camera inputs, and will record all video and audio playing in the vMix output just like a standard recording. Playback Audio Source This is the audio source vMix will use when playing back events.
vMix User Guide This will transition input A to output, play the event then transition back to Camera 1 when completed. While the event is playing, try moving the scroll wheel on your mouse to change the playback speed. Advanced Replay The example above allows you create quick replays of a single camera with only a single click.
vMix User Guide vMix Replay includes a centralized Instant Replay Controller that can either be docked to the main vMix window or opened separately. Main Interface Mini Interface The mini interface is located next to the Instant Replay channel "A" input and includes common controls such as recording, quick 5 second or 10 second mark in / out buttons, a playback last event button and a settings button. Slow motion can also be controlled here in addition to the main interface.
vMix User Guide The buttons on most MIDI and X-Keys controllers can be programmed vis the Shortcut feature to activate most functions in Instant Replay. For more information see Shortcuts User Guide Jog and shuttle wheels can also be used on supported devices such as the Behringer CMD PL-1 or the XKeys XK-12 Jog and Shuttle. Pay special attention to the Jog wheel configuration options when setting up a MIDI Shortcut.
vMix User Guide Shortcut Reference The shortcuts below can be configured as keyboard or controller shortcuts to allow easy control of common Instant Replay functions. See the Shortcuts User Guide For a complete list of Instant Replay Shortcuts see Shortcut Function Reference.
vMix User Guide ReplayPlayLastEven Play the most recent event (based on time) t ReplayPlayLastEven Same as ReplayPlayLastEvent but this will automatically transition Replay A to tToOutput output if it is not already. ReplayPlaySelected Event Play all of the selected events in the current Events list ReplayPlaySelected EventToOutput Same as ReplayPlaySelectedEvent but this will automatically transition Replay A to output if it is not already.
vMix User Guide vMix supports controlling multiple Pan Tilt and Zoom cameras directly from the main interface and by shortcut and/or joystick control. PTZ support can be enabled on any input, providing the ability to enable PTZ support regardless of how the camera is connected, be it SDI, HDMI, NDI or RTSP Stream. NOTE: PTZ cameras will need to be connected to the same network as vMix in order to be controlled.
vMix User Guide · Other cameras supporting VISCA over IP iSmart VISCA UDP · AMC series IP PTZ Cameras It is important to note that for simplicity and ease of use, only PTZ cameras that support network control are supported. Cameras that only have serial control such as via the VISCA or Pelco RS-422 or RS-232 protocols are not currently supported. Entering in the PTZ camera network address Once the Device Type is selected, a box to enter either a Web Address or IP Address will be displayed.
vMix User Guide Step 2 - Move the camera into position Use the provided controls under the Input Settings PTZ tab to move the camera into the position you wish to create a virtual input for. Step 3 - Click Create Input at this Position This will create a new input based on the current camera and PTZ position. You can see these two inputs side by side in the screenshot above.
vMix User Guide Step 4 - Repeat steps 2 and 3 to create as many virtual inputs as needed Step 5 - Use these inputs just as you would if multiple real cameras were available Any time one of these inputs is selected into Preview, the PTZ camera will automatically move into position. When the input is not visible in either Preview or Output, a static image of what the camera was seeing when the input was created will be displayed to make it easy to locate a particular camera angle.
vMix User Guide The number next to each button (for example "Update Input 2") corresponds to the number of the input in the main window. Moving the camera and then clicking the corresponding update button will update that virtual input so that it recalls that position in the future.
vMix User Guide By default this template assigns all the buttons to the Preview input which means as long as a PTZ enabled camera is in input it can be moved and controlled using this template. Of course, the shortcuts in this template can be edited to assign to a particular input if you prefer. PTZ Shortcuts and Speed Control By default, PTZ shortcuts will use the speeds defined by the sliders in the Input Settings PTZ tab.
vMix User Guide See NDI / Desktop Capture for more information. Sending video and audio from vMix using NDI vMix supports sending a number of different types of output via NDI. To enable a particular type of output for NDI, it must first be turned on from Settings - Outputs / NDI Output 1 This is the main Output (or "Program") feed and includes the Master stereo audio mix Output 2, 3, 4 These are independent outputs that can be configured to show Output, Preview, MultiView or a particular input.
vMix User Guide SRT - Secure Reliable Transport Secure Reliable Transport is an open source video transport protocol. It optimises streaming performance across unpredictable networks, such as the Internet, by dynamically adapting to the real-time network conditions. Features · · · · Input and Output (send and receive) support for Caller, Listener and Rendezvous connection methods. 256 bit encryption through use of PassPhrase.
vMix User Guide Enable SRT Check this box to enable the SRT output. Type Listener: Listen on the specified Port on all network adapters on the computer for connections. Hostname is ignored. Caller: Connect to the specified Hostname and Port. Rendezvous: Connect to the specified Hostname and Port. The other side must also be set to Rendezvous with an identical port number specified. This mode allows connecting through most firewalls automatically.
vMix User Guide Quality Select one of the built in compression profiles from the list or click the cog icon to customise the encoding settings. Video Codec Select either H264 or HEVC as the video compression method. Video Bandwidth / Audio Bandwidth Specify the bandwidth in bits per second for Video and Audio. Example 2000000 = 2mbps and 128000 = 128kbps. Audio bandwidth is total for all channels. For example for 8 channels, 384 = 48 kbps per channel.
vMix User Guide These sources can be from files on the local system, network or internet and data will update the title automatically as it changes.
vMix User Guide Google Sheets also requires an API Key which can be created by following the instructions below. How to create a Google API Key RSS Use any web site address in RSS format with this data source. RSS is commonly used by news sites, blogs and other online information sites. Text Select any text file to use as a data source, for example Stream Labels on Twitch Alerts. XML Select any XML compliant web site or file to use as a data source.
vMix User Guide 2. The following window will appear. click the button to add the first Data Source 3. Once added, a window will appear where you can type either the web address to the data file or browse for it on the local computer. Depending on the Data Source type, a number of other settings may appear in this window.
vMix User Guide Name: Provide a memorable name to identify this data source. Use first row as column names: If the first row of a spreadsheet contains the column names, tick this box. Convert rows to columns: Ticking this box will group all rows in the data source into a single row, numbering the column names in the process. For example a spreadsheet with Name and Description and 3 rows will become Name1, Description1, Name2, Description2, Name3, Description3 with all data contained in a single row.
vMix User Guide 3. Select the Data Source and other settings such as Table and Column. Table: Select the table you wish to source the data from. Some data sources may only have a default table available to select here.
vMix User Guide 5. Repeat steps 1 to 4 for each Title field you wish to assign to data. Controlling Data Sources Once a Data Source has been added and assigned to a title, it may contain a number of rows you want to select from, for example a list of speakers during a conference. There are a number of methods to select rows that are described in the following section. When a row is selected, all Titles that refer to that data source will update automatically.
vMix User Guide 1. A Title mapped to a Excel data source with the first row selected 2. The Excel file is open on another computer The computer that has opened the excel file can move or copy the data they wish select into the first row and click save. Each time they click save, the data will update in vMix. Using Images in Data Sources If your title includes an image field, this can also be assigned to a data source.
vMix User Guide 6. Select Dashboard in the left hand menu 7. Select Enable API 8. Select Sheets API from the list 9. Select Enable up the top. If Google prompts for additional steps after this, they can be safely ignored and the key will be ready to use. 10. The API key can now be used in vMix Data Sources. vMix Call vMix Call allows you to add remote guests to your vMix production with high quality audio and up to HD video.
vMix User Guide · · · Guest Network Connection: 2 Mbps Down / 600 Kbps Up network bandwidth for the guest side connection. Quad Core Processor 2Ghz (up to 2 guests) or 4Ghz+ (up to 8 guests) Recommended Guest Requirements Help Topics Setting up a Call Call Manager / Chat Audio and Talkback Troubleshooting / FAQ Setting up a Call Setting up a Call 1.
vMix User Guide Audio Source: Select the audio mix to send back as the audio the guest will hear. Note that regardless of the setting selected, Auto Mix Minus will be applied so that the guest will never hear themselves back again as an echo. Selecting Master here is usually recommended as using Bus A or Bus B to apply a Mix Minus is not necessary.
vMix User Guide The Call Manager window lists the Name, Password and Receiver Statistics for each caller along the top panel from left to right, in the same order as the inputs in vMix. TIP: Click any of the coloured panels to change what is displayed between Name + Password, Name + Input Title and Name. The colour of the box listing the Name and Password indicates the status of that particular call.
vMix User Guide From left to right this indicates the audio sample rate from the guest, their current audio bandwidth and jitter buffer latency. Advanced Statistics Advanced diagnostic information can be found by clicking the button Audio and Talkback vMix Call provides three different audio feed options that can be sent to all guests. All three include built in automatic mix minus, so regardless of the option selected the guest microphone audio will not be returned back to them.
vMix User Guide HD USB Webcam such as the Logitech C920 Headset/Mic combo or Earphones + USB Microphone such as the Yeti from Blue Microphones Guest is able to connect but no video and audio is received Check to make sure the caller has a Webcam and Microphone plugged in and these have been selected in the browser. In Google Chrome the camera and microphone can be configured by clicking the grey Camera icon at the top right hand corner of the address bar.
vMix User Guide laptop, PC or mobile device. High Latency vMix Call uses what is known as a Jitter Buffer which adds a variable amount of latency to each call to ensure smooth video and synchronised audio. This latency can range from approx 200ms for guests on the same or nearby network to between 1 and 1.5 seconds for guests located on different continents or on congested networks.
vMix User Guide Select the video quality to send back to the guest from vMix. As this is generally used for preview purposes by the guest it is recommended to select this as low as practical. NOTE: This setting is the same for all guests and cannot be configured independently. Advanced Settings Remote Guest Video Bandwidth NOTE: This applies only to guests connecting using a browser as vMix callers will have specified their own bandwidth manually.
vMix User Guide input in vMix and select Reload to update vMix with the changes. Note that any Font, Text or Image changes made in vMix directly will always override any equivalent changes made in the designer. To open the Title exactly as it is in the designer, close the input and add it again. Changing Ticker Settings Settings such as speed and direction of Tickers can be changed in real time from the Title Editor. Right click the Ticker input in vMix and go to Title Editor.
vMix User Guide New, Open, Save, Save As Open or create a new title Add Text Add a new dynamic text element to the title. When selected the properties pane on the right hand side will contain the following options. Drop Shadow Specify a drop shadow for the text with colour, radius and direction Font Specify font and font size for the text. This can be changed later from within vMix. StrokeThickness / StrokeColor Create an outline around the text. Name Specify a unique name to identify this text box.
vMix User Guide Background Image If you have a full resolution graphic created that includes an alpha channel (such as PNG) this can be set as the title background. This image should be the same size as the title (for example 1920x1080) Click Browse to browse for the background or click X to remove it. PlayList PlayList provides the ability to automate switching tasks or play multiple videos sequentially. Click the Cog Button next to PlayList to bring up the PlayList window.
vMix User Guide Previous: Jump to the previous item in the playlist using the PlayList item's transition Next: Skip to the next item in the playlist using the PlayList item's transition. Creating a PlayList To create a PlayList, click the PlayList button from the bottom left hand corner of vMix. Select an input from the Available Inputs column and click the > arrow to add it to the Playlist.
vMix User Guide MultiCorder is an advanced feature found in the 4K and Pro editions of vMix. It provides the ability to record the raw video and audio from capture inputs to separate files in addition to the main vMix Recording. Note: Instant Replay and MultiCorder cannot be used at the same time. MultiCorder has the following minimum system requirements: · · · Solid State Disk (SSD) for storing recordings.
vMix User Guide The following options are also available: Recording Format vMix AVI, AVI, MKV, MP4 and FFMPEG are available as recording options in MultiCorder. For more information about these formats see Recording Setup. Fault Tolerant Recordings It is recommended that a fault tolerant recording format is selected when using MultiCorder. This means in the event of a power outage, the recording will still be recoverable. See Fault Tolerant Recordings for a list of options available.
vMix User Guide Smart Phone Tally Lights vMix supports turning any Smart Phone into an instant Tally Light! See the Web Controller Tally Lights section for more information. Tally-Lights.com Tally lights can be purchased from http://www.tally-lights.com and connected via USB. These lights work automatically with vMix and will be assigned to Inputs according to the tally number. (Tally 1 = Input 1, Tally 2 = Input 2, ...
vMix User Guide List Same as for Video above Interlaced can be set for each video independently. Image Sequence Yes, one image per field Each image in an image sequence is treated as a field when using an interlaced output. For example, 50 images are needed for 1 second of 50i video.
vMix User Guide This window displays real time statistics of each live input including dropped frames and audio sync. Each column is described in detail below: Source Dropped This shows the number of dropped frames as a result of the capture card / camera running slowly. For example, the camera clock might be slower than vMix or the capture card is experiencing a bandwidth bottleneck. Renderer Dropped This shows the number of dropped frames as a result of the graphics card running slowly.
vMix User Guide Resampled: 0/40 Number of milliseconds of audio that has been resampled to stay in sync. Snapshot A snapshot of the live production (that is a still image taken at a particular point in time) can be created in one of the following ways: Output Snapshot Click the camera icon to take a Snapshot of the final vMix Output. This will browse to save the file as a PNG, JPEG or BMP image. If saved as a PNG, transparency is preserved, where applicable.
vMix User Guide below are locked: · · · · · · · · vMix Close Button Input Close Button Open Preset Last Preset Recording Stop Streaming Stop External Output Stop MultiCorder Stop Scripting and Automation 4K and Pro editions of vMix include powerful programming capabilities through the Scripting feature.
vMix User Guide Both of these scripts do the same thing, that is to find the Title Input with name "NewsHD.xaml" and assign the "Headline" field with the text "Hello World!" To try it out add the NewsHD.xaml title template to vMix and then run the script. VB.NET vMix Scripting supports the majority of VB.NET 2.0 code that will work within a single sub or function. This means that custom classes and structures are not supported, however you can use the vast majority of the built in base classes in the .
vMix User Guide Examples: Overlay.Find(1).In("NewsHD.xaml") For i As Integer = 1 to 4 Overlay.Find(i).Off Next Console Shared Methods WriteLine(message as String) Write the message string to the vMix Script console accessible from the Scripting tab of Settings. This is useful for debugging purposes Examples: Console.WriteLine("Beginning Example Script") Overlay.Find(1).In("NewsHD.xaml") Console.WriteLine("Title should now appear in Overlay 1, now we wait 5 seconds") Sleep(5000) Console.
vMix User Guide Function=OverlayInput1In&Input=NewsHD.xaml Sleep 2000 Function=OverlayInput1Out Syntax The syntax for each line is the same as the query string used with the but vMix Web API without the URL portion For example http://localhost:8088/API/?Function=Cut in the Web API would be just Function=Cut with Web Scripting All the same parameters apply for example: Function=Slide&Input=NewsHD.xaml&Duration=1000 Function=SetText&Input=NewsHD.
vMix User Guide · Any media related controls such as MediaElement and WebBrowser are not supported and will display a blank window. How to add a Custom WPF User Control to vMix 1. First make sure the user control has been compiled as a DLL and follows the implementation guidelines above. 2. Click Add Input in vMix and then select the Title / XAML tab 3. Click Browse and browse for the DLL file and click OK 4. Click OK and the control will now be available in vMix. 5.
vMix User Guide Input Input can be used to specify the Input in one of three ways: 1. By number starting from 1. 0 can be used for Preview and -1 for Active. 2. By name. (note that it is case sensitive, and requires the full title name including spaces) 3. A GUID can be used to specify an exact input. The GUID can be found from the "Key" attribute in the XML. For example: http://127.0.0.
vMix User Guide Mix In the 4K and Pro editions up to three separate Mix inputs are available. This parameter can be used to select the Mix to use where 0 = main mix, 1 = first Mix input, 2 = second Mix input etc. Return If successful, the API will return the standard 200 response code. If an error occurs, the API will return the standard 500 error code. Information If all parameters are left blank the API will return state information in XML format.
vMix User Guide In the example above Input 2 is active and Input 1 is currently running as Overlay 2. TCP API The vMix TCP API provides the same functionality as the HTTP WEB API but with lower processing overhead making it suitable for use in embedded devices that have limited XML parsing capabilities. It also provides the ability to subscribe to a TALLY event that will automatically send TALLY updates to the client.
vMix User Guide Commands TALLY Event Supported: Yes Example Request: TALLY\r\n Example Response: TALLY OK 0121...\r\n Description: Returns a list of tally values where 0 = off, 1 = program, 2 = preview. The list is padded to the total number of inputs currently added to vMix and may have up to 1000 entries as a result. (Maximum possible length = 9 + 1000 + 2 = 1011 bytes) FUNCTION Format: FUNCTION [QueryString]\r\n Example Request: FUNCTION PreviewInput Input=5\r\n Example Request: FUNCTION SetT
vMix User Guide Description: Subscribe to an event/command. Event responses matching the selected command may begin immediately, even before the SUBSCRIBE response is received. Event responses will continue to be received until either a. UNSUBSCRIBE is called or b. the connection is closed. UNSUBSCRIBE Format: UNSUBSCRIBE \r\n Example Request: UNSUBSCRIBE TALLY\r\n Example Response: UNSUBSCRIBE OK TALLY\r\n Description: Due to the internal event queue in vMix, event responses may continue to be re
vMix User Guide Value = Plugin Number AudioPluginOn Turn on Audio Plugin, starting from 1 AudioPluginOnOff Value = Plugin Number Toggle on/off Audio Plugin, starting from 1 AudioPluginShow Value = Plugin Number Show Audio Plugin Editor, starting from 1 Value = Plugin Number BusAAudio BusAAudioOff BusAAudioOn BusAAudioPluginOff Turn off Audio Plugin, starting from 1 BusAAudioPluginOn Value = Plugin Number Turn on Audio Plugin, starting from 1 BusAAudioPluginOnOff Value = Plugin Number Toggle on/o
vMix User Guide BusXAudioOn M,A,B,C,D,E,F,G BusXAudioPluginOff Value = Bus Turn off Audio Plugin, starting from 1 BusXAudioPluginOn Value = Bus,PluginNumber Turn on Audio Plugin, starting from 1 BusXAudioPluginOnOff Value = Bus,PluginNumber Toggle on/off Audio Plugin, starting from 1 BusXAudioPluginShow Value = Bus,PluginNumber Show Audio Plugin Editor, starting from 1 BusXSendToMaster Value = Bus,PluginNumber M,A,B,C,D,E,F,G BusXSendToMasterOff Value = Bus M,A,B,C,D,E,F,G BusXSendToMasterOn
vMix User Guide SetBalance Value = Balance -1-1 SetBusAVolume Value = Volume 0-100 SetBusBVolume Value = Volume 0-100 SetBusCVolume Value = Volume 0-100 SetBusDVolume Value = Volume 0-100 SetBusEVolume Value = Volume 0-100 SetBusFVolume Value = Volume 0-100 SetBusGVolume Value = Volume 0-100 SetGain Value = Gain dB 0-24 SetGainChannel1 Value = Gain dB 0-24 SetGainChannel2 Value = Gain dB 0-24 SetHeadphonesVolume Value = Volume 0-100 SetMasterVolume Value = Volume 0-100 SetVolume
vMix User Guide SetTransitionDuration3 Change Transition Duration for Button 3 SetTransitionDuration4 Value = Duration MS Change Transition Duration for Button 4 SetTransitionEffect1 Value = Duration MS Change Transition for Button 1 SetTransitionEffect2 Value = Transition Change Transition for Button 2 SetTransitionEffect3 Value = Transition Change Transition for Button 3 SetTransitionEffect4 Value = Transition Change Transition for Button 4 Value = Transition Stinger1 Stinger2 Transition1 Cl
vMix User Guide SetOutputFullscreen Change what is displayed on the Fullscreen output. Output,Preview,MultiView,Input SetOutputFullscreen2 Value = Output, Preview, MultiView, Input Change what is displayed on the Fullscreen2 output. Output,Preview,MultiView,Input Snapshot Value = Output, Preview, MultiView, Input Create a snapshot image of the current Output. Optional Value speci Filename, otherwise a save file window will appear. Filename can sp for example mysnapshot {0:dd MMM yyyy}.
vMix User Guide StreamingSetURL StreamingSetUsername WriteDurationToRecordingLog Set URL on Custom RTMP Stream. Optional stream number starting fr start followed by comma, e.g 0,rtmp://myurl/ Value = Stream Set Username on Custom RTMP Stream. Optional stream number sta at start followed by comma, e.
vMix User Guide SetTextColour Change Colour of Text in Title in HTML format (#xxxxxx) SetTextVisible Value = Colour Toggle Text Visibility in Title SetTextVisibleOff SelectedIndex or SelectedValue can be used to select text field. Hide Text in Title SetTextVisibleOn SelectedIndex or SelectedValue can be used to select text field. Show Text in Title SetTickerSpeed SelectedIndex or SelectedValue can be used to select text field. Change Ticker Speed.
vMix User Guide AutoPlayFirstOn Turn On automatically playing first item in a List with Transition AutoPlayNext Toggle automatically playing next item in a List AutoPlayNextOff Turn Off automatically playing next item in a List AutoPlayNextOn Turn On automatically playing next item in a List AutoPlayOff AutoPlayOn AutoRestartOff AutoRestartOn ColourCorrectionAuto Basic Auto Colour Correction. ColourCorrectionReset Reset Colour Correction to Default Values.
vMix User Guide Play PlayPause PreviewInput Send to Preview the selected Input PreviewInputNext Send to Preview the next Input PreviewInputPrevious Send to Preview the previous Input PreviousItem Move to previous item in List PreviousPicture Move to Previous Picture for Photo and PowerPoint Inputs RemoveInput ResetInput Restart Restart selected Input SaveVideoDelay Save video clip from Video Delay according to Duration in millisecon SelectCategory Change to Category according to Value (All,R
vMix User Guide SetCCGammaG Change Gamma G level of Input. 0=Original SetCCGammaR Value = Value -1-1 Change Gamma R level of Input. 0=Original SetCCGammaRGB Value = Value -1-1 Change Gamma RGB level of Input. 0=Original SetCCHue Value = Value -1-1 Change Hue level of Input. 0=Original SetCCLiftB Value = Value -1-1 Change Lift B level of Input. 0=Original SetCCLiftG Value = Value -1-1 Change Lift G level of Input. 0=Original SetCCLiftR Value = Value -1-1 Change Lift R level of Input.
vMix User Guide SetPanX Change current PanX value of Input. 0=centered, -2=100% to left, 2=100% to right SetPanY Value = Value -2-2 Change current PanY value of Input.
vMix User Guide WaitForCompletion Wait for a Video Input to reach the end of playback. Overlay MoveMultiViewOverlay Move Overlay in Input MultiView according to Value parameter.
vMix User Guide Value = Index,Input PlayList NextPlayListEntry Move to Next Item in a running PlayList PreviousPlayListEntry Move to Previous Item in a running PlayList SelectPlayList Open PlayList with Name matching Value Value = PlayList StartPlayList StopPlayList Scripting ScriptStart Value = Script Name ScriptStartDynamic Start a dynamic script using code specified as the Value.
vMix User Guide ReplayLastEventCameraOn Turns on the specified camera angle (1-4) ReplayLastEventSingleCameraOn Value = Camera Turns on only the specified camera angle (1-4) Value = Camera ReplayLive ReplayLiveToggle ReplayMarkCancel ReplayMarkIn ReplayMarkInLive ReplayMarkInOut Number of previous seconds to use when creating a new event. ReplayMarkInOutLive Value = Seconds Number of previous seconds to use when creating a new event.
vMix User Guide ReplayPlayPrevious ReplayPlaySelectedEvent ReplayPlaySelectedEventToOutput ReplayRecorded ReplaySelectedEventCameraOff Turns off the specified camera angle (1-4) ReplaySelectedEventCameraOn Value = Camera Turns on the specified camera angle (1-4) ReplaySelectedEventSingleCameraOn Value = Camera Turns on only the specified camera angle (1-4) Value = Camera ReplaySelectEvents1 ReplaySelectEvents2 ReplaySelectEvents3 ReplaySelectEvents4 ReplaySelectEvents5 ReplaySelectEvents6 ReplaySelec
vMix User Guide ReplayToggleLastEventCamera3 ReplayToggleLastEventCamera4 ReplayToggleSelectedEventCamera1 ReplayToggleSelectedEventCamera2 ReplayToggleSelectedEventCamera3 ReplayToggleSelectedEventCamera4 ReplayUpdateSelectedInPoint Update In point of Selected Event to current Position. ReplayUpdateSelectedOutPoint Update Mark Out point of Selected Event to current Position.
vMix User Guide Preset LastPreset Load the last preset. OpenPreset Load preset from the specified Filename. SavePreset Value = Filename Save preset to the specified Filename.
vMix User Guide A number of display options are supported including EBU/SMPTE, 80/90% and grids of various sizes. Safe Areas can also be displayed and controlled from the Input Settings window. Undo Button After completing an action in vMix, an Undo button may appear next to the Preset buttons at the top right of vMix Press this button to undo that action.
vMix User Guide Currently the following actions are supported with more expected to be added in the future. · Closing Inputs Waveform and Vectorscope Monitor The professional waveform monitor can be turned on within the Preview window and the Input settings window by clicking the colour bar icon as shown below. Waveform RGB Displays a waveform of the red, green and blue colour channels on top of each other as shown below.
vMix User Guide Waveform Y Displays the Luminance waveform only. Parade RGB Displays three separate waveforms representing the three colour channels Red, Green and Blue. Vectorscope Graphs the chrominance portion of the video (Cb,Cr or U,V channels) as an X/Y plot.
vMix User Guide Colour squares indicators representing 75% and 100% Red, Magenta, Blue, Cyan, Green and Yellow are displayed at the relevant points for easy calibration. For example the lines on a standard colour bars or test chart (such as those provided in Add Input -> Colour) will line up perfectly with the coloured squares when the colour is calibrated correctly. Thus using a test chart on a camera source will allow accurate colour correction to be achieved.
vMix User Guide 208 / 208