
User's Manual


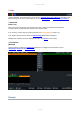
Table Of Contents
- Introduction and Features
- Getting Started
- Presets
- Video Controls
- Fullscreen
- Transitions
- Production Clocks
- Categories
- Fade Bar
- Pause Inputs
- Overlays
- Right Click Menus
- Settings
- Inputs
- Input Settings
- Audio
- Recording
- Live Streaming
- External Output
- Keyboard, MIDI and Controller Shortcuts
- Activators - MIDI Lights and Faders
- vMix Control Surface
- Web Controller
- Instant Replay
- PTZ - Pan Tilt Zoom
- NDI - Network Device Interface
- SRT - Secure Reliable Transport
- Data Sources
- vMix Call
- GT Title Designer
- vMix Title Designer (Legacy)
- PlayList
- MultiCorder
- Tally Lights
- Interlaced Support
- Statistics
- Snapshot
- Padlock
- Scripting and Automation
- Developer Information
- Shortcut Function Reference
- Safe Areas
- Undo Button
- Waveform and Vectorscope Monitor

vMix User Guide
10 / 208
3. Tabs
Colour coded tabs on the left hand side can be used to organise Inputs into categories and tabs on the
right hand side can be used to dock features such as the Audio Mixer and Instant Replay Controller
3. Input Bar
(Bottom row)
Each source such as Camera, Video and all other types of Inputs are loaded into this Input Bar.
A small real-time preview window is shown for each of these inputs.
If you click any of these items they will be queued in the Preview Window ready to go.
If you double click any of these items the Input Settings window will be displayed.
Multiple rows of inputs can also be displayed at a time. See Inputs to find out more.
4. Footer Bar
(Bottom)
Along the bottom are buttons to Add Input and buttons to configure and start features such as
Recordings, Streams and External Output.
Presets