
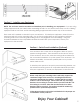
Instruction Manual

Safety First
- These enclosures are heavy and you should always have at least 2 people involved with moving,
unpacking and mounting them.
- Please verify that your mounting surface will safely support the combined weight of the enclosure,
mountinghardwareandequipmentinstalledinthecabinet.Conrmthatthemountingsurfaceis
safe to drill through. Please note that only mounting hardware for mounting to wooden studs is
provided with the unit. If mounting to a surface other than wooden studs, then other hardware
will be required. This product should be installed by professionals or professionally installed.
*Video Mount Products will not be held liable for the improper use or installation of their products.*
- You are working with equipment that requires proper ventilation. Do not block or cover external
ventilation openings or, if you are using fans, the fan intake area at the bottom of the enclosure.
- Keep the enclosure and the related equipment in a clean dry area for best results.
Get Familiar
- Take a few minutes to familiarize yourself with your enclosure as you unpack it, and also spend
some time planning for your mounting location, as well as how you are going to populate your
equipment into the enclosure. While the enclosure ships fully assembled, you still have the option
of reversing the door and adjusting the vertical mounting brackets. Consider making whatever
adjustments to the door and the vertical rails that you need to, before installing the enclosure on
the wall.
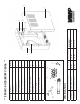
Section 1 - Reversing the Front Door
You will encounter a wide variety of installation applications
and it may be necessary from time to time to have to reverse
the swing direction of the door. The front door can be
reversed by switching the conguration of the hinges, latch
and lock from one side to the other. Simply remove the
hinges, latch and lock from one side and move all of the
pieces to the corresponding holes on the opposite side. You
will have the 2 hinges on one side (1 – Top and 1 – Bottom)
and the latch and lock on the other side.
Note: You will nd that the unused screw holes are lled
with a small rubber ll plug. These plugs are easily removed.
Please retain them and replace them into the unused holes
on the opposite side.
3
L ATCH
LOCK
L ATCH
LOCK
HINGE
HINGE
HINGE
HINGE
2