
Instruction Manual
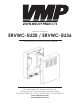

Section 2 - Vertical Mounting Rails
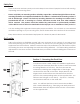
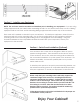
Your enclosure provides 2 threading options based upon your
preference and the equipment you are using. One side of the rail
is threaded for M6 hardware and the other side is threaded for 12-
24. The rails are visibly labeled with both options. Position the rails
with the desired thread pattern on top. To install your equipment,
use the included M6 or 12-24 hardware, or the hardware provided
with your equipment to secure equipment to the rails.
Section 3 - Adjusting the Mounting Rail Depth
Note: Do not use the mounting rails without both screws installed
and attached to the vertical mounting bracket. Do not adjust
the rails while equipment is installed in the enclosure.
The two horizontal mounting rails are factory-installed with a
mounting depth of 20” for ERVWC-5U20 and 36” for ERVWC-5U36
.
The rails can be adjusted in 1-inch increments for mounting
depths between 17-20 inches for ER-VWC5U20 and 33-36 inches
for ER-VWC5U36. It is not necessary to adjust the mounting rails
unless your equipment requires a different mounting depth.
To adjust the height of the rails, simply remove the 2 screws,
position the rails vertically to the desired depth and reattach
using the 2 screws. Make sure to adjust both rails equally.
Section 4 - Mounting your Enclosure
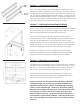
The alignment of the keyhole cutouts in the back of the cabinet
provides multiple mounting options for your convenience. There
are 4 sets of 5 keyholes, which allows for 5 mounting options on
16” center. Each set of keyholes are spaced in 2” intervals.
For optimal results, use a level and measure to position your
mounting areas precisely. Always use appropriate mounting
hardware to secure the enclosure to the wall.
Please verify that your mounting surface will safely support the
combined weight of the enclosure, mounting hardware and
equipmentinstalledinthecabinet.Conrmthatthemounting
surface is safe to drill through. Please note that only mounting
hardware for mounting to wooden studs is provided with the unit.
If mounting to a surface other than wooden studs, then other
hardware will be required. This product should be installed by
professionals or professionally installed. *Video Mount Products
will not be held liable for the improper use or installation of their
products.*
4