
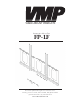
FP-LF/FP-LFB_Instruction Sheet

Step 1
Before starting, lay out all parts to your mount and match them to
the parts list provided. Verify that you have all your parts before at-
tempting to assemble the mount.
Step 2
Mark the wall or desired mounting surface in preparation of installation
of the wall plate . Pre-drill in necessary and mount the wall plate
to the desired mounting surface.
Warning: Please verify that your mounting surface will support the
combined weight of your mount, mounting hardware, and monitor.
Also verify that the mounting surface is safe to drill through. If in doubt,
please contact a profession installer.
Step 3
Determine the correct screw size and if you need to use wash-
ers, lock washers, or spacers. Note: Spacers are used for TVs with
recessed hole patterns. Secure the TV to the mounting bracket
using the appropriate hardware ( through ). Note: The
brackets have to be level with each other to work properly.
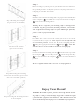
Step 4
Use the hooks in the mounting bracket to hook on the top rail of
the wall plate . Use security screws and the long allen key
to secure the TVs to the wall plate and to secure its horizontal
position.
Please verify that all nuts and screws are securely tightened.
Step 2: Mounting the wall plate
(Lag screws are not included)
Step 3A: Attaching the mounting
brackets to the monitor
(spacers not needed)
WARNING: The installer of these products must verify that the mount-
ing surface, ceiling or wall, will safely support the combined weight
of all attached equipment and hardware. Video Mount roducts will
not be held liable for the improper use or installation of its products.
Enjoy Your Mount!
Step 4: Securing the mounting brackets
to the wall plate
2
1
1
1
5
19
3
2
4
1
Step 3B: Attaching the mounting
brackets to the monitor (spacers used
due to recessed hole patterns)