
LCD-1/LCD-1B_InstructionSheet

Ste p 1
Be fo re sta rting , la y o ut a ll parts to yo ur mo unt a nd ma tc h the m to
the p a rts list p ro vid e d . Ve rify tha t yo u ha ve a ll yo ur p a rts b e fo re
a tte mpting to a sse mb le the mo unt.
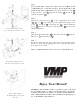
Ste p 2
Atta c h the mo unting p la te to yo ur LCD mo nito r using the M4
o r M5 sc re ws o r a s a p pro p ria te .
Ste p 3
Mark the wa ll o r de sire d mo unting surfa c e in p re paratio n o f insta lla -
tio n o f wa ll mo unting p la te . Pre -d rill if ne c e ssa ry a nd mo unt wa ll
pla te to de sire d surfa c e . Mo unt wa ll p la te with sma ll we ld e d
ro ta tio n sto p pe rs to the b o tto m o f the p la te . Warning: Ple ase ve rify
that yo ur mo unting surfac e will suppo rt the c o mb ine d we ig ht o f
y o ur mo unt, mo unting hardware , and mo nito r. Also ve rify that the
mo unting surfac e is safe to drill thro ug h. If in do ubt, ple ase c o ntac t
a pro fe ssio nal installe r.
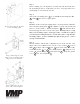
Ste p 4
Ne xt d e te rmine whic h a rm c o nfi g ura tio n yo u d e sire (d o ub le a rm,
sing le a rm, o r ne a r fl ush) a nd lo c a te the c o rre c t a rms ( fo r ne a r
fl ush, fo r sing le a rm, OR a nd fo r d o ub le a rm). Atta c h the
de sire d wa ll a rm o r o r to the wa ll pla te using the 3/ 8”
sc re w , pla stic fl a ng e s a nd nylo n nut . Sna p the p la stic
c o ve r o nto the wa ll pla te .
Ste p 2: Attac hing the mo nito r
to the mo unting plate
Ste p 3: Attac hing the wa ll
plate to the mo unting surfac e
(Lag Sc re ws no t inc lude d)
Ste p 4: Attac hing the re ar
fo rc e a rm to the wa ll plate
3
2
11
20
17
2
8
1
5
19
18
1
2
8
1
1
6