
LCD-1C-1CB-1CW_InstructionSheet

Step 1
Before starting, lay out all parts to your mount and match them to
the parts list provided. Verify that you have all your parts before
attempting to assemble the mount.
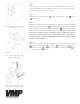
Step 2
Attach the mounting plate to the LCD using the M4 or M5
screws.
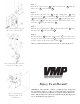
Step 3
Mark the wall or desired mounting surface in preparation of installa-
tion of wall mounting plate . Pre-drill if necessary and mount wall
plate to desired surface. Mount wall plate with small welded
rotation stoppers to the bottom of the plate. Warning: Please verify
that your mounting surface will support the combined weight of
your mount, mounting hardware, and monitor. Also verify that the
mounting surface is safe to drill through. If in doubt, please contact
a professional installer.
Step 4
Attach the swivel bracket assembly from step 2 to the support tube
using the 3/8” screw , washers and nylon nut . Insert
adjustable screw into the back of the swivel bracket for
use when tilting the monitor.
Step 2: Attaching the mounting
plate to the LCD
Step 3: Attaching the ceiling
plate to the ceiling
Step 4: Attaching the swivel
bracket to the support tube
21
1
5
22
1
3
15
12
8
16
4