
LCD-2537/2537B_InstructionSheet


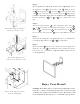

Ste p 5
If y o ur applic atio n c alls fo r the do uble arm c o nfi g uratio n, a tta c h
the fro nt fo rc e a rm to the re a r fo rc e a rm using the me ta l
p in , the lo ng sp a c e r , wa she rs o n the to p a nd b o tto m
a nd b e twe e n the two a rms, a nd the nylo n nut . If y o ur ap-
plic atio n c alls fo r the single arm o r ne ar fl ush mount c o nfi guratio n,
inse rt the sho rt sp a c e r into o r a nd c o ntinue to the ne xt
ste p .
Ste p 6
Atta c h the swive l b ra c ke t to the a p p ro p ria te fo rc e a rm ( ,
, o r d e p e nd ing o n yo ur a p p lic a tio n) using a 3/ 8” sc re w ,
wa she rs , a nd nylo n nut . Inse rt a d justa b le sc re w into
the b a c k o f the swive l b ra c ke t fo r use whe n tilting the mo nito r.
Ste p 7
Atta c h the mo unting p la te a sse mb ly fro m ste p 2 to yo ur LC D mo ni-
to r using the M4 o r M5 sc re ws o r a s a p p ro p ria te .
Ste p 8
Inse rt e nd p lug s into the fo rc e a rms use d b y yo ur a p p lic a tio n.
Inse rt the c ab le c lip s b y p ushing the a rro w e nd s into the sq ua re
ho le s in the fo rc e a rms. Ple ase ve rify that all nuts and sc re ws are
se c ure ly tighte ne d.
Ste p 5: Atta c hing the fro nt fo rc e
arm to the re a r fo rc e a rm
Ste p 6: Atta c hing the p ivo t
b ra c ke t to the fro nt fo rc e a rm
Ste p 7 : Atta c hing the mo nito r
to the mo unting p la te
WARNING: The installe r o f the se produc ts must ve rify that the mo unt-
ing surfac e , c e iling o r wall, will safe ly support the c o mb ine d we ig ht
o f all attac he d e quipme nt and hardware . Vide o Mo unt ro duc ts will
no t b e he ld liab le fo r the impro pe r use o r installatio n o f its pro duc ts.
Enjo y Yo ur Mo unt!
16
3 2
19
5
11
20
2
8
18
4
2
3
8
14
15
11
10
4
21
22
9
7