
Installation Instructions

Ste p 1
Be fo re sta rting , la y o ut a ll p a rts to yo ur mo unt a nd ma tc h the m to
the pa rts list p ro vide d . Ve rify tha t yo u ha ve a ll yo ur p a rts b e fo re
a tte mpting to a sse mb le the mo unt.
Ste p 2
Ma rk the wa ll o r d e sire d mo unting surfa c e in p re p a ra tio n o f insta l-
la tio n o f wa ll pla te . If mo unting to wo o d e n stud s, p re d rill p ilo t
ho le s using a 7/ 32” d rill b it. Atta c h the wa ll p la te to the wo o d e n
stud using the 5/ 16” b y 2.5” lo ng la g sc re w a nd wa she r )
ma king sure the sma ll e a r fl a p s a re o n the to p ra il o f the wa ll p la te
. WARNING: Ple ase ve rify that y o ur mo unting surfac e will suppo rt
the c o mbine d we ight o f y o ur mo unt, mo unting hardware , and fl at
pane l. Also ve rify that the mo unting surfac e is safe to drill thro ugh.
Ple ase no te o nly mo unting hardware fo r mo unting to wo o de n studs
will b e pro vide d with the unit. If mo unting to a surfac e o the r than
wo o de n studs the n o the r hardware will b e re quire d. If in do ub t o r
unc e rtain ab o ut any o f the abo ve , ple ase c o ntac t a pro fe ssio nal
installe r.
Ste p 3
De te rmine the c o rre c t sc re w size a nd if yo u ne e d to use wa sh-
e rs, lo c k wa she rs, o r spa c e rs. No te : Sp a c e rs a re use d fo r TVs with
re c e sse d ho le p a tte rns. Se c ure the TV to the mo unting b ra c ke t
using the a p p ro p ria te ha rd wa re thro ug h . No te : The
b ra c ke ts ha ve to b e le ve l with e a c h o the r to wo rk p ro p e rly.
Ste p 4
Use the ho o ks in the mo unting b ra c ke t to ho o k o n the to p ra il
o f the wa ll pla te . Use se c urity sc re ws a nd the lo ng a lle n
ke y to se c ure the TVs to the wa ll pla te a nd to se c ure its
ho rizo nta l p o sitio n.
Ple ase ve rify that all nuts and sc re ws are se c ure ly tig hte ne d.
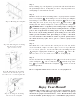
Ste p 2: Mo unting the wa ll p la te
Ste p 3A: Atta c hing the mo unting
b ra c ke ts to the mo nito r
(sp a c e rs no t ne e de d)
WARNING: The installe r o f the se pro duc ts must ve rify that the mo unt
surfac e , c e iling o r wall, will safe ly suppo rt the c o mbine d we ight o f
all attac he d e quipme nt and hardware . Vide o Mo unt Pro duc ts will
not b e he ld liab le fo r the impro pe r use o r installatio n o f its pro duc ts.
Enjo y Yo ur Mo unt!
1
4
5
Ste p 4: Se c uring the mo unting
b ra c ke ts to the wa ll p late
2
1
21
1
3
22
19
1
2
1
Ste p 3B: Attac hing the mo unting
b ra c ke ts to the mo nito r (sp a c e rs
use d due to re c e sse d ho le p a tte rns)