
LCD-MID-FT/LCD-MID-FTB Instruction Sheet
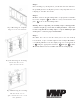

Ste p 4: Adjusting the tilt te nsio n
b e fo re p lac ing the sc re e n o n
the wa ll
Ste p 4
Ad just the tilt te nsio n b y tig hte ning the so c ke t he a d sc re ws with
the M5 Alle n Ke y so the y a re fa irly tig ht. Note : Yo u may have
to adjust the tilt te nsio n o nc e the fl at sc re e n is o n the wall so do no t
tig hte n as hard as yo u c an be c ause it will make furthe r adjustme nt
o n the wall muc h mo re diffi c ult.
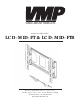
Ste p 5
Use the ho o ks o n the p ivo t b ra c ke t to ho o k o n the to p ra il o f the
wa ll p la te . Use the M5 sc re ws to se c ure the TV to the wa ll
p la te a nd to se c ure its ho rizo nta l p o sitio n.
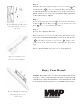
Ste p 6
If y o u ne e d to adjust the tilt te nsio n:
Tilt d o wn the fl a t sc re e n a s fa r a s it will g o . No te : This is do ne to give
y o u ro o m to wo rk with b e hind the fl at sc re e n. Ta ke the M5 Alle n Ke y
a nd tig hte n d o wn the so c ke t sc re ws until yo u ha ve
a c hie ve d the d e sire d tilt te nsio n a nd re a d just the tilt to the d e sire d
a ng le .
Ple ase ve rify that all nuts and sc re ws are se c ure ly tig hte ne d.
Ste p 5: Se c uring the p ivo t
b ra c ke ts to the wa ll p la te
Ste p 6: Adjusting the tilt te nsio n
a fte r p la c ing the sc re e n
o n the wa ll
WARNING: The installe r o f the se pro duc ts must ve rify that the mo unt-
ing surfac e , c e iling o r wall, will safe ly suppo rt the c o mb ine d we ight
o f all attac he d e quipme nt and hardware . Vide o Mo unt Pro duc ts will
not b e he ld liab le fo r the impro pe r use o r installatio n o f its pro duc ts.
Enjo y Yo ur M o unt!
4
9
1
2
1
1 0
4
1 0
VIDEO MOUNT PRODUCTS