
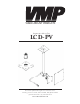
InstructionSheet

Step 1
Before starting, lay out all parts to your mount and match them to the
parts list provided. Verify that you have all your parts before attempt-
ing to assemble the mount.
Step 2
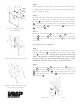
Determine the VESA standard that your TV follows to determine which
VESA plate you will be using. For VESA 75 or 100 use the small mount-
ing plate and for VESA 200 or 100x200 use the large mounting plate
. Once you have determined the correct VESA plate for your TV,
attach the plate or to the pivot bracket using an M6 screw
and nylon nut .
Step 3
Attach the swivel bracket to the support tube using the 3/8”
screw , washers and nylon nut . Insert the adjusting
screw into the back of the pivot bracket for use when tilting
the monitor.
If you plan to use the ceiling mast,
Step 4
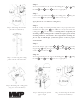
Mark the ceiling or desired mounting surface in preparation of instal-
lation of ceiling plate . Pre-drill if necessary and mount the ceiling
plate to desired surface. Warning: Please verify that your mounting
surface will support the combined weight of your mount, mounting
hardware, and monitor. Also verify that the mounting surface is safe to
drill through. If in doubt, please contact a professional installer.
Step 5
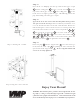
Attach the extension tube to the support tube using the ¾”
bolt and washers . Then screw the longer ¼” brake screw
into the extension tube so that it is tight against the ¾” bolt
. This will prevent the ¾” bolt from turning loose within the
extension tube .
Step 2: Selecting the correct
mounting plate
Step 3: Attaching the pivot bracket
Step 4: Mounting the ceiling plate
(Lag screws not included)
VIDEO MOUNT PRODUCTS
5
5
6
Step 5: Attaching the extension tube
6
4
9
7
4
3
4
8
12
16 15
1
1
2 3
10 11
17
2
10
10
2