
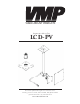
InstructionSheet
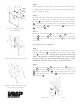

Step 6
Attach your monitor to the chosen mounting plate or using
the M4 , M5 or M6 screws as appropriate.
Step 7
Connect the extension tube to the ceiling plate using the
5/16” screw and nylon nut . Proceed to step 12.
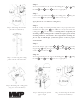
If you plan to use 1.5” NPT as a ceiling mast,
Step 8
Mark the ceiling or desired mounting surface in preparation of in-
stallation of ceiling plate . Pre-drill if necessary and mount the
ceiling plate to desired surface. Warning: Please verify that your
mounting surface will support the combined weight of your mount,
mounting hardware, and monitor. Also verify that the mounting sur-
face is safe to drill through. If in doubt, please contact a profes-
sional installer.
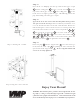
Step 9
Attach the female pipe couple , & to the top of the
support tube using the 5/8” screw , washers & , spring
washer and hex nut .
Step 10
Attach your monitor to the chosen mounting plate or using
the M4 , M5 or M6 screws as appropriate.
Step 6: Attaching the monitor
(monitor not included)
Step 7: Connecting the ceiling
plate and the extension tube
Step 8: Mounting the ceiling plate
(Lag screws not included)
VIDEO MOUNT PRODUCTS
Step 9: Attaching the female
pipe couple
Step 10: Attaching the monitor
(monitor not included)
2
18
19
5
6
21 22
33
1
42
42
37
38
36
3
41
39
40
35
34
5
6
21
22
33