NUVICO EasyNet - VMS Lite NUVICO EasyNet - VMS Lite Revision 4 Page 1
Table of Contents I. Installation .................................................................................................................................................. 3 1. PC Requirements ................................................................................................................................ 3 2. Installing NUVICO EasyNet - VMS Lite.............................................................................................. 4 II. Basic Operation .......................
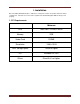
I. Installation Before installing NUVICO EasyNet - VMS Lite to a PC, please make sure that the PC meets below requirements. If the PC does not meet the requirements, NUVICO EasyNet VMS Lite may not run properly. 1. PC Requirements Minimum CPU Intel Core ™2 Duo 2.4GHz Memory 2GB Video Card 512MB Resolution 1280ⅹ1024 HDD storage space 10GB or higher OS Windows XP SP2 Others DirectX 8.
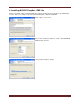
2. Installing NUVICO EasyNet - VMS Lite Please note that in order to install and utilize the software, the PC must be logged in as an administrator account. Run x.x.x.x Setup.exe file in the NUVICO EasyNet – VMS Lite Setup CD. Click “I Agree” to proceed. Choose the components and press “Next”. Note that WESP SDK must be selected. Select folder and press “Install”.
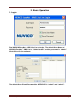
II. Basic Operation 1. Login Run NUVICO EasyNet – VMS Lite Live to begin. The default User Name of NUVICO EasyNet – VMS Lite is “Administrator” and the password is “admin”. Click OK to run the software. The default User ID and Password for APEX DVR is “admin” and “admin”.
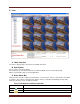
2. Live A. Main View Area Live video is displayed up to 64 cameras in the Main View Area. B. Unit Explorer Site : To make connection to DVRs Favorite Group: To view different cameras from different DVRs for more efficient monitoring. Map: To monitor with e-map for special applications C. Event Status Bar Status & Action : Provides activities and information such as motion, video loss, date & time of the DVRs in real time.
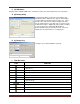
Connection fail Login fail Connected Event occurred Currently being viewed Camera off/on Relay out off/on Sensor on/off Microphone on/off Motion Video detected/video loss Authentication fail Configuration changed D. Tool Bar Icons in the tool bar are to activate and deactivate numerous function s that NUVICO EasyNet – VMS Lite offers. Please refer to below chart for each icons and its function.
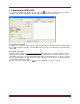
3. Connecting to APEX DVRs To connect to an APEX series DVR, in the site mode, click icon in the tool bar or right mouse click in Unit Explorer Area then click Add Unit. Add Unit window will appear as shown below. For local area connection If a DVR is connected in local area network, simply click Auto Detect. DVRs information will appear in the box on right hand side. Thereafter, select the DVR from the list, type User ID and Password, followed by clicking OK.
4. Playback To access recorded data of DVRs, click on Playback icon on the desktop. icon in the tool bar or click NUVICO EasyNet VMS – Lite A. Main View Area Up to 16 cameras are displayed during playback B. Playback Graph Yellow : Continuous Green: Motion / Pre&Post Event Red: Alarm C. Log Displays event log for selected duration D. Camera Select To select or deselect cameras from remote playback streaming E. Calendar When connected to a DVR, recorded dates will turn black.
F. (A) HDD Status Displays total & available HDD status of the DVR as well as the earliest and the latest recorded data. G. (B) Backup Utility Select Backup Utility to download recorded data to PC. NUVICO EasyNet – VMS Lite also supports downloading recorded data as proprietary format as well as avi. Select the date, time, and cameras and then input the file name. For avi download, please note that only one camera can be downloaded at a time.
J.
5. Configuration Tools Configuration Tools is to change settings on the DVRs. Click Lite Configuration Tool on the desktop. icon or run NUVICO EasyNet – VMS A. Unit Explorer Unit Explorer displays all the DVRs that are currently connected. Select the DVRs icon to change settings. B. Menu 1. System Information: Information such as DVR name, model, H/W version, F/W version, MAC address, and IP address are displayed.
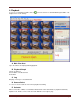
III. Advanced Operation This section will cover advanced features that NUVICO Easy – VMS Lite offers. This instruction manual will assume that the section on basic operation has been read and understood thoroughly. 1. Live A. Favorite Group Favorite Group may be utilized when there are multiple DVRs connected. By creating favorite groups, monitoring different cameras from numerous DVRs may become more efficient. To begin, select Favorite Group tab in the Unit Explorer. There after click Add icon.
B. Monitoring Control Monitoring Control consists of Caption, Stream, REC Start, Save As, Listen, PTZ, and Close. During live monitoring, right mouse click on a picture, these control options will appear on the screen as illustrated. Please refer to below table for detail information for each feature. FUNCTION Caption Stream REC Start Listen PTZ Close CONTROL OSD such as camera number, DVR name, date/time, refresh rate, number of users, etc.
MOUSE MOVEMENT TRACK: For NUVICO PTZs, a PTZ camera can be moved with the mouse clicks on the picture. The camera will track the mouse movement and change its speed based on the distance of the mouse point from the center of the picture. MENU: Access menu of the PTZ camera. ESC TELE, WIDE: Zoom in and out. Also used as a enter button on the PRESET, TOUR, PATTERN and SCAN function setup menu. FUNCTIONS: Used as an Iris Open/Close during IRIS mode. Used as a focus Far/Near in FOCUS mode.
D. Event Search Utility Go to Tools then select Event Search Utility. This is to search events by the event log kept on NUVICO EasyNet – VMS Lite. Select Time, Unit, and Category then click on Find. List of log will be generated as illustrated. Select an event to playback, print, or save. When finished, click Exit to close. E. Options Go to Tools -> Options to change configuration of NUVICO EasyNet – VMS Lite. a. Caption Caption tab is to change settings pertain to OSD settings. b.
FUNCTION Monitor Viewer Mode Use DirecX Apply Deinterlace DESCRIPTION Full: Resize the video accordingly to the display size Ratio: Keep original aspect radio Caption Area: Display caption bar Use DirecX control. Not suggest for the older PC model Use de-interlace for D1 video Monitor Mode Use either Single monitor or dual monitor Don’t ask login Bypass initial login screen for VMS Lite Color Space System Performance Adaptive Mode RGB/ YUV color display option.
Alarm Notification Schedule Sensor-Channel Mapping e. Sequence Configure automatic sequence duration. When Monitor 1 Only is checked, NUVICO EasyNet – VMS Lite will sequence cameras only in the first grid in the Main View Area.
f. Frame Rate Not supported. Please note that this setting is irrelevant to actual recording rate and the network refresh rate. g. Map Map tab is to select whether or not display DVRs’ names when utilizing Map feature. F. Users and Passwords Go to Admin -> Users and Passwords to create, modify, or delete accounts for NUVICO EasyNet – VMS Lite.
G. Map If a map such as floor plant is available in jpg or bmp file, users can create a map and allocate peripheral devices, cameras, alarm inputs, relay outs, and microphones, on the map. To create a map, click Map tab in the Unit Explorer then click add icon. MapEditor window will appear on the screen; thereafter, open the map file. After the map is displayed, drag and drop the icons from the Unit Tree. When finished, click Save icon to exit.
2. Playback A. Smart Search Smart Search is to search by change in specific area within the field of view of a camera. To begin, click on Smart Search icon, if the icon is in grey scale, please stop or pause playback. Select the camera and the area, input the range, and click Search. As illustrated below, list of thumbnails will be generated. After searching is done, double click on the desired picture to begin playback from particular moment. Otherwise, click Close to exit.
3. Configuration Tools A. User Authority NUVICO EasyNet –VMS Lite offers User Authority, in which up to 10 remote user accounts can be generated. Each user account may be assigned with different privileges including PTZ can relay out control, playback access, as well as specific cameras view only. First, activate user accounts in Account under User Setup. Create User ID and Password; afterwards, click on Authority to assign privileges to created user accounts.
4. Schedule Backup NUVICO EasyNet – VMS Lite offers Schedule Backup that allows users to save recorded data to PC’s HDD during programmed hours. To open Schedule Backup go to Start - > Programs - > NUVICO EasyNet -> NUVICO EasyNet - VMS Lite -> Tools -> Schedule Backup. Select an APEX DVR from My Units. Designate the drive for file download. Mainly, due to bandwidth issue, defining Backup Policy as well as selecting particular cameras may make the process more practical.