TOURING 7000 SERIES QUICK USER GUIDE
Quick User Guide page 2
Quick User Guide CONTENTS SAFETY PRECAUTIONS ............................................................................................................................................................................ BACK UP SD MEMORY CARD DATA ........................................................................................................................................................ FRONT PANEL CONTROLS ...........................................................................................
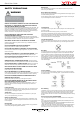
Quick User Guide SAFETY PRECAUTIONS Maintenance If you are experiencing problems, do not attempt to repair the unit yourself. Return it to your VMS dealer. WARNING Never Attempt the Following: Do not grip or pull out the disc while it is being pulled back into the player by the automatic reloading mechanism. Do not attempt to insert a disc into the unit when the unit power is off. Doing so may cause damage to the DVD / CD mechism. This symbol means important instructions.
Quick User Guide protected CDs which do not conform to the audio CD industry standard. • Use discs with MP3/WMA files written in a format compliant with this unit. To customers using CD-R / CD-RW • If a CD-R/CD-RW cannot be played, make sure the last recording session was closed (finalised). • Finalise the CD-R / CD-RW if necessary, and attempt playback again.
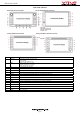
Quick User Guide FRONT PANEL CONTROLS Touring 7023 Toyota Front Panel Touring 7006 Nissan Front Panel Touring 7000 Double Din Front Panel Touring 7032 Subaru Forester Front Panel Touchscreen Display No. Function Description 1 PWR-VOL Tune knob to increase / decrease volume. Press to MUTE. Press and hold to power on / off. 2 SEEK Radio: Change station up or down. CD/DVD: Change track up or down. iPOD: Change track up or down. 3 AV Cycles through all AV functions.
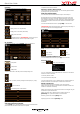
Quick User Guide switched off, the system will power down. To manually power the system on or off, INSERT SD CARD PLEASE NOTE: The memory card slot is directional. Ensure the card is in the correct orientation. Incorrect orientation can cause physical damage to the card slot. press and hold the [PWR/VOL] knob. Insert the card into the slot and press gently until the card locks into position.
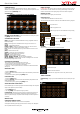
Quick User Guide DVD MENU When a DVD is inserted, the DVD menu will appear. 2. Repeat the above for other stations. MANUALLY TUNING A RADIO STATION If the automatic scan did not find a station, you can manually adjust the station by pressing the step up or down buttons. REAR SEAT ENTERTAINMENT The 7000 series is Rear Seat Entertainment ready. It has the ability to: Send DVD video & audio to a display located at the rear of the vehicle. Rear Seat Passengers can watch a movie with wireless headphones.
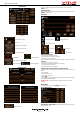
Quick User Guide PHONE MENU To call from these menus, select the phone number to call, then press the [CALL] button. IPOD OPERATION Ensure iPOD is connected to the iPOD cable. To access the iPOD menu, press [iPOD] in the main menu. IPOD MENU Keypad - Connected phone name. - Current track name. - Pair phone. - Current artist name. - Current album name. - Handsfree mode is activated. - Play / pause. - Switch call back to handset. - Turn Bluetooth On/Off. - Previous Track. - Next Track.
Quick User Guide GPS AUDIO - Toggles GPS sound on/off. DEFAULT = ON. iPOD - Toggles iPOD integration on/off. If this option is OFF, the iPOD icon in the main menu turns into a AUX icon. DEFAULT = ON. - Copyright & system info menu. TPMS - Tyre Pressure Monitoring System TPMS SETUP MENU AUTO DIMMING - Toggles dimming of the screen when headlights are switched on, on/off. DEFAULT = ON. REAR ENTERTAINMENT - Toggles rear entertainment menu on/off. DEFAULT = ON.
Quick User Guide Memory Map Pros: Easier to use. Easier to learn. Technical support via phone and online. Memory Map Cons: Can only use Memory Map format maps. Not all maps are published in this format. Ozi Explorer Pros: Can accept a wider format of maps. Many users may already have maps in Oziexplorer format. Offers advanced users more flexibility. Ozi Explorer Cons: Harder to use compared with Memory Map. Online technical support only.
Quick User Guide To Start Street navigation, select [Street Navigation] in the GPS console. This quick start guide will only cover basic operation. For a complete Street Navigation user manual, please visit: http://www.vms4x4.com/vms_support GETTING STARTED WITH STREET NAVIGATION Street Navigation is optimised for in-car use. You can use it easily by tapping the screen buttons and the map with your fingertips. You do not need to tap the screen twice for any function.
Quick User Guide USING THE ON SCREEN KEYBOARD You can enter letters or numbers in Street Navigation with your fingertips on the full-screen keyboards and you can switch between various keyboard layouts, for exam Tap , and select from the list of available keyboard types. Switching to another keyboard layout, for example from a Latin QWERTY keyboard to a Greek keyboard Street Navigation remembers your last keyboard choice and offers it the next time you need to enter data.
Quick User Guide Action Button (s) Description Changes the horizontal view angle of the map in 3D mode. When GPS position is available, Street Nav always rotates the map so its top faces your direction of travel (Track-up orientation). You can turn away from track up with these buttons if GPS position is available and you have rotated the map, the button appears. Tap this button to re-enable the automatic map rotation.
Quick User Guide Icon Description Select the data box and tap on the map to see grid coordinates and route/track information. Use the Menu > Overlay > Settings... command to set your preferred units of measurement, magnetic variation and the size of the velocity vector. INFORMATION - The blue Information button will appear whilst your GPS position is being calculated. Tapping the Blue information button will simply bring up a dialogue box that states you have No GPS Signal.
Quick User Guide Once the route is complete, Tap-and-Hold on the route and select Lock to prevent any waypoints from being accidentally re-positioned. Use the Show All / Hide All menu commands to choose which overlays to show on your maps. FIND A PLACE BY NAME Tap Menu > Find Place and tap the [Kbd] keyboard button on the right of the window. Ensure that the cursor is in the Find box and start typing. It’s best to type part of the word to maximise search results.
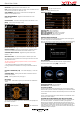
Quick User Guide OPEN A MAP If the GPS has acquired satellites lock, your current position will be displayed on a map. There is no need to manually open a map file. However, you can open a map file manually for trip preparation. ON SCREEN FUNCTION USING TOURING 7000 SERIES WITH MEMORY MAP ON THE PC Memory Map Mobile is compatible with Memory Map on the PC. Maps, Routes, Waypoints, Tracks & licenses etc can be shared between VMS Touring products & Memory Map.
Quick User Guide SEARCHING FOR MAPS AROUND CURRENT POSITION 1. Another method of finding more maps around your location is to simply go to the map menu, select [map] > [find maps at cursor] WAYPOINT INFORMATION DISPLAY UNDERSTANDING PLANNING MODE AND NAVIGATION MODE It is important to understand that OziExplorer has 2 modes of use, Planning mode and Navigation Mode. 2. A list of found maps appear.
Quick User Guide Planning mode is required for this tutorial. Button (s) 1. Load any map. 2. Open the Waypoint Toolbar. [View] > [Toolbars] > [Waypoint Toolbar] Description Load a Waypoint File - Select a waypoint file (.wpt) to load onto the map. Save Waypoints to File - All waypoints currently on the map are saved to a waypoint file (.wpt). Show / Hide Waypoint Name - Waypoint names are displayed on map / or not.
Quick User Guide 5. Route properties TRACK LOG OPTIONS NAVIGATING ALONG A ROUTE To navigate along this route in normal order, select [map] > [navigation] > [Forward Route] REVERSE THE ROUTE To navigate along this route in reverse order, select [map] > [ Navigation] > [Forward Route] PLEASE NOTE: The information provided in this quick user guide on Ozi Explorer is current with Version 2.3. For additional help and support contact Oziexplorer directly.
Quick User Guide IMPORTANT INFORMATION MAP DATA INFORMATION: One of the goals of the product is to provide customers with the most complete and accurate cartography that is available to us at a reasonable cost. Along with VMS’ extensive field work, we use a combination of governmental and private data sources, which we identify in product literature and copyright messages displayed to the consumer. Virtually all data sources contain some inaccurate or incomplete data.
Quick User Guide page 22
Quick User Guide page 23
September 2009 / Rev 1.0 Printed in Australia VMS © is a trademark of XIA GROUP PTY LTD, registered in Australia and other countries and may not be used without the express permission of XIA GROUP Pty Ltd.