View Integration VMware Horizon 6 Version 6.2 This document supports the version of each product listed and supports all subsequent versions until the document is replaced by a new edition. To check for more recent editions of this document, see http://www.vmware.com/support/pubs.
View Integration You can find the most up-to-date technical documentation on the VMware Web site at: http://www.vmware.com/support/ The VMware Web site also provides the latest product updates. If you have comments about this documentation, submit your feedback to: docfeedback@vmware.com Copyright © 2015 VMware, Inc. All rights reserved. Copyright and trademark information. VMware, Inc. 3401 Hillview Ave. Palo Alto, CA 94304 www.vmware.com 2 VMware, Inc.
Contents View Integration 5 1 Introduction to View Integration 7 View Components 7 Integration Interfaces to View 8 2 Integrating View with the Event Database 9 Event Database Tables and Schemas 9 Connection Broker Events 11 View Agent Events 16 View Administrator Events 17 Event Message Attributes 24 Sample Database Queries and Views 25 3 Using View PowerCLI 27 Getting Started with View PowerCLI 27 View Administrator, View PowerCLI, and vdmadmin Compared 30 View PowerCLI cmdlet Reference 32 View Pow
View Integration 7 Setting Desktop Policies with Start Session Scripts 81 Obtaining Input Data for a Start Session Script 81 Best Practices for Using Start Session Scripts 81 Preparing a View Desktop to Use a Start Session Script 82 Sample Start Session Scripts 84 Index 4 87 VMware, Inc.
View Integration The View Integration document describes how to integrate View™ software with third-party software such as Windows PowerShell, business intelligence reporting engines, and Microsoft System Center Operations Manager (SCOM). Intended Audience This document is intended for anyone who wants to customize or integrate software to work with View.
View Integration 6 VMware, Inc.
Introduction to View Integration 1 With View, system administrators can provision desktops and control user access to these desktops. Client software connects users to virtual machines running in VMware vSphere™, or to physical systems running within your network environment. In addition, View administrators can configure Remote Desktop Services (RDS) hosts to provide View desktop and application sessions to client devices.
View Integration vCenter Server A server that acts as a central administrator for ESX/ESXi hosts that are connected on a network. A vCenter Server instance provides the central point for configuring, provisioning, and managing virtual machines in the datacenter. View Composer A software service that is installed on a vCenter Server instance to enable View to rapidly deploy multiple linked-clone desktops from a single centralized base image.
Integrating View with the Event Database 2 You can configure View to record events to a Microsoft SQL Server or Oracle database. View records events such as end-user actions, administrator actions, alerts that report system failures and errors, and statistical sampling. End-user actions include logging and starting desktop and application sessions. Administrator actions include adding entitlements and creating desktop and application pools.
View Integration View records details about events to all the database tables. After a certain period of time has elapsed since writing an event record, View deletes the record from the event and event_data tables. You can use View Administrator to configure the time period for which the database keeps a record in the event and event_data tables. IMPORTANT View does not restrict the growth of the event_historical and event_data_historical tables.
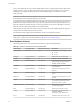
Chapter 2 Integrating View with the Event Database Table 2‑2. Schema for the event and event_historical Tables (Continued) Column Name Oracle Data Type SQL Server Data Type Description ThinAppId NVARCHAR2(512) nvarchar(512) ID of the associated ThinApp™ object. Time TIMESTAMP datetime Time at which the event occurred, measured from the epoch (January 1, 1970). UserDiskPathId NVARCHAR2(512) nvarchar(512) ID of the user disk.
View Integration Table 2‑4.
Chapter 2 Integrating View with the Event Database Table 2‑4.
View Integration Table 2‑4.
Chapter 2 Integrating View with the Event Database Table 2‑4.
View Integration Table 2‑4.
Chapter 2 Integrating View with the Event Database View Administrator Events View Administrator events report information about actions that users initiate in View Administrator. Table 2‑6.
View Integration Table 2‑6.
Chapter 2 Integrating View with the Event Database Table 2‑6.
View Integration Table 2‑6.
Chapter 2 Integrating View with the Event Database Table 2‑6.
View Integration Table 2‑6.
Chapter 2 Integrating View with the Event Database Table 2‑6.
View Integration Event Message Attributes ModuleAndEventText messages use certain attributes. To determine the data type for an attribute, you can examine its value in the type column in the event_data or event_data_historical table. Table 2‑7. Attributes that ModuleAndEventText Messages Use 24 Attribute Name Description AdminFolderName Name of a folder that requries privileged access. AdminPermissionEntity Name of an object that requires privileged access.
Chapter 2 Integrating View with the Event Database Table 2‑7. Attributes that ModuleAndEventText Messages Use (Continued) Attribute Name Description ThinAppRepositoryName Name of a ThinApp repository ThinAppRepositoryPath Path of a ThinApp repository. Time Date and time value. UserCount Maximum number of desktop users over a 24-hour period. UserDiskName Name of a user data disk. UserDisplayName User name in the form DOMAIN\username. UserName Name of a user in Active Directory.
View Integration The following query lists all recent events where the agent on a machine shut down. CREATE VIEW agent_shutdown_events AS ( SELECT ev.EventID, ev.Time, ed.StrValue FROM dbo.VE_event_historical AS ev, dbo.VE_event_data_historical AS ed WHERE ev.EventID = ed.EventID AND ev.EventType = ‘AGENT_SHUTDOWN’ AND ed.Name = ‘MachineName’ ); The following query lists all recent events where a desktop failed to launch because the desktop pool was empty.
Using View PowerCLI 3 View PowerCLI provides an easy-to-use PowerShell interface to View. You can use View PowerCLI cmdlets to perform various administration tasks on View components.
View Integration Start the PowerShell Console with View PowerCLI Loaded You can run the View PowerCLI cmdlets directly on a View Connection Server host. Prerequisites Verify that the View Connection Server host has the following software installed. n View 4.5 or later n Microsoft .NET framework n Windows PowerShell 1.0 Procedure 1 Log in to the View Connection Server instance as a user in a role that has sufficient privileges to modify configuration data.
Chapter 3 Using View PowerCLI 2 Display the View PowerCLI help. Option Action List all View PowerCLI cmdlets Run the Get-Command cmdlet. For example: Get-Command -PSSnapin VMware.View.Broker | more Display help for a specific cmdlet Type Get-Help followed by the name of the cmdlet. For example: Get-Help Add-ViewVC | more Display detailed help for a specific cmdlet Type Get-Help followed by the name of the cmdlet and the -full parameter.
View Integration Table 3‑2.
Chapter 3 Using View PowerCLI Table 3‑3.
View Integration Table 3‑3.
Chapter 3 Using View PowerCLI Table 3‑4. View PowerCLI cmdlets Object cmdlet Description Desktop pool Get-Pool Returns information about desktop pools. Remove-Pool Removes a desktop pool. Add-PoolEntitlement Creates desktop pool entitlements for users. Get-PoolEntitlement Returns information about the users who are entitled to use desktop pools. Remove-PoolEntitlement Removes desktop pool entitlement from users.
View Integration Table 3‑4. View PowerCLI cmdlets (Continued) Object cmdlet Description Physical machine Get-DesktopPhysicalMachine Returns a list of physical machines that are available for use with unmanaged desktop pools. Virtual machine Get-DesktopVM Returns information about virtual machines. Send-VMReset Resets a virtual machine. Get-EventReport Returns an event report for a specified view. Get-EventReportList Returns the views that are available for use with the Get-EventReport cmdlet.
Chapter 3 Using View PowerCLI Deletion Policy Parameter The -deletePolicy parameter specifies the deletion policy for automatically provisioned floating and linked-clone desktop pools. Table 3‑6. -deletePolicy Parameter Settings Setting Description Default Do not delete the machine when the user logs out. DeleteOnUse Delete the machine when the user logs out. RefreshOnUse Refresh the machine when the user logs out. NOTE This setting applies only to linked clone desktop pools.
View Integration Table 3‑9. -ldapBackupFrequency Parameter Settings Setting Description Every12Hour Back up the LDAP database once every 12 hours. Every2Day Back up the LDAP database once every two days. Every2Week Back up the LDAP database once every two weeks. Every6Hour Back up the LDAP database once every six hours. EveryDay Back up the LDAP database once per day. EveryHour Back up the LDAP database once per hour. EveryWeek Back up the LDAP database once per week.
Chapter 3 Using View PowerCLI Table 3‑10. -poolType Parameter Settings (Continued) Setting Description SVINonPersistent (AutomaticPool) The pool contains floating (nonpersistent) machines that are provisioned, managed, and configured by a vCenter Server instance and View Composer. SVIPersistent (AutomaticPool) The pool contains dedicated (persistent) machines that are provisioned, managed, and configured by a vCenter Server instance and View Composer.
View Integration Table 3‑13. -smartCardSetting Parameter Settings Setting Description NotAllowed Disable smart card authentication. Optional Allow users to use smart card authentication or password authentication to connect to the View Connection Server instance. If smart card authentication fails, the user must provide a password. Required Require users to use smart card authentication when they connect to the View Connection Server instance.
Chapter 3 Using View PowerCLI Managing vCenter Server Instances in View You can use View PowerCLI cmdlets to perform vCenter Server management tasks in View. Table 3‑16. Examples of Common vCenter Server Management Tasks in View Task Example View PowerCLI cmdlet Syntax Add a vCenter Server instance to the View configuration Add-ViewVC -serverName vc01.mydom.
View Integration Creating and Updating Automatically Provisioned Desktop Pools You can use the Get-ViewVC and Update-AutomaticPool cmdlets to create and update automatically provisioned desktop pools. In the following example, the Get-ViewVC cmdlet adds an automatically provisioned desktop pool called auto1. The desktop pool is managed by a vCenter Server instance called vc.mydom.int. Get-ViewVC -serverName vc.mydom.
Chapter 3 Using View PowerCLI Table 3‑18.
View Integration In the following example, the Get-User cmdlet displays information about a user named fred in the domain named mydom. It excludes information about the user's group. Get-User -name "fred" -domain "mydom" -includeGroup $false Managing Desktop Entitlements You can use View PowerCLI cmdlets to manage desktop entitlements. Table 3‑19.
Chapter 3 Using View PowerCLI Managing Virtual Machines You can use View PowerCLI cmdlets to manage virtual machines. View Agent must be running in the virtual machines. Table 3‑21.
View Integration Displaying Event Reports You can use View PowerCLI cmdlets to display event reports. Table 3‑22.
Chapter 3 Using View PowerCLI Examples of Using View PowerCLI to Perform Advanced Tasks You can combine View PowerCLI and vSphere PowerCLI cmdlets to create PowerShell functions that perform complex operations, such as resizing pools and adding datastores to desktop pools. Determining if View Connection Server Is Running The following PowerShell function determines whether the View Connection Server service is running and starts the service if it is not running.
View Integration } } } else { Write-Error "The View Connection Server services could not be found. Is the Connection Server installed?" } } Resizing Automatic and Linked-Clone Pools The following PowerShell functions determine the current usage of all desktop pools and resize any automatically provisioned or linked-clone desktop pools that are at maximum capacity. # PollAllPoolsUsage # Parameters # $increment Amount by which to increase a pool that is at maximum capacity (default = 5).
Chapter 3 Using View PowerCLI # If a pool is using all its desktops, increase its maximum size # or output a warning if it cannot be resized. if($maxdesktops -eq $remotecount){ if($Pool.deliveryModel -eq "Provisioned"){ # Pool type can be resized $newmaximum = [int]$Pool.maximumCount + [int]$increment if($Pool.desktopSource -eq "VC"){ # Resize an automatic pool Update-AutomaticPool -pool_id $Pool.pool_id -maximumCount $newmaximum } elseif ($Pool.
View Integration $path = VVGetPath(Get-Folder -Id $InvObject.FolderId) } # Build the path, omitting the "Datacenters" folder at the root. if(-not $InvObject.isChildTypeDatacenter){ # Add object to the path. $path = $path + "/" + $InvObject.Name } $path } } Determining Paths to vSphere Datastore Objects The following PowerShell function uses vSphere PowerCLI to return the full path to a datastore in a cluster as specified by a resource pool.
Chapter 3 Using View PowerCLI $PoolSettings = (Get-Pool -pool_id $Pool) $datastores = $PoolSettings.datastorePaths + ";$Datastore" Update-AutomaticPool -pool_id $Pool -datastorePaths $datastores } Define a PowerShell function to remove a datastore from an automatic pool. # RemoveDatastoreFromAutomaticPool # Parameters # $Pool Pool ID of pool to be updated. # $Datastore Full path to datastore to be removed.
View Integration $pathToRemove = $Datastore } if(-not ($path -eq $pathToRemove)){ $datastores = $datastores + "$spec;" } } Update-AutomaticLinkedClonePool -pool_id $Pool -datastoreSpecs $datastores } Assigning Multiple Network Labels to a Desktop Pool In View 5.2 and later releases, you can configure automated full-clone and linked-clone desktop pools to use multiple network labels.
Chapter 3 Using View PowerCLI Network Label Attribute Definition Section This section lists the network labels associated with each NIC. The network labels are commented out and the assignments are not functional. You must remove the comments (### marks) from the appropriate network labels to allow them to be assigned to a desktop pool. The maxvm parameter defines the maximum number of IP assignments that can be made to virtual machines from the network label.
View Integration #total port count against network02: 488. #IP address might be over-subscribed. ... ... #WARNING! Multiple NICs:(nic1,nic2) detected against network02, #total port count against network10: 488. #IP address might be over-subscribed. ####nic1.network01.maxvm=244 ####nic1.network02.maxvm=244 ####nic1.network03.maxvm=244 ####nic1.network04.maxvm=244 ####nic1.network05.maxvm=244 ####nic1.network06.maxvm=244 ####nic1.network07.maxvm=244 ####nic1.network08.maxvm=244 ####nic1.network09.
Chapter 3 Using View PowerCLI Procedure n To obtain and export NIC and network label information to create a full-clone pool, use the ExportNetworkLabelSpecForFullClone cmdlet. For example: Export-NetworkLabelSpecForFullClone -vc_id id -clusterPath "cluster-path" -TemplatePath "template-path" -maxVMsPerNetworkLabel nn -networkLabelConfigFile "config-file-path" n To obtain and export NIC and network label information to create a linked-clone pool, use the ExportNetworkLabelSpecForLinkedClone cmdlet.
View Integration 4 Verify that only one type of network label is used for the pool. A NIC can be configured with a standard network switch or distributed virtual network switch. 5 Save your changes. Example: Edited Network Label Configuration File In this example, network06 and network07 are assigned to nic1 (Network adapter 1) and network08 and network09 are assigned to nic2 (Network adapter 2). network01 through network05 remain commented and are not used.
Chapter 3 Using View PowerCLI Procedure u Use a View PowerCLI cmdlet to deploy the desktop pool. Option Action Deploy a linked-clone pool Run the Add-AutomaticLinkedClonePool cmdlet and specify the path to the network label configuration file with the -NetworkLabelConfigFile parameter. Deploy a full-clone desktop pool Run the Add-AutomaticPool cmdlet and specify the path to the network label configuration file with the -NetworkLabelConfigFile parameter.
View Integration n If both the original linked-clone desktop and the new base image have one NIC configured with a distributed virtual network switch, the network label and MAC address are preserved. n If the original linked-clone desktop has one NIC configured with a standard network switch and the new base image has one NIC configured with a distributed virtual network switch, the network label is not preserved. The MAC address is preserved.
Chapter 3 Using View PowerCLI Displaying Network Label Assignments for a Virtual Machine You can use the Get-DesktopVM cmdlet to display network label assignments for a virtual machine. The netLabelAutoAssigns output parameter shows the NIC names and network labels that View attempted to assign to the virtual machine. You do not have to add a parameter in the command line to display this information.
View Integration id : VirtualMachine-vm-46148 vc_id : 2162aa44-e99c-4f1a-875d-dd295681d2ca Name : pool2-85 UnescapedName : pool2-85 Path : /resource/vm/Discovered virtual machine/pool2/pool2-85 GuestFullName : Microsoft Windows 7 (32-bit) GuestID : windows7Guest HostName : POOL2-85.vdi3.net IPAddress : 192.168.1.
Customizing LDAP Data 4 You can use VMware and Microsoft command-line tools to import and export LDAP configuration data to and from View. These command-line tools import and export LDAP configuration data in LDAP Data Interchange Format (LDIF) configuration files. This feature is intended for use by advanced administrators who want to perform automatic bulk configuration operations. To create scripts to update the View configuration, use View PowerCLI.
View Integration Modifying LDAP Configuration Data You can export LDAP configuration data on a View Connection Server instance to an LDIF configuration file, modify the LDIF configuration file, and import the modified LDIF configuration file into other View Connection Server instances to perform automatic bulk configuration operations. You can obtain examples of LDIF syntax for any item of LDAP configuration data in View by examining the contents of an exported LDIF configuration file.
Chapter 4 Customizing LDAP Data You associate each VM Pool entry with one Desktop Application entry in a one-to-one relationship. A Desktop Application entry cannot be shared between VM Pool entries, and a VM Pool entry can only be associated with one Desktop Application entry. The following table describes the attributes you must specify when you modify a desktop pool definition in an LDIF configuration file. Table 4‑1.
View Integration pae-VmPath: /New Datacenter/vm/vm-1 pae-OptSuspendTimeout: 0 pae-OptDisconnectLimitTimeout: 0 pae-OptMaximumSessions: 0 pae-Disabled: 0 # # Virtual Desktop VM entry VM2 # DN: CN=vm2,OU=Servers,DC=vdi,DC=vmware,DC=int changetype: add objectClass: top objectClass: pae-Server objectClass: pae-WinServer objectClass: pae-ThinWinServer objectClass: pae-VM cn: vm2 description: sample virtual desktop entry pae-VmSuspended:: IA== pae-OptIgnoreProcessList: 0 pae-MOID: vm-2 pae-VmState: READY pae-Ser
Chapter 4 Customizing LDAP Data pae-VmStartClone: 1 pae-VmPoolCalculatedValues: 1 pae-ServerPoolType: 0 pae-VmMinimumCount: 0 pae-VmHeadroomCount: 0 pae-VmMaximumCount: 0 pae-Disabled: 0 # # Desktop Application entry Pool1 -- one entry is required for each VM Pool # DN: CN=Pool1,OU=Applications,DC=vdi,DC=vmware,DC=int changetype: add objectClass: top objectClass: pae-Entity objectClass: pae-App objectClass: pae-WinApp objectClass: pae-ThinWinApp objectClass: pae-DesktopApplication cn: Pool1 member:: PFNJRD
View Integration 2 At the command prompt, type the vdmimport command and use the -f option to specify the LDIF configuration file to import. For example: vdmimport -f myexport.LDF After the vdmimport command runs, the configuration of your View Connection Server instance is updated with the data from the file, and the number of records that have been successfully updated is displayed. Errors are displayed if some records could not be updated because your role has insufficient privileges.
Integrating View with Microsoft SCOM 5 You can use Microsoft System Center Operations Manager (SCOM) to monitor the state of View components, including View Connection Server instances, security servers, and the View services that run on View Connection Server and security server hosts.
View Integration What to do next Complete the procedure described in “Import the View Management Packs on the SCOM Server,” on page 66. View Management Packs View management packs enable you to use SCOM to monitor and manage the state of View components. Table 5‑1. View Management Packs View Management Pack Description VMware.View.Discovery.mp Contains the agent that discovers instances of View Server installations. VMware.View.Monitoring.
Chapter 5 Integrating View with Microsoft SCOM Enable a Proxy Agent on a View Connection Server Host or Security Server You must use the Operations Manager console to enable a proxy agent on each View Connection Server host or security server that you want to monitor with SCOM. The discovery script can discover a Windows server only if you enable the proxy agent for the server. Prerequisites Complete the procedure described in “Import the View Management Packs on the SCOM Server,” on page 66.
View Integration View Connection Server and Security Server Managed Objects The discovery script discovers managed objects for View Connection Server instances and security servers. Table 5‑2. Managed Objects for View Connection Server Instances and Security Servers Object View Connection Server Instance Security Server VMware.View.Cluster X X VMware.View.Cluster.Node.Item X X VMware.View.ConnectionServerRole.Item X X VMware.View.Component.ConnectionServer.Item X X VMware.View.Component.
Chapter 5 Integrating View with Microsoft SCOM Table 5‑4. View Library Base Classes Class Name Description VMware.View.Cluster.Node Represents a member of a View Connection Server group. This class has the properties ClusterID, ClusterName, ProductVersion, and InstallPath. VMware.View.Component Represents a View component that has been installed on a member of a View Connection Server group. This class has the property Name. VMware.View.Component.
View Integration Table 5‑5. View Library Concrete Classes (Continued) Class Name Description VMware.View.Component.Directory.Item Represents version 5.1.x or a later release of the Directory component that has been installed on a member of a View Connection Server group. This class inherits its properties from VMware.View.Component.Directory. VMware.View.Component.Framework.Item Represents version 5.1.
Chapter 5 Integrating View with Microsoft SCOM Table 5‑6. Available Views for View Objects (Continued) View Description Groups Displays a diagram of all discovered View Connection Server groups, members, roles, and components. You can obtain details about objects and their relationships by clicking the icons and the connectors. Connection Server Role Performance Data Displays the following data sets.
View Integration Table 5‑7. View Service Component Monitors for a View Connection Server Instance (Continued) Monitor Display Name Monitored Service SecureGatewayCheck Security Gateway Service Health VMware View Security Gateway Component WebServiceCheck Web Service Health VMware View Web Component DirectoryServiceCheck Directory Service Health VMwareVDMDS Service Component Monitors for Security Servers The following table describes the service component monitors that the VMware.View.
Chapter 5 Integrating View with Microsoft SCOM Display Alerts for a View Connection Server Group You can use the Health Explorer in the Operations Manager console to display information about alerts that the health monitors raise for a View Connection Server group. Prerequisites Integrate View with SCOM. See “Setting Up a SCOM Integration,” on page 65. Procedure 1 In the Operations Manager console, go to Monitoring\VMware View and select the Active Alerts view.
View Integration Procedure 1 In the Operations Manager console, go to Monitoring\VMware View and select the Group State view or the Group Node State view. 2 Right-click the View Connection Server instance and select Open > Health Explorer. 3 Right-click the Domain Connectivity Health entry for the View Connection Server instance in the Health Explorer and select Monitor Properties. 4 On the Overrides tab, click Override and select the option for all objects of the same class.
Examining PCoIP Session Statistics with WMI 6 You can use Windows Management Instrumentation (WMI) to examine performance statistics for a PCoIP session by using any of the supported programming interfaces, including C#, C++, PowerShell, VBScript, VB .NET, and Windows Management Instrumentation Command-line (WMIC). You can also use the Microsoft WMI Code Creator tool to generate VBScript, C#, and VB .NET code that accesses the PCoIP performance counters.
View Integration General PCoIP Session Statistics The WMI class name for PCoIP general session statistics is Win32_PerfRawData_TeradiciPerf_PCoIPSessionGeneralStatistics. Table 6‑1. General Session Statistics WMI Property Name Description BytesReceived Total number of bytes of PCoIP data that have been received since the PCoIP session started. BytesSent Total number of bytes of PCoIP data that have been transmitted since the PCoIP session started.
Chapter 6 Examining PCoIP Session Statistics with WMI Table 6‑2. PCoIP Audio Statistics WMI Property Name Description AudioBytesReceived Total number of bytes of audio data that have been received since the PCoIP session started. AudioBytesSent Total number of bytes of audio data that have been sent since the PCoIP session started. AudioRXBWkbitPersec Bandwidth for ingoing audio packets averaged over the sampling period, in seconds.
View Integration Calculating Bandwidth for Received Imaging Data To calculate the bandwidth in kilobits per second for received imaging data over the time interval from time t1 to time t2, use the following formula. (ImagingBytesReceived[t2]-ImagingBytesReceived[t1]) * 8 / (1024 * (t2-t1)) Do not use ImagingRXBWkbitPersec for the calculation.
Chapter 6 Examining PCoIP Session Statistics with WMI Calculating Bandwidth for Transmitted Network Data To calculate the bandwidth in kilobits per second for transmitted data over the time interval from time t1 to time t2, use the following formula. (BytesSent[t2]-BytesSent[t1]) * 8 / (1024 * (t2-t1)) Do not use TXBWkbitPersec for the calculation.
View Integration Calculating Bandwidth for Received USB Data To calculate the bandwidth in kilobits per second for received USB data over the time interval from time t1 to time t2, use the following formula. (USBBytesReceived[t2]-USBBytesReceived[t1]) * 8 / (1024 * (t2-t1)) Do not use USBRXBWkbitPersec for the calculation.
Setting Desktop Policies with Start Session Scripts 7 With start session scripts, you can configure specific View desktop settings before a desktop session starts based on information received from Horizon Client and View Connection Server. For example, you can use a start session script to configure desktop policies based on client device and user location instead of setting up multiple desktop pools that have different desktop policies.
View Integration Managing Start Session Timeouts Make sure your start session scripts run quickly. If you set the WaitScriptsOnStartSession value in the Windows registry, your start session script must finish running before View Agent can respond to the StartSession message that View Connection Server sends. A long-running script is likely to cause the StartSession request to time out.
Chapter 7 Setting Desktop Policies with Start Session Scripts Add Windows Registry Entries for a Start Session Script You must add Windows registry entries on each View desktop virtual machine where you want View to run a start session script. Prerequisites n Verify that the path where you configured your start session scripts is accessible only to the SYSTEM account and local administrators. For more information, see “Making Start Session Scripts Accessible,” on page 82.
View Integration e In the Value data text box, type 1 to enable start session scripting and click OK. You can type 0 to disable this feature. The default value is 0. f (Optional) To delay the StartSession response by View Agent, add a second DWORD value to the Configuration key called WaitScriptsOnStartSession. A WaitScriptsOnStartSession data value of 1 causes View Agent to delay sending a StartSession response and fail if the scripts do not complete.
Chapter 7 Setting Desktop Policies with Start Session Scripts outFile.WriteLine(strEnv) Next outFile.Close The following sample script tests the timeout functionality. Option Explicit WScript.Sleep 60000 The following sample script tests a non-zero exit code. Option Explicit WScript.Quit 2 VMware, Inc.
View Integration 86 VMware, Inc.
Index A L Active Directory users and groups 41 advanced PowerShell commands 45 alerts 73 assigning a name 65 automatically provisioned desktop pools 40 LDAP configuration data 59 LDAP data customization 59 LDIF configuration file entries 61 LDIF configuration file format 60 LDIFDE command 64 licenses 44 linked-clone desktop pool management 40 C components 7 connection broker events 11 connectivity monitoring 73 D database queries and views 25 database tables and schemas 9 datastore management 48 deskt
View Integration resizing pools 46 S SCOM integration 65 start session scripts 81, 82, 84 starting PowerShell 28 V vCenter Server management tasks 39 vCenter Server network label assignments 57 View Administrator events 17 View Agent events 16 View component services 73 View Connection Server management 38 View Connection Server service 45 View PowerCLI cmdlets 27, 32, 34 View PowerCLI comparison 30 View PowerCLI cmdlet examples 38 View PowerCLI help 28 views and monitors for View 70 virtual machine mana