
User`s guide

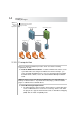
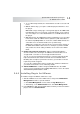

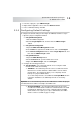
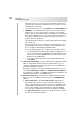
Table Of Contents
- Table of Contents
- Introducing Quest NetVault Backup Plug-in for VMware
- Installing the Plug-in
- Configuring the Plug-in
- Defining a Backup Strategy
- Performing Image-Level Backups
- Performing File-Level Backups
- Restoring Image-Level Backups
- Restoring File-Level Backups
- Troubleshooting

Quest NetVault Backup Plug-in
for VMware User’s Guide
17
Chapter 3:
CONFIGURING THE PLUG-IN
Adding a Server
Reconfiguring an Added Server
Removing a Server
Configuring Default Settings
Enabling Virtual Machine Locking
Additional Notes
Supported Backup Consistency States
3.1.0 Adding a Server
Before you can start using the plug-in for backups and restores, you must add the
applicable ESX or vCenter Server to the plug-in, and configure a user account to
log on to the server.
Standalone ESX/ESXi Server Setup – In a VMware environment consisting
of one or more ESX/ESXi Servers, you must add the individual hosts to the
plug-in, and configure a user account for each server.
Cluster Setup – In a cluster setup managed by a vCenter Server, you must
add the vCenter Server to the plug-in, and configure account for the server.
Note: The Plug-in for VMware supports ESXi Servers that are in Lockdown Mode
when the hosts are managed by a vCenter Server.
To add a vCenter Server or an ESX Server, follow these steps:
1. Start the NVBU Console on the NVBU Server, and open the NVBU Backup
window. To open this window:
Click Backup on the toolbar or Large Buttons panel.
Alternatively, on the Operations menu, click Backup.
2. On the Selections tab, double-click the NVBU Client on which the plug-in is
installed. Alternatively, right-click the client, and select Open.
3. In the list of plug-ins, right-click VMware Plugin, and select Add Server.
4. Configure the following parameters: