
User guide


116 | Protecting Workstations and Servers
4. Click Verify to validate the credentials you entered.
The Deploy Agent dialog box displays a message to indicate that validation is being
performed. Click Abort if you want to cancel the verification process. After the
verification process is complete, a message indicating that verification has been
completed displays.
5. Click Deploy.
A message indicating that the deployment has started displays. You can view the
progress in the Events tab. Click Show details to view more information about the
status of the agent deployment.
6. Click OK.
Replicating a New Agent
When you add an AppAssure 5 Agent for protection on a source core, AppAssure 5
gives you the option to replicate a new agent to an existing target core. Complete
the instructions below to replicate a new agent.
For more information about replication, see “Understanding Replication” on page 48
and “Replicating to a Self-Managed Core” on page 53.
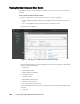
To replicate a new agent
1. Navigate to the AppAssure 5 Core Console, and then click the Machines tab.
2. In the Actions drop-down menu, click Protect Machine.
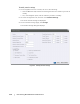
3. In the Protect Machine dialog box, enter the information as described in the
following table.
4. Click Connect to connect to this machine.
5. Click Show Advanced Options, and edit the following settings as needed.
Text Box Description
Host Enter the host name or IP address of the machine that you want to protect.
Port Enter the port number the AppAssure 5 Core should use to communicate
with the Agent on the machine.
User name Enter the user name used to connect to this machine; for example,
Administrator.
Password Enter the password used to connect to this machine.
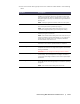
Text Box Description
Display Name Enter a name for the agent machine to be displayed in the
AppAssure 5 Core Console.
Repository Select the repository on the AppAssure 5 Core where the data
from this machine should be stored.